We may earn revenue from the products available on this page and participate in affiliate programs. Learn More ›
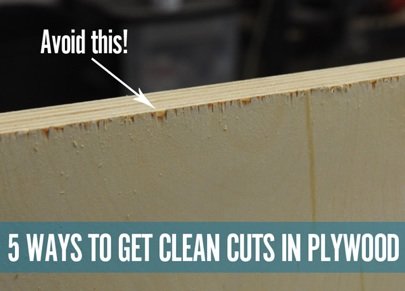
Plywood sheet goods are an essential in any home improvement project involving wood. But due to their layered structure, they’re often prone to tear-out. The result: little, ragged splinters in the fibers of the wood exposing the ply underneath. You don’t need fine cabinetmaking tools to get clean cuts in sheet goods. You just need a little know-how.
1. Use the right blade, and use it properly.
This shouldn’t come as a surprise, but the blade that came with your circular saw, miter saw or table saw isn’t going to give you the cuts you’re after. These blades will work for rough cuts in construction-grade soft lumber, but for working with hardwoods and sheet goods, you need to upgrade. For circular saws, grab a $15-20 carbide tip blade designed for plywood. For table and miter saws, invest in an 80 TPI plywood blade, one designed for cross (miter saw) or rip (table saw) cuts.
Then when making your cuts, set yourself up for success. Your plywood should be oriented so that the blade exits the wood on the good face. So for a circular saw and miter saw, make your cuts with the good face down; on the table saw, with the good face up.
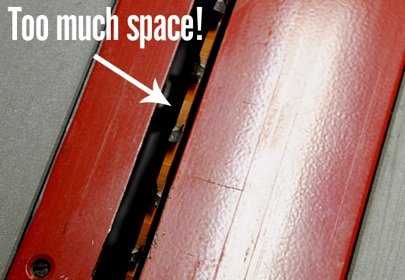
2. Zero-tolerance for not going zero-clearance.
The best thing you can do to get clean cuts in plywood is to use a zero-clearance insert. This closes the gap around the blade in the throat plate or shoe. On a table saw, you can buy an aftermarket insert blank, or you can easily make one yourself. For the circular saw, attach a thin piece of luan or compressed hardboard to the shoe of your saw, then lower the blade to cut a zero-clearance slot.
3. Support it.
Plywood usually come in 4′ x 8′ sheets, which is a very unwieldy thing to cut with any tool. The size makes it difficult to keep the sheet flat on the table or bench, and simultaneously tight against the fence. So get some help: Ask a friend or family member to assist, or use a roller stand or sawhorse to keep things flat. That way, you can focus on pushing the wood or saw at a consistent feed rate, getting a cleaner, straighter cut. If possible, use a circular saw to break down large sheet goods into manageable pieces, and then focus on cutting the finished edge. Also, whenever you use a circular saw, set up a straight edge or fence to guide the foot of the saw. This will minimize the tiny side-to-side movements that contribute to tear-out in plywood.
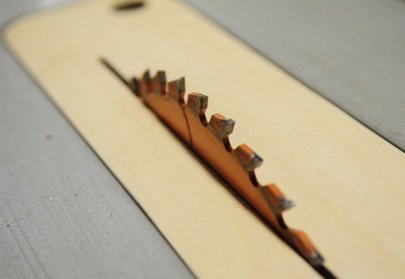
4. Raise the blade height.
Typically, to prevent kickback with power tools, you set the blade to exit the wood just at the gullets, the valleys between the teeth. By raising the blade you can change the direction with which the teeth actually enter the wood, shifting from an angled cut to an almost perpendicular cut. Of course, you need to account for the change and be much more careful when making your cuts—use a feather board and slow your feed rate down.
Note: This does increase the danger of making these cuts and is best practiced on a table saw by an experienced DIYer. Don’t raise the blade more than 1″ above the gullets, and support the wood on both sides of the blade.
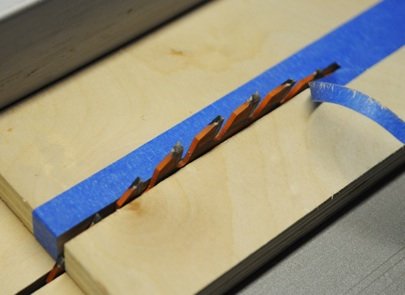
5. Tape it up.
Painter’s tape… what can’t it do? Adding low-adhesion blue masking tape to both faces on the cut line holds the wood fibers in place while cutting plywood. Be sure to secure it firmly, and peel off lightly to minimize splintering.