
We may earn revenue from the products available on this page and participate in affiliate programs. Learn More ›
This post has been brought to you by Hyde Tools. Its facts and opinions are those of BobVila.com.
If you’ve ever finished drywall, you know that the sanding process releases lots of dust. Only moments after starting, your entire work space fills with a cloud so thick that you can barely see the wall on the other side of the room. Sanding wood cabinets or furniture before applying a fresh coat of paint or varnish may not create the same visibility issues, but the mess is similar.
Moreover, any of these surfaces can release particulates that would be harmful if ingested—respiratory irritants in drywall joint compound, toxic chemicals found in wood finishes, and even contaminants like sap, mold, and fungus spores, depending on the condition of the wood. (The things we endure for a professionally smooth finish!)
Whether you’re working on drywall or wood furniture, the good news is that with the following techniques and a secret weapon from Hyde Tools in your arsenal, you can reduce airborne sanding dust by up to 95 percent, making the job easier on you and your health.
Tools & Materials
Bobvila.com may earn a commission from purchases made through these links.
- Eye protection
- Dust mask
- Drop cloth
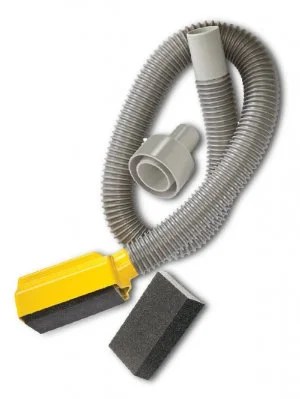
- HYDE Dust-Free Sponge Sander
- Sanding sponges
- Wet/dry vacuum
- Ladder
- Portable work light
- Putty knife
- Tack cloth
Sanding Drywall
STEP 1
Although these next steps minimize dust while sanding, it’s smart to employ commonsense safeguards against those dust particles that do escape. By taking some simple precautions—donning a dust mask and goggles, draping plastic sheeting in open doorways, and spreading a drop cloth over carpeted or hardwood floors—you can virtually eliminate any risk to yourself, the flooring, and any nearby items.
STEP 2
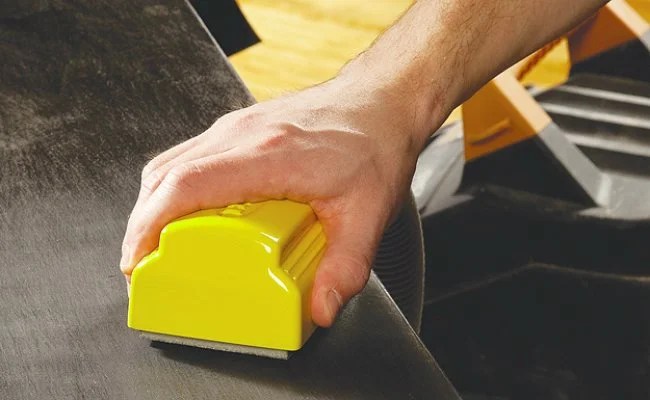
For the best results, enlist the HYDE Dust-Free Sponge Sander. The $15 hose attachment converts nearly any wet/dry vacuum into a sanding assistant that cleans as it goes. Use the tool’s adapter to securely connect it to the wet/dry suction outlet. (The adapter works with vacuum hoses that have 1¼-inch, 1½-inch, or 2½-inch openings.) Once the tool is attached, press a standard 3″ x 5″ sanding sponge into the rectangular casing at the other end of the hose.
Pro Tip: Most drywall sanding jobs can be successfully completed using medium- or fine-grit sanding sponges. Skip the large-grit sanding sponges, as they tend to leave grit streaks in the drywall compound.
STEP 3
Hold the yellow sanding end so that the sponge is flat against the wall, then turn on the wet/dry vacuum and begin working in a circular motion. As you sand, the vacuum sucks most of the dust into the tank through a narrow gap around the perimeter of the sanding sponge.
For the smoothest—and cleanest—results, use very light pressure and work at a medium speed. As you approach the centers of seams and joints, lighten up even more so that you’re using only enough pressure to remove ridges and bumps. If you find that dust is escaping around the edges of the sanding adapter, you’re sanding too quickly. Take your time. You’ll be glad you did!
Continue to sand the entire area, using a stepladder to reach the highest corners. Even though you’re entrusting your vacuum with the job of tidying up as you go, it’s also important to clean your vacuum’s filter frequently to prevent clogs caused by large amounts of drywall compound dust.
STEP 4
When you think you’ve finished, inspect your sanded surfaces. Since it’s difficult to spot rough areas of compound with overhead lighting alone, shine a bright handheld light, such as a portable work light, parallel to the joints to check for any irregularities. You may find that some areas need more sanding, or you may need to fill in indentations with spot applications of drywall compound and then sand those areas again.
Once you’ve determined that the surface is free of rough patches and gouges, you’re ready to prime the walls and then cover them with either paint or wallpaper. (With most of the mess already in your wet/dry vacuum, cleanup will be so minimal you won’t even consider it a step!)
Sanding Wood and Cabinetry
STEP 1
Pull on a respirator mask and goggles to reduce the slight risk from any airborne wood dust that might escape the HYDE Dust-Free Sponge Sander. Your sanding experience should be virtually dust-free, but it’s always better to err on the side of caution.
STEP 2
Fasten the dust-free sander to your wet/dry vacuum at its suction outlet, and insert a sanding sponge into the opposite end. The sandpaper grit you choose will be essential to the success of your sanding job. It’s best to work in the following order:
- Large-grit sanding sponges smooth rough wood surfaces and remove surface coatings, such as old varnish.
- Medium-grit sanding sponges work well for smoothing stripped wood surfaces and unfinished wood cabinets and boards.
- Fine-grit sponges should be reserved for the final sanding step to achieve an extra-smooth surface.
STEP 3
Sand your wood surface in the same direction as the wood grain rather than against it, which can leave cross-sanding marks on the wood. As you work, the HYDE Dust-Free Sponge Sander directs the vast majority of wood dust around the edges of the sponge where your wet/dry vacuum can safely suck it away.
STEP 4
If the wood you’re sanding involves contoured trim and corner creases, remove the sanding sponge from its casing and sand those areas with just the sponge. The HYDE Dust-Free Sponge Sander works best on flat expanses of wood, such as cabinet doors and bookcase sides and shelves.
STEP 5
Finally, wipe a tack cloth over the sanded wood. This pass serves two purposes: First, any catching or snagging will alert you to a rough area that you need to sand a bit more. Also, the tack cloth can remove traces of dust not visible to the naked eye that might mar a smooth paint finish. But these swipes with the tack cloth will be just about all the cleanup you’ll need after your practically dust-free sanding job.