We may earn revenue from the products available on this page and participate in affiliate programs. Learn More ›
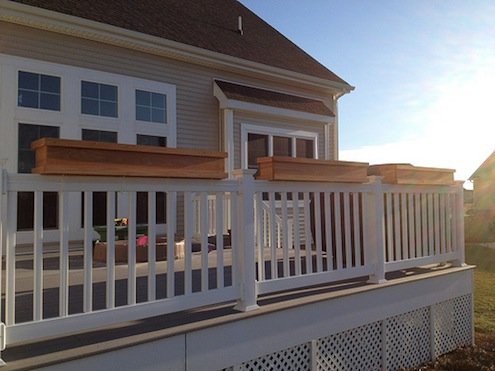
Last year, I was dying to have some deck rail planters to grow spinach and lettuce in, but I couldn’t find any that were the right size (or that I liked well enough for the price).
So this year, I decided to build my own. For about $45 a piece in materials, I succeeded in making a trio of beautiful, 48-inch planters in cedar. You could make them less expensively in pressure-treated lumber.
Being that stock lumber, a butt joint design, and only basic carpentry skills were involved, I would rate this as an attainable project for a beginner who has some experience with power tools.
MATERIALS AND TOOLS
– Work table
– Tape measure
– Carpenter’s square
– Carpetner’s pencil
– Circular saw
– Clamps
– Hack saw
– Power drill
– 1/2″ flat drill bit
– 1 pound of galvanized 2″ nails
– Hammer
– Outdoor woodworking adhesive
– Caulk gun
– Sandpaper
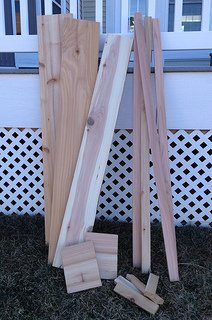
LUMBER TO PURCHASE
3 – 8 ft. 1″ x 2″ boards
1 – 8 ft. 1″ x 6″ board
2 – 8 ft. 1″ x 8″ boards (or 1 12 ft. 1″ x 8″ board)
PIECES TO CUT
4 pieces of 1″ x 2″, 48″ in length
4 pieces of 1″ x 2″, 7″ in length
1 piece of 1″ x 6″, 45″ in length
2 pieces of 1″ x 8″, 46-1/2″ inches in length
2 pieces of 1″ x 8″, 5-1/2″ in length
You’ll have a little lumber left over, enough to use for a second planter or another project!
Note: In general, a 1″ board is in actuality 3/4″ thick. And a 1″ x 6′ board is in actuality 5-1/2″ wide. However, some 1″ x 6″ boards are 5-3/4″ wide instead of 5-1/2″. So be careful to measure when buying and as always, measure twice and cut once in the shop.
How to Make a Deck Rail Planter
1. Measure and cut wood to length.
Measure out and mark each board with a square before cutting. Cut the 48″ 1″ x 2″ boards first. Then cut the 1″ x 6″ planter bottom and 1″ x 8″ planter sides. Follow with the 5-1/2″ 1″ x 8″ and 7″ 1″ x 2″ pieces, being careful to dry-fit everything as you go, making adjustments as necessary.
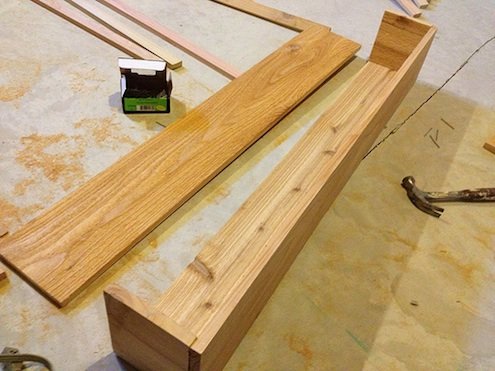
2. Build the box.
Place a thin bead of construction adhesive on the end of the 1″ x 6″ planter bottom and secure a 5-1/2” side board with three nails. Repeat on the other side. (Warning: Woodworking adhesive is very sticky and difficult to remove, so be careful and clean your work as you go.) Apply a bead of adhesive to the edges of the planter bottom and sides and attach a 46-1/2″ 1″ x 8″ side board with several nails. Repeat for the opposite side.
Related: 10 Inspired DIY Planters to Dress Up Your Garden
3. Trim the box.
Secure one 48″ 1″ x 2″ board to a 7″ 1″ x 2″ with a single nail to make one corner of the bottom trim. Apply a thin bead of adhesive on the inside and secure to the bottom of the box with nails. (Note: I found that if cuts weren’t perfect, it was best to leave the excess hanging off of one end, then trim with a hack saw later.) Next, secure the second 7″ 1″ x 2″ with adhesive and nails and secure the last 48″ 1″ x 2″ trim board. Repeat the same process for the top trim. You’ll need to hammer the ends of the nails down inside the box to keep things safe for planting.
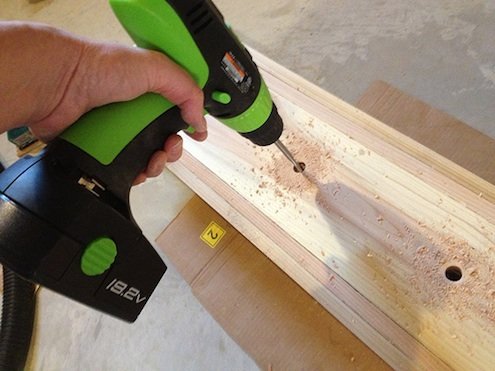
4. Drill drainage holes.
Using a 1/2″ flat bit (or a similar bit, or even a hole saw), drill several drainage holes in the bottom of the planter.
5. Sand and clean.
Lightly sand the planter to smooth out rough spots and clean up any adhesive residue. Then vacuum and wipe the entire planter down with a damp cloth. Allow to dry completely.
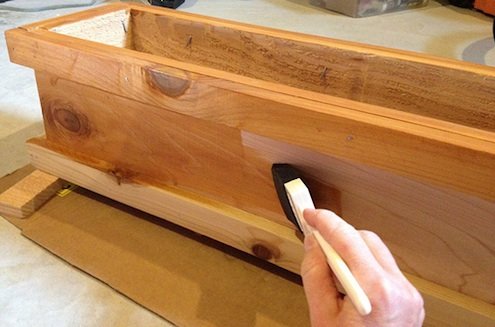
6. Seal.
You can leave your cedar planter unfinished, but it will weather and turn gray with age (which you may prefer). If you want to protect the wood and maintain its color, seal it with a coat of cedar stain that has a UV inhibitor in it.
Now you’re ready to install your planters. There are a number of manufactured brackets on the market for deck rails, so do your research and find one that’s appropriate for your site. Or if you’re still feeling ambitious, try designing and making your own brackets. Happy building, and happy planting!