
We may earn revenue from the products available on this page and participate in affiliate programs. Learn More ›
Laying sod is a great way to have a lawn without the interminable wait for seeds to germinate and grow, but don’t kid yourself—it’s a big, time-consuming job. However, carefully executing the planning, preparation, and installation will ensure you’re laying a solid foundation for a lush, attractive, and healthy lawn that will serve as a backdrop for family fun for many years. And don’t forget post-installation care—treat your lawn right and it will love you right back!
If you’re thinking about laying sod on your property, here’s how to go about it.
Before You Begin
It’s important to make a careful plan for your yard before ordering it. First, determine the best time to lay sod in your area. Planting or moving sod is best done in the fall or spring in the north, and in the spring in the south. Plant the sod during the cool season because planting it when warm will subject it to burnout. Do not plant sod later than one month before the average date for the first fall frost, because it’s important to give the grass time to establish roots before cold weather sets in.
If your lawn is large, consider doing the project in phases. Begin by redoing the worst or most visible lawn area, and tackle other sections next year.
It’s important to learn in advance how to prep for sod. Plan your timeline so you are prepared to lay the sod soon after your order is delivered—in other words, have all the prep work done before the sod is delivered.
“Preparing the land for laying sod can’t be done instantly. You would need to prepare the area at least two to three days before the sod is delivered because once the sod arrives, there’s a lot more work to be done,” says Ben Edwards, CEO of SodGod, an online service that connects homeowners with sod purveyors and installers.
Sod can go bad quickly, especially if it begins to heat up or dry out. Have the pallets delivered to a shady spot. If you can’t start right away, unroll the sod if it’s rolled and keep it moist.
[resource-list]
STEP 1: Remove the old lawn.
Mechanical removal of your old lawn is the fastest and easiest way to get the job done. For small lawns, a grape (grubbing) hoe is a terrific tool for removing turf. For large lawns, consider renting a sod cutter. It slices under the grass, enabling you to pull up strips of old turf. Make the job easier by cutting sod while the lawn soil is moist.
Be thorough when you’re pulling up the old grass. “Make sure you’re pulling it up from the roots or you’ll have trouble laying sod,” says Jeremy Yamaguchi, CEO of Lawn Love, an online company that helps homeowners find local lawn services.
STEP 2: Fix your property’s grading issues.
Now is the perfect time to fix any existing grade problems. Although grading often requires help from a landscaping contractor with heavy equipment, you can fix minor problems yourself.
The first rule of grading is that the ground should slope away from your house in all directions so that it drops at least 2 or 3 inches every 10 feet. The finished grade should also end up matching the level of existing features, such as walkways and patios, as well as areas of established lawn.
The proper way to regrade is first to remove the topsoil from the problem area; a rototiller makes this job easier. Make adjustments to the subsoil by scraping away high areas and filling in low areas. Then spread 2 inches of the reserved topsoil over the subsoil, and till it to blend. This will help prevent drainage problems between the two layers of soil. Next, spread the rest of your topsoil, which should make up at least another 4 inches. If you need to add topsoil, buy a loam that’s free of debris, such as roots and stones. It should also be free of weed seeds and pesticides. A landscaping rake is the best tool for working topsoil to the proper grade if you’re doing it yourself.
STEP 3: Test and amend the soil.
“I generally recommend my clients have the soil on their property tested for chemical imbalance,” says Michael Dean, co-founder of Pool Research, an online company that offers pool and landscaping advice.
“It takes less than five minutes to dig up some soil and send it to a lab,” says Rick Hoskins, a home care expert based in Miami. “The lab will tell you the soil’s pH level, which allows you to optimize your fertilizer choice.” You might also need to add organic material or lime- or sulfur-based nutrients. Recommendations will vary depending on your soil’s nutrient, organic matter, pH levels, and your particular soil type.
Without a soil test that will provide more detailed specifics, the typical recommendations for every 1,000 square feet of new lawn include about 2 pounds of actual (elemental) phosphorus and potassium, 50 to 100 pounds of lime (in areas with acid soil), and 3 to 6 cubic yards of organic matter (such as compost or peat moss).
Ensure an even application of amendments by dividing the recommended amounts in half and applying half while walking in one direction and the other half while walking in a perpendicular direction. Once you have applied the amendments, till them into the top 6 inches of soil.

STEP 4: Rake the soil smooth, and firm it with a roller.
The next step in preparing a yard for sod is to rake the area to be replanted until it’s smooth. Remove any stones and vegetative matter brought to the surface during tilling. “Level the ground with a rake and remove any stones or rocks,” says Edwards. “Focus on keeping the ground as flat as possible.”
Once you’re satisfied, water the ground and check for puddles. Puddles show where depressions remain. When the soil dries, remove soil from high spots to fill the depressions.
Next, roll the prepared soil to provide a firm base for the sod. Fill a lawn roller about one-third full of water and roll the soil until your footprints are no deeper than 1⁄2 inch. Complete planting preparations by watering the area thoroughly two days before planting.
“Keep the ground moist, says Edwards, an expert in how to lay sod, but “be careful of overwatering it,” he adds. “The goal is to keep the ground damp,” but not soaked. Check to be sure the soil is moistened to a depth of 5 or 6 inches.
Related: The Benefits of Working with a Landscape Designer
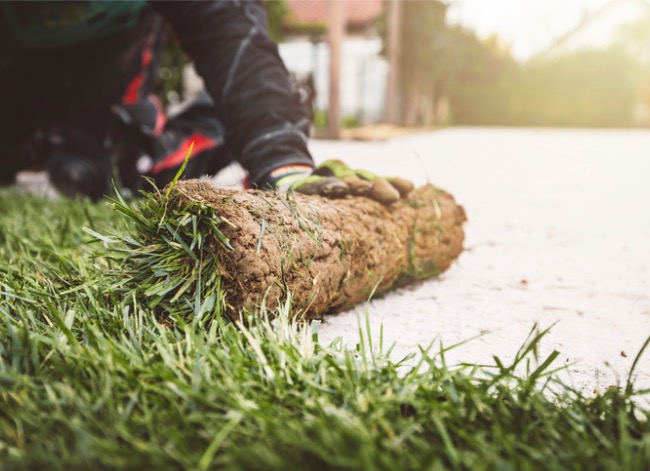
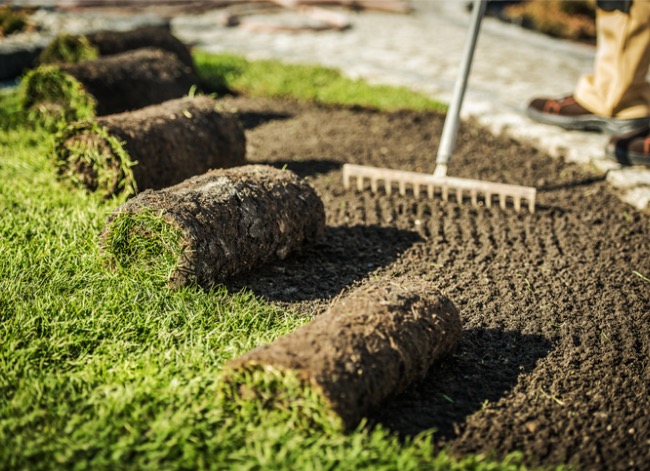
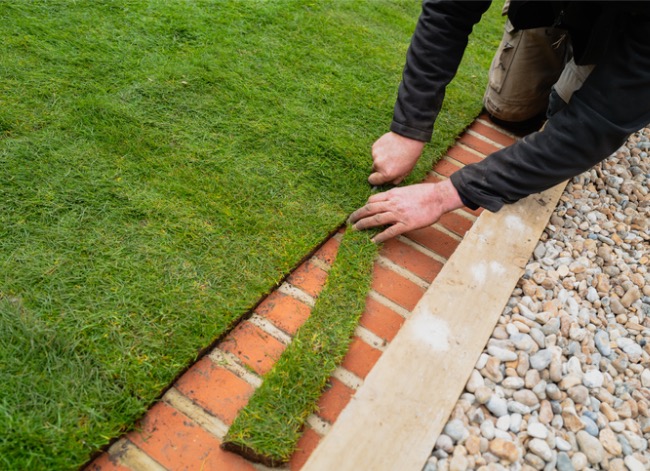
STEP 5: Lay the sod.
Begin by applying a starter fertilizer high in phosphorus, such as 2:1:1 or 1:1:1 ratio. Then lightly water the area where you will begin.
Lay sod over one section of lawn at a time. “Lay the first row against a straight edge in your yard, such as your patio or fence,” says Ryan Smith of Ant and Garden Organic Pest Control in Beaverton, Ore., who often offers his clients tips on how to install sod. Starting with a straight row reduces the amount of cutting and fitting you’ll do later. Work toward the opposite edge of the lawn. Use a sod-cutting tool or sharp-bladed knife to cut as required. Make your last row a full-width strip, even if it means cutting the preceding row narrow. With contoured borders, overlap the border with sod, and trim away the excess later. Again, try to install all the sod the day it’s delivered. If you have sod left over, unroll it in a shady spot, water it lightly, and use it the next day.
In some parts of the country, and with some grass varieties, the sod will be delivered in pallets of rectangular pieces, rather than in rolls. “If the sod is brick-shaped, lay it out as if you were building a wall on your lawn,” says Hoskins. “This pattern helps with drainage” and helps the sod fill in more completely, he adds.
If you’re installing sod on a slope, start laying the sod at the lowest point. Stake each piece in three places to prevent slippage. Stakes should be equally spaced and set in from the sod strip’s edges by at least 6 to 8 inches.
After installing the sod, firm it with a roller that is one-third full. If the roller is too heavy, it may cause the sod to slip. In hot weather, lightly watering the sod prior to rolling will also help prevent slippage. Follow rolling immediately with a thorough soaking—to a soil depth of 6 to 8 inches.
STEP 6: For the first month or so, be extra careful with your new lawn.
“Be patient because the sod will take time to grow and root into the ground,” says Noah James, a landscaper near Vancouver, British Columbia. Once sod is laid, take precautions to prevent it from being damaged. Minimize play and foot traffic for at least three weeks. Plan for ongoing watering needs before you lay sod, not afterward. Insufficient water is the leading cause of new-lawn failure—and overwatering is not far behind.
Water at least twice a day, including once during midday. Keep the soil moist to a depth of 1 to 2 inches. Check, however, to be sure that the soil does not stay saturated for long periods; otherwise the sod may not root. Reduce watering frequency to every second or third day once the sod begins new root growth (about two weeks). After four weeks, a sodded lawn can survive longer periods without water.
“Don’t start mowing your new turf for at least a month,” says James, and not until the grass has begun to grow vigorously. “Once the sod has had time to establish itself, you can go ahead and mow your grass carefully using a high setting on your lawnmower—no lower than 2.5 inches.”
Finally, do not fertilize new lawns for at least 6 weeks. Then, a light fertilization of 1⁄2 pound nitrogen per 1,000 square feet is recommended.
FAQs About How to Install Sod
Q. How long can sod sit before laying grass?
Optimally, sod should be placed as soon as it is delivered, but in a pinch, it can sit for about 24 hours before it begins deteriorating. The warmer the weather, the riskier it is to let the sod remain rolled up for long. While sod prices vary, losing a pallet of sod is not a cost most homeowners want to experience.
Q. What should you not do when laying sod?
Don’t let your sod sit around too long before laying it, and don’t let it bake in the sun while it’s awaiting installation. Walking on the sod immediately after installation is another no-no, as is laying sod in 100-degree weather.
Q. Can I lay sod on top of grass?
No. The bottom of the piece of sod must have contact with soil.
Q. Can I lay sod over weeds?
No. It’s best to start with a clean palette. If you place sod over weeds, the sod may not thrive. If it does manage to take hold, the weeds will likely push through the sod and then you’ll have an unattractive, weedy lawn.
Q. How much sod can one person lay in a day?
One person can lay between 2000 and 4000 square feet of sod per day, depending on how experienced and motivated the installer is.
Final Thoughts
As with many things in life, the toil is long, but the rewards are longer, when it comes to laying sod. Take the time to prepare your yard and soil, lay the sod carefully, and care for it diligently. You’ll be rewarded with a verdant setting for everyday activities and special occasions alike.