Recapping the Remodeling and Converting an Unfinished Basement into Living Space
Bob recaps the project and the installation of a new ceiling and walls begins.
Clip Summary
Bob recaps the work done so far in the basement remodeling project in Melrose, MA, converting an old cluttered basement into a playroom for the homeowners' two children. A perimeter drain was dug and a triple pump installed in the basement to prevent any moisture problems. A vapor barrier was also put in place over the foundation walls to channel water into the drainage ditch. A waterproof coating was applied to the concrete floor as well. Old plumbing fixtures were updated and the oil tank, heating ducts, and kitchen drain were all moved to make way for the playroom. The water tank was replaced with an on-demand hot water system that is more efficient. A Trane furnace and air filtering system were installed to maintain air quality in the home, which should help combat colds, allergies, and other illnesses. The old windows were also replaced with Energy Star-rated windows. The crew from Owens Corning Basement Finishing Systems has been at work putting up the framework for the walls and the grid for the ceiling. The first step was to lay out the steel-stud wall just to the inside of the perimeter drain. The bottom sheet metal track was attached to the foundation using concrete nails. Magnetic levels were used to get a plumb line to the ceiling joists to mark where the top track should go. The top tracks were then screwed into the ceiling joists. The studs are cut to length and two studs are attached together back-to-back and then affixed to the bottom plates. The magnetic level is again used to find plumblines to attach the studs to the top track. The room will eventually be used as a family playroom. A suspended ceiling system is attached to the existing joists with wires so it can later be adjusted for level.
Hi, I'm Bob Vila. Welcome to the show where our little remodeling project here in Melrose, Massachusetts is coming along nicely. Our 1921 bungalow is getting a basement refinishing system installed.
We've already done the hard work of getting rid of the old pipes and stuff. And today we are showing you how we're installing some new windows on the basement, as well as the new walls , and the ceiling.
Stick around. I think you'll love it.
It's a great day at our basement finishing project where we've been converting what was once very dingy and junk filled space into a great playroom for a couple of kids.
But this 1921 1921 house needed a lot of work before we could even consider putting up these walls. First, we wanted to be sure any moisture problems are a thing of the past. We dug a perimeter drain and installed a triple pump inside, then put a vapor barrier over the field stone foundation walls, to be sure that any moisture that gets trough them stays away from the finished space and gets channeled right into the drain. We even added a special waterproof coating to the slab to be sure no moisture gets through the concrete. Next we tackled the outdated plumbing and mechanicals, we had to move a few things to make room for the finished space, like the oil tank, heating ducts, and the kitchen drains. Our plumber, Al Leoni, did a great job updating the cast iron waste stack and running pex tubing for all the water lines in the house. We got some space back and saved the home owner some energy dollars by replacing their 40 gallon water tank with an instantaneous water heater, and trane came in to install a state of the art furnace and air conditioning system with the latest in air cleaning technology.
So, not only is this going to make a much more comfortable house to live in during hot steamy summers and our cold New England winters, but when you think about the health implications of replacing all the old junk in a basement, all the old duct-work from ancient heating equipment with new equipment. You're getting rid of so many, so many moldy agents that really effect quality of indoor air, and that's what leads to allergies and colds and all those other illnesses.
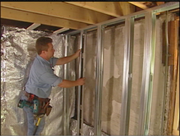
And then of course the other thing that we've done that's very important is to get rid of the old drafty leaky windows that were here. The original single pane sash from the 1921 house and replace them with an Energy Star window. We'll learn more about that later, but I know right now we got the guys from Owens Corning basement finishing systems who have been busy inside working on putting up the framework for the walls as well as the grid for the ceiling.
Let's check in.
The first step was to lay out the steel stud wall just inside the perimeter drain and allow bump outs for the mechanicals that couldn't be moved, like the water meter and the waste stack.
The bottom sheet metal track is attach to the slab by drilling a pilot hole and pounding in concrete nails specially designed for this.
Once the bottom track was in, Federrico used two magnetic levels stuck together to get a plumb line to the ceiling joists and mark off where the top track should go. It's kind of a neat trick, since its hard to find a level that reaches floor to ceiling.
The top tracks just screwed into the ceiling joist. It doesn't have to be level since it'll be hidden by the drop seal. The steel studs are actually doubled up in the basement finishing systems to provide a good surface to the linnials which will see later.
Federico cuts the studs to length with tin snips, screws them together They are back to back and installs them 16 inches on center before screwing them into the bottom plates.
The magnetic level comes in handy again as he adjusts the studs at the top for plumb, and attaches them.
It's an efficient way to frame the walls, and because it's steel, the framing won't be affected by any moisture that still gets into the cavity between the old walls and the new. And it won't be providing food for mold.
The area will eventually be a nice place to house an entertainment cente , and Federico and his son, Marco, did a great job framing it up symmetrically between the two front windows. Once the walls were framed, the ceiling was next.
Owens-Corning uses a suspended ceiling system that's attached to the existing joists with wires, so that it can be adjusted for level. Those old joists were never meant to provide a ceiling and they're way off.