Hi.
I'm Bob Vila.
Welcome to the show here in Melrose Mass for today.
we're putting finishing touches on our project, mostly on the exterior of the house.
We'll be giving you some tips on exterior painting even when the weather gets cold.
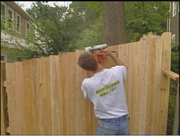
Also we're putting finishing touches on the wood decking using Ipay and tiger claws for the installation.
Putting shutters up and building a trellis.
Stick around.
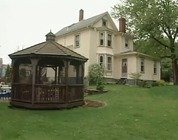
This house was built in 1921, and the original stucco surfaces, the sidewalls are in very good condition except for just a few spots that needed repairs.
But the woodwork was a bit of a different story: eighty year old wood, New England winters.
We've had to do a fair amount of repairs and replacements, some of it, most of it, really, using Western Red Cedar, which is a very good wood to choose for this kind of work.
And then of course we replaced the gutters up on the gambrel roof.
One thing that's important in New England winters is to keep water and ice from forming on the eves of the roof.
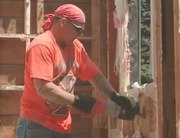
There were some areas of the house however that had pretty serious damage, the porch columns, for example.
After we discovered insect damage, we decided that the best way to strengthen and preserve these columns was to fill them up with concrete.
So mason Kevin Latham wound up doing all three of them just to be safe.
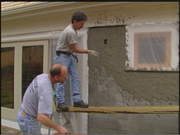
Once that was done, there was plenty of patching and repair to do, as well as some new stucco to add where we removed the back door and added the new kitchen slider and the small window.
Kevin starts with wire lath over felt paper over plywood.
Then he adds a brown coat, and lets that cure.
Next comes the finish coat, which is as much fun to watch as it is to apply.
You just have to have good aim.
With all these different surfaces to deal with, painting the house was not going to be a simple job.
So we called on CertaPro painters to help us out.
You know, like a lot of homes here in New England this house is eighty years old and like a middle aged Hollywood starlet different parts of the house, are different ages.
Some of them have held up really well over time, and others have needed a little bit of work.
So on this particular home, we've got some old stucco, which is in really good shape.
We've get some new stucco, which in this case needs to be primed and then we're going to paint it with a couple of coats.
This window is an area where we've got a couple of different materials.
This is, of course, our old natural wood.
But going around it, we've replaced the frame here with AZEK material, which is a man-made product, which sounds like wood, does not actually need to be painted.
Although we're going to paint it to make it match the rest of the trim.
This AZEK material is relatively new, by the way.
And it's especially effective in areas where there's a lot of moisture, a lot of recurrent water issues, where rot is really going to be a problem.
We've already replaced it once.
They don't want to ever have to replace this again, and this should solve the trick here.
So we're gonna be able to put paint right onto the AZEK, but the natural wood is actually going to need to be primed and then painted with two coats to match everything else.
Now here's another area where we see a lot of texture, from old layers of old paint.
And you can see where the water issue caused that peeling in sheets.
Now you can also see a lot of alligatoring going on.
That's all the checking marks going on in the paint, and what that is caused by is, in the olden days, which is to say 40, 50 years ago, when this was probably painted originally.
There are oil-based paints and there also lead-based paints.
And they don't have enough flexibility for a New England winter and summer, where the temperature variances are huge , you know, from ten degrees below to ninety degrees.
And so that paint cracks like that.
And you know, when you're thinking about your house, what's a realistic expectation of what it's gonna look like at the end of the process.
And that alligatoring is really baked in the cake now.
What we're going to do is scrape down everything that's loose, chipping, and peeling.
We're going to sand down the edges a little bit and then we're going to prime over it and go over it.
But you're still going to see that existing texture coming through the paint where the old layers of paint are doing their job, which is that they're adhered to the old wood on the house.
So even when it is done, everything going to look uniform in color, and there won't chipping and peeling going on, but there will still be a lot of texture involved in it.
Now, up above, what we've got going on here is, before these gutters and downspouts were installed, you had the lip of the roof coming down and slamming into all these shingles.
And it's really just like Chinese water torture on those shingles all the time and causing all the paint to flake off.
So, in fact, we've had to replace all of those shingles.
And we're going to hit them a solid color stain.
Looks a lot like paint, but it won't chip and peel.
It penetrates into the wood, and that stain is a self-priming product as well.
So we aren't going to have to go over it with a special primer.
And again you're going to see a difference in texture between the old shingles, which are a little bit more horizontal and, or vertical rather, and the new ones, which will be smoother finish.
That's part of that Hollywood starlet, where different parts of it are different ages, and that's something you're just going to have to expect with a home this age.
So, Fergus, what are some tips to think about when you are painting towards the end of the season and it is getting a little bit cold?
Sure , the key is to think about temperatures at night.
As long as the temperatures are above thirty-five degrees overnight, and really ideally for forty-eight hours, you're okay.
So if it's 50 degrees during the day and dropping down to the 45 at night, you're okay.
That's an interesting point then.
It's not just about the temperatures when you're applying the paint, but also during that curing cycle, those 48 hours after you paint.
That's exactly right.
And you know, the technology in paints today, we can go longer into the season and start a little bit earlier.
That's especially important here in New England.
But in other parts of the country one of the biggest culprits to a good paint job is the humidity, right?
That's right, and in that case, you know, in New England where it's only an issue on occasion.
But if you're in a Florida climate or something like that, with high humidity, it might mean that you can't paint certain times of the year either.
So sort of the opposite effect.
Exactly.
Well, thank you.
It's a beautiful job.
Okay, thank you, Bob.