

We may earn revenue from the products available on this page and participate in affiliate programs. Learn More ›
A popular choice for kitchen and bathroom upgrades, polished and sealed granite has the timeless allure, durability, and low maintenance few other materials can match. But this natural stone is pricey, running between $15 and $40 per square foot, with professional installation adding another $25 to $35 per square foot. One way to save considerable cash on your dreamy update? Learning how to cut granite yourself.
Granite is extremely dense and hard, so you must proceed with patience and the proper tools to get the job done. Here’s all the guidance you need to successfully cut granite slabs (typically 1¼” thick, but ranging up to 1½” thick) and tiles (of about 3/8” thick) for your home improvement project.
Tools & Materials
Bobvila.com may earn a commission from purchases made through these links.
- C-clamps
- Painter’s tape
- Tape measure
- Indelible marker
- Safety goggles
- Dust mask
- Ear protection
- Circular saw
- Diamond-cut saw blade
- Wet saw
- Shop vacuum
- Cotton rags
Cutting a Granite Slab
STEP 1
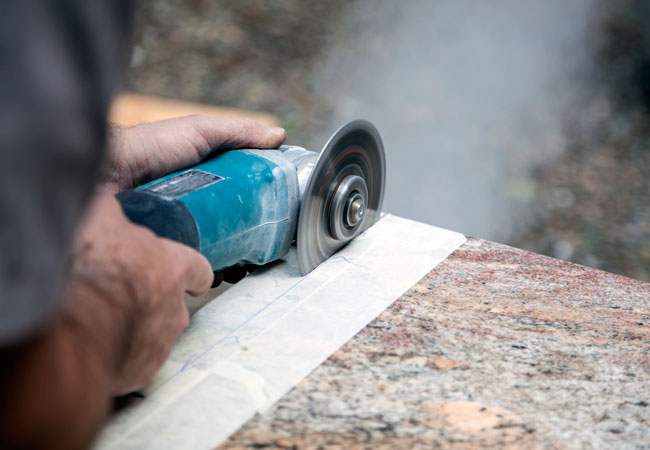
Choose either a standard circular saw or a wet-cut circular saw to cut granite. Either will work, but the wet-cut circular saw will produce very little dust, thanks to a small tube that drizzles water onto the surface of the granite as you cut. Cut granite slab outdoors if possible to simplify cleanup.
STEP 2
Position the granite slab on a sturdy work surface, and use C-clamps, attaching one every couple of feet along the sides of the slab, to secure it tightly. A designated workbench works well, but avoid placing the slab on a something that could shift, such as sawhorses. By securing the piece with clamps, you’ll reduce vibration and movement of the slab, both of which can lead to chipping.
STEP 3
Protect yourself by wearing a dust mask, safety goggles, and ear protection. Cutting granite is loud, and it’s a dusty prospect without a wet-cut circular saw.
STEP 4
Cover the section of granite you intend to cut with painter’s tape. Because the tape will simply serve to protect the surface and reduce the risk of chipping, the placement of the tape needn’t be precise. Just place two or three strips along the topside in the general area where you’ll be cutting—you’ll be cutting right through it.
STEP 5
Measure carefully and make a cutline on top of the painter’s tape with a marker. The wise carpenters’ adage of “measure twice; cut once” applies here. Take your time and recheck your measurements to ensure you’ll be cutting in the exact place. When cutting granite, you’ll have only one chance to get it right.
STEP 6
Fit a diamond blade labeled for cutting granite onto the saw. Then, make a short “back-cut,” about two inches long, from the end of the cutline in. This will reduce the risk of the granite chipping as you cut from the other end and reach this spot.
Making the back-cut is a must because the granite material becomes very thin just before the sawblade breaks through the last bit of stone at the end of the slab. Without the back-cut, vibrations from the saw could likely cause chipping or even break off a chunk.
STEP 7
After making the back-cut, reposition the saw at the opposite end of the slab and cut slowly along the cutline. Focus on keeping the blade aligned precisely on the cutline and maintain light and steady pressure on the saw without forcing it, letting the blade do the work. Use the same light pressure until you’ve finished the cut. Depending on the length of the cut, this could take 15 minutes or longer.
STEP 8
Peel the tape from the granite and admire your smooth, clean cut. Allow the granite dust to settle and suck it up with a shop-type vacuum. If you used a wet-cut circular saw, you’ll find a thin wet slurry instead of dust; wipe this off the slab with a damp rag. Slurry left on a sidewalk or driveway can be easily rinsed away with a garden hose.

Cutting Granite Tile
STEP 1
Make cuts in granite tile with a wet-tile saw. Unlike a circular saw, which is handheld, a wet-tile saw is stationary and the tile rests on a sliding table. Wet-tile saws vary widely; some come with lasers to help align the tiles, adjustable guides, or the ability to make beveled cuts, but they all work on the same principle.
STEP 2
Fit the tile saw with a diamond blade labeled suitable for cutting granite. A blade designed to cut ceramic tile or marble isn’t adequate. Granite is harder than ceramic and marble—a blade designed to cut those types of tile will barely make a dent in a granite.
STEP 3
Carefully measure how much you need to cut from the tile and then make the cutline with an indelible marker. A regular marker can wash off while cutting granite. Any errant ink that remains on the tile post-cut can be removed with a bit of rubbing alcohol on a rag.
STEP 4
Fill the reservoir on the wet-tile saw to the “Fill” line with water.
STEP 5
Position the tile on the sliding table and align the cutline with the blade. Secure it in place using the guides. (Check your owner’s manual if you have questions as to how to use the guides on your machine.)
STEP 6
Turn on the saw and use only light forward pressure on the sliding table; let the spinning motion of the blade do most of the work. As you cut granite, water will flow freely over the blade and the tile, which eliminates dust, cools the blade, and reduces the risk of chipping.
STEP 7
Turn the saw off before removing cut pieces of granite tile from the sliding table. Drain the tile saw reservoir and wipe up any spilled or splattered water or slurry with a rag. Hose down outdoor surfaces with a regular garden hose if necessary.