We may earn revenue from the products available on this page and participate in affiliate programs. Learn More ›
Beautifully mowing a lawn without edging the perimeter and beds is like getting an amazing haircut but leaving an overgrown beard unkempt. You could do that, but why would you?
We all know the guy with the perfect lawn, the golfing-green grass with perfectly-edged sides. That guy.
Guess what? His secret’s out, and it’s not hard. The peekaboo glimpse of soil in edging looks sharp and snazzy, but it also helps prevents grass from invading your garden beds, sidewalk, or driveway. It doesn’t take a horticulture degree to edge a lawn! All you need is time, the right tools, and patience.
Tools & Materials
Bobvila.com may earn a commission from purchases made through these links.
Tool notes: Some lawn edgers are great with curves and some are abysmal. Take care to choose one that’s up to the challenging of achieve clean cuts on any edge, be it straight or curved. It’s worth the modest extra investment.
Step 1
Just like taping before painting, it’s best to know what you’re after with edging.
If this is your first time edging your yard and making new beds, mark out a path by using a rope or garden hose laid where you want your edging cuts made. (You will edge between your chosen guide and the pavement or flower bed, so place your guide accordingly.)
Some advise spray-painting your path, but this can cause as many problems as it solves, if your spray gets unruly or a wind gust blows unexpectedly.
If edging is obvious, like along sidewalks, you may feel comfortable skipping this step.
Step 2
For straight edging, start at an end. For curved edging, you may find it easier to control the shape if you start in the center then work out on either side. Depending on the type of edger you’ve invested in, your technique will vary slightly.
- For power edging, assume a good stance that allows you to walk forward slowly while firmly controlling the path of your edger. Engaging your core and watching your posture will keep you in better control. If new to this, make your first practice edge in the backyard so you get the hang of it before the front yard for all to see. Go slowly, because the faster you go, the more likely you’ll go awry and get a wobble cut or go off-track.
- Manual edging uses a tool that looks like a shovel with a half-moon blade. Firmly but gently push it in with your feet and rotate the blade left-to-right or vice versa to get your cut. Be sure to use the same procedures as you would with shoveling to avoid straining your back. Overlapping cut marks with each incision may help you stay straight.
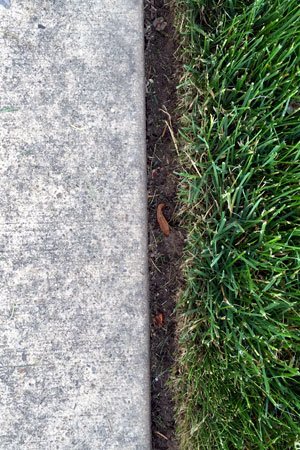
Step 3
With either method, cut only about 2 inches deep, and be wary of buried pipes and cables. This depth may seem arbitrary, but it’s one most power-edgers reach and tends to be sufficient for controlling root spread. Two inches is a rough guide, but it’s your choice. See what depth will be easiest to handle throughout.
Step 4
Periodically remove cut turf to ensure you’re making clean lines. Stand back for a good look and make corrections where you may have wobbled in or cut inconsistently along the way.
Step 5
If it’s garden beds you’re edging, grab the spade and deepen edged cuts to about 4 to 6 inches if your flower beds are sunken. If it’s a raised garden bed, then choose a depth that works aesthetically for your bed. Cut into the bottom from inside the beds for easy turf removal. Some prefer a 90-degree angle for this, but really, it’s about consistency from one end to the other, so pick an angle and carry through.
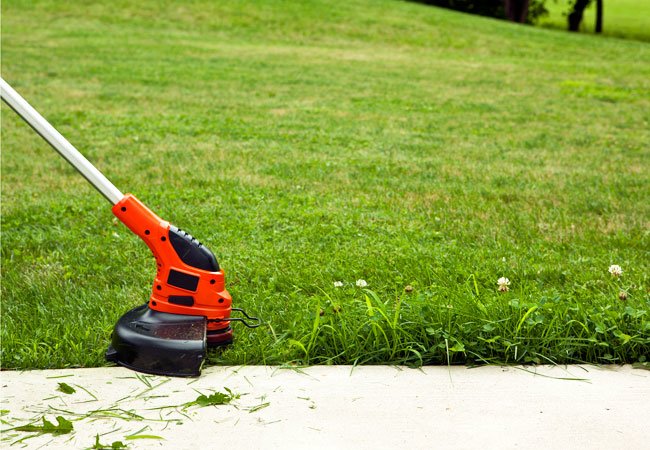
Step 6
Ah, the reward! It’s time for perfect edges. Bust out the weed whacker or the hand shears! The goal here is to get the grass cut back perfectly in line with the trench edge. The weed whacker could be overzealous, so proceed cautiously. Hand shears will do a beautiful, meticulous job. Repeat this task as needed throughout the season.
Step 7
Be nice to your tools. Before you put them away, clean and dry any blades, and follow manufacturer’s maintenance suggestions on your power tools.
- In general, manual edgers can be filed or sharpened when you find it laborious to use, but cleaning after every use will prolong their sharpness.
- Power-edgers are similar to lawnmowers—blades should be fine for up to three years, but look for nicks and other damage that may require replacing.
- Look for blades of grass that seem torn rather than sheared off as a clue that your blades need attention.
Now grab a chair and enjoy the beauty of a well-edged yard.