
We may earn revenue from the products available on this page and participate in affiliate programs. Learn More ›
Bathroom fans don’t have to sound like a jet engine to remove enough moist air to keep your bathroom mold- and odor-free. In fact, a loud bathroom fan may signal just the opposite: inefficiency. The latest bathroom fans are so quiet you can barely hear them run, yet they remove just as much air (if not more) than your old rattletrap—and they’re more energy efficient too. While most homes that are at least 20 years old have bathroom fans that consume about 125 watts of energy and rate 5 to 6 sones (roughly five times the noise of an average refrigerator, which rates only 1 sone), today’s fans range from a $100 model that uses around 55 watts and rates 1.5 sones to a super-quiet 0.3-sone model that uses just 5.8 watts and costs around $200.
Switching out your bathroom fan for a newer, more efficient model means you’ll be able to run it longer to remove more humidity and still save money on your energy bill, all without the nuisance of an obnoxiously loud roar. You may be apprehensive about taking on the installation yourself, but don’t let fear hold you back. This guide to installing a bathroom fan will set you on the right course.
Key Considerations Before Replacing or Installing a Bathroom Fan
Taking on any home renovation project can be challenging and rewarding, but before you decide to replace or install a bathroom fan, there are several factors to consider, including whether a permit is necessary, the type of bathroom fan that you need, and both the size and style of the existing bathroom fan.
Determine Whether You Need an Electrical Permit
A permit is an official government document that gives a person or company the authorization to perform certain work. It’s commonly used by local governments to ensure that any work performed on a home or commercial building is safe and appropriate and takes into consideration the age and condition of the existing structure, the age of the electrical system, and local laws that may inhibit significant changes to a building.
A bathroom fan requires an electrical circuit for the fan as well as ducting to carry humid air to the outside of the home for proper ventilation. This work will likely fall into mechanical and electrical categories, which generally require a permit. It’s important to note, however, that every city has somewhat different guidelines for permits, so check with your local municipality to determine if you need a permit for this work.
Determine the Type of Fan You Need
Bathroom fans can be separated into three types: ceiling-mounted, wall-mounted, and inline fans. It’s important to know what type you already have before choosing a replacement.
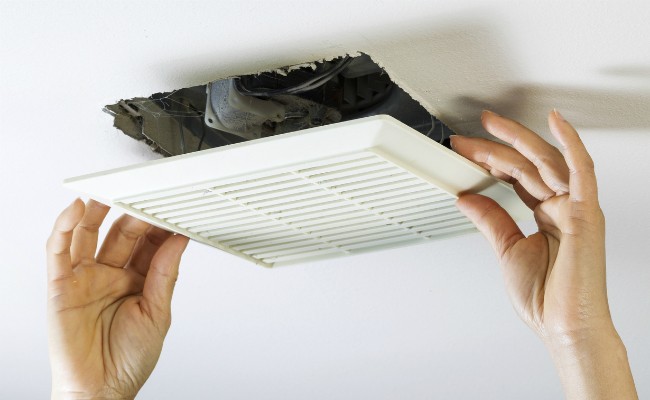
- Ceiling-mounted bathroom fans have a self-contained fan unit that pulls air in from the bathroom and pushes it out through ducting that runs up to and out through the roof. This is the most common type of bathroom fan.
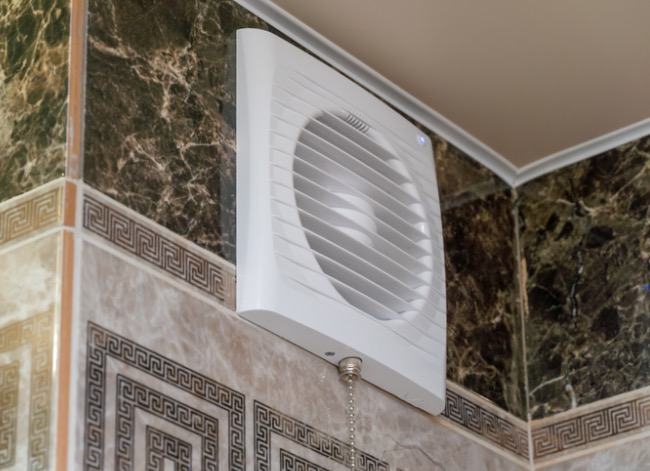
- Wall-mounted bathroom fans are essentially the same as ceiling-mounted fans, except they are mounted in the bathroom on an exterior wall of the house, and their exhaust ducting runs out through the wall instead of the roof.
- Inline bathroom fans have one or more exhaust ducts that run to the various bathrooms in the home. The actual fan, however, isn’t installed in the bathrooms but rather in a remote location, such as an attic. These fans are typically much larger than ceiling- or wall-mounted fans because they need to be powerful enough to provide adequate ventilation to multiple bathrooms.
Select the Right Size and Style of Fan
Bathroom fans come in several sizes, from small units that exhaust just 50 cubic feet of air per minute (CFM) to larger units that remove almost 200 CFM. It’s important to choose the proper fan size from this wide range. A fan that’s too small won’t remove enough odor or moisture, leaving your bathroom subject to mold, mildew, and peeling paint. One that’s too big could, in some instances, contribute to a dangerous negative air pressure situation that could pull deadly carbon monoxide back through the flue of a furnace or water heater.
To calculate the size that will meet your needs, multiply the bathroom’s length, width, and height to arrive at total cubic feet. To determine the target CFM, multiply the total cubic feet by .13 and round up to the nearest 10. For example, a 7-by-9-foot bathroom with an 8-foot ceiling equals 504 cubic feet. When you multiply 504 by .13, you get 65, so you would round up and buy a 70 CFM bathroom fan. If you have a large bathroom (600 cubic feet or more) or one with a jetted tub, it’s best to bump up fan size by 50 CFM.
Quieter fans cost more, but you may decide that the reduced noise is worth the higher price. If you have a mold problem in your bathroom, you may want to consider a model with a built-in moisture sensor that runs the fan until the humidity drops to a normal level. For easiest installation, DIYers who are replacing an existing bathroom fan should consider choosing a replacement fan with slightly larger dimensions than their current fan. Retrofit models can be installed from inside the bathroom, which saves you a trip to the attic, and their larger footprint eliminates the need to patch the wall afterward.
Tools & Materials
Bobvila.com may earn a commission from purchases made through these links.
- Work light
- Extension cord
- Flathead screwdriver
- Philips-head screwdriver
- Voltage tester
- Stud finder
- Tape measure
- Carpenter's pencil
- Drywall saw
- Reciprocating saw
- Electric drill/ driver
- Twist-on wire connectors
- Self-drilling 1.5" construction screws
- Aluminum foil HVAC UL-listed tape
- Fire-barrier caulk
- Fire-rated expanding foam
A Step-by-Step Guide to Installing a Bathroom Fan
STEP 1: Switch off the power to the bathroom fan.
Before you begin any removal or installation, turn off the power to the bathroom fan at the circuit breaker. Don’t rely on just the switch to cut power to the fan. Use a work light and extension cord to light up your work area.
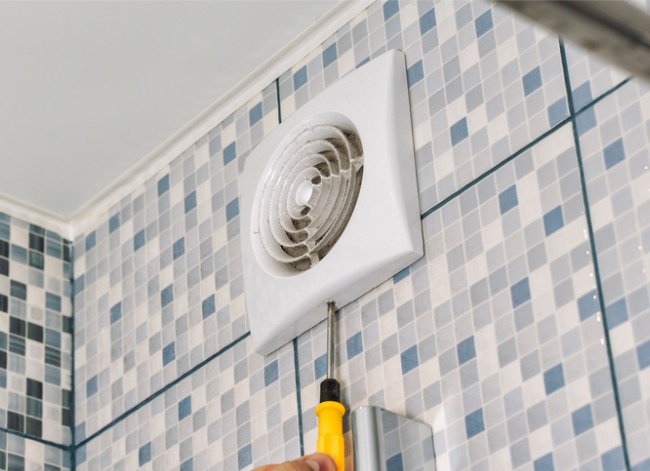
STEP 2: Remove the existing bathroom fan.
If the grille on your bathroom fan doesn’t have screws or a knob, pull it straight down to access the U-shaped spring retainers. Squeeze the top two legs of the spring together and lean the legs toward the center of the fan to unhook them from the housing. Repeat the procedure on the other spring and remove the grille.
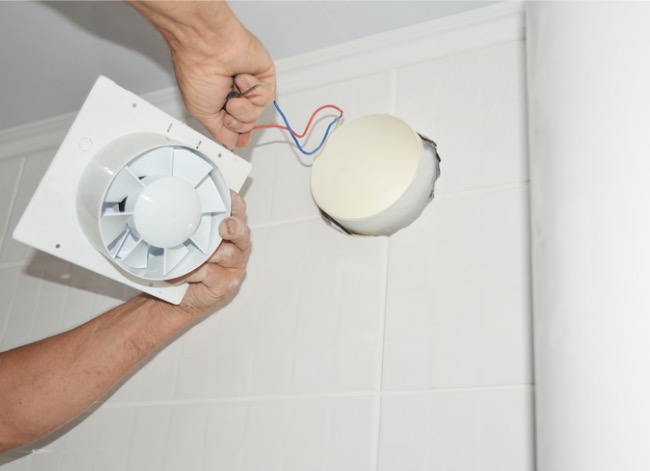
Disconnect the fan by unplugging it from the receptacle in the fan housing (if equipped with a plug). Probe the receptacle with your voltage tester to make sure the power is off. If the fan is hard-wired, confirm that the power is off by placing the tester leads in the hot and neutral wire connectors before removing them. If you detect power, stop and call an electrician. Otherwise, remove the fan retaining screw and tilt the fan down and out.
STEP 3: If necessary, measure and cut a larger hole.
Use a stud finder to locate the rafter or truss in the bathroom ceiling or a stud in the wall that’s nearest the existing fan. Mark the rafter or stud with tape and note the location of the vent damper. You’ll enlarge the opening by making an L-shaped cut opposite the stud and in the direction of the vent damper. Measure and mark the new cut lines or tape the cutting template (supplied with your new bathroom fan) in position. Then, leave the old housing in place while you make the cuts with your drywall saw. Use care when cutting near the flexible vent to avoid damaging it.
STEP 4: Remove the existing electrical junction box.
Locate the electrical junction box inside the fan housing. Remove the junction box cover screws or squeeze the cover together until the locking tabs disengage. Disconnect the house wiring and unscrew the electrical clamp locking ring.
Next, locate the screws or nails that secure the fan housing to the stud or rafter. Remove them by hand or with a reciprocating saw and metal cutting blade. If you have blown-in insulation, slide a piece of thick cardboard into the newly cut opening as you remove the old housing. Doing this will prevent the insulation from falling into the bathroom. Later, in Step 9, slide the cardboard sideways as you push the new housing into the mounting frame.
STEP 5: Install the new mounting frame.
Slide the mounting frame into the enlarged opening. Extend the frame arms out to the rafters or studs on each side of the frame and fasten them with 1.5-inch construction screws.
STEP 6: Install the new bathroom fan wiring.
Thread the house power wires and electrical clamp into the round hole in the new fan housing and screw the locking ring onto the clamp. Then, slide the housing into the mounting frame until it clicks in place. Do not connect the wiring yet.
STEP 7: Connect the bathroom fan exhaust ducting.
Connect the flexible duct to the damper assembly and seal the connection securely with aluminum foil HVAC UL-listed tape (not ordinary duct tape). Orient the damper according to the diagram shown in the manufacturer’s instructions, and attach it to the housing using the supplied fasteners.
STEP 8: Connect the bathroom fan wiring.
Connect the hot (black) and neutral (white) wires to the corresponding wires inside the fan housing. Wrap the house bare copper wire clockwise around the green grounding screw in the housing and tighten. Connect the remaining bare copper wire to any green wires using a twist-on wire connector. Consult the wiring diagram shown in the manufacturer’s instructions to double-check your connections before restoring power. Secure the junction box cover with the screws provided.
STEP 9: Secure the bathroom fan assembly to the housing.
Push the fan assembly into the housing and secure it with the screws provided. Install the silencer baffle (if provided) using the screws included with the kit. The baffle is an important noise reduction component—don’t leave it off. Plug the fan into the receptacle in the housing. Then, turn on the power and test the fan.
STEP 10: Fill any drywall gaps with fire caulking.
Fill the gap between the fan housing and the drywall with a generous bead of fire caulk to prevent warm air from bleeding into your attic. If the gap is ½ inch or larger, use a fire-rated expanding foam.
STEP 11: Install the new bathroom fan grille.
Locate the grille spring connector in the housing slots and push the grille into place. Square the grille by sliding it slightly with your fingers.
STEP 12: Turn on the power and test the newly installed fan.
Test the fan again: The fan should run quietly with no rattling, which would indicate that you’ve left out a fastener. Now, check its suction power by holding a small piece of toilet paper near the grille. The fan should suck the paper toward the grille. Finally, test for proper damper operation by holding your hand in front of the grille with the fan off. You shouldn’t feel any air movement. If everything checks out, clean up the work area and tell all of your friends how handy you are!
FAQs About Installing a Bathroom Fan
Replacing or installing a bathroom fan takes time and diligent effort to make sure the fan looks great and functions properly. Given the many steps in the project, there may be a few questions about bathroom fans and the installation process. Keep reading to find answers to some of the most commonly asked questions about bathroom fan installation.
Q. What type of light bulbs can I use in my bathroom fan?
Most bathroom fans that have integrated lights use LED bulbs instead of traditional bulbs. However, halogen bulbs are also appropriate, and they are more efficient than standard incandescent bulbs.
Q. Can I install an exhaust fan directly over a bathtub or shower?
If the exhaust fan is listed as tested and approved for installation over a tub or shower, and it’s attached to a ground-fault circuit interrupter (GFCI), then it can be installed directly over the tub or shower. Just make sure to regularly check the bathroom fan grille for signs of mold.
Q. Does it matter if there is insulation touching my exhaust fan?
It depends on the type of bathroom fan you have. Check the insulation contact (IC) rating in order to determine whether the bathroom fan can be in contact with insulation or if the insulation needs to be adjusted to allow for safe installation and operation of the fan. If you are still unsure, there may be additional information included with the product or listed on the manufacturer’s website to help determine the best course of action.
Q. What is the best way to duct an exhaust fan?
Ideally, the bathroom fan exhaust duct should run directly to the exterior of the home. Avoid running the duct to a soffit or right under a roof overhang because moist air could be pulled back into the home where it could lead to mold and mildew problems in the attic.
Final Thoughts
Bathrooms are the most common problem areas in the home for moisture accumulation, mold, and mildew. The best way to combat these threats is to install and regularly use a bathroom fan that will vent the moisture outside instead of letting it linger on the walls, cabinets, and ceiling.
Replacing or installing a bathroom fan is a great project for an experienced DIYer. Don’t forget that you’ll probably need to get an electrical permit, and be sure to verify the type, size, and style of the fan you need before getting started. Also, make sure to check the insulation contact rating on the fan and install the unit according to the manufacturer’s directions to reduce the risk of fire.