
We may earn revenue from the products available on this page and participate in affiliate programs. Learn More ›
It’s difficult to know everything that goes on below your flooring. Underneath the hardwood, laminate, tile, or carpet lies the subfloor, and it’s a component that only gets attention during a full-scale renovation or a full-blown problem. Even some of the telltale signs are easy to ignore. By the time that the issue becomes apparent, it might be too late for your subfloor.
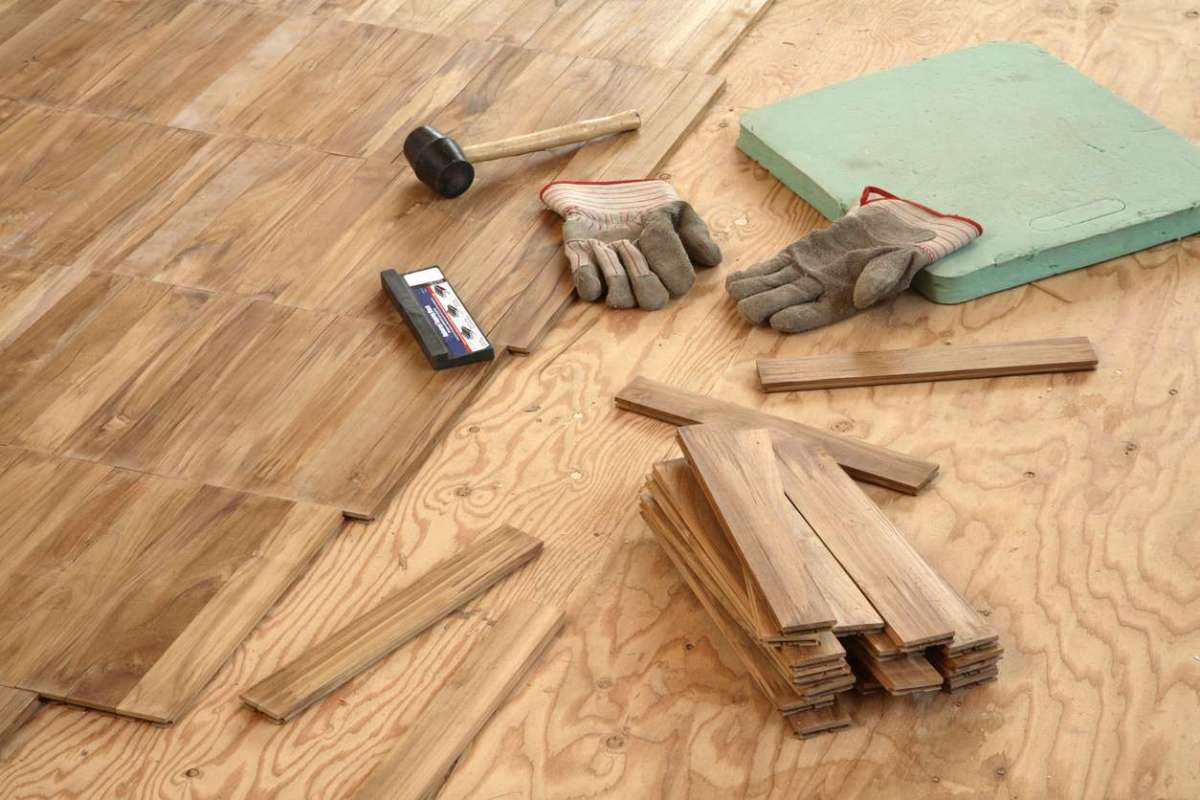
A subfloor is the structural sheathing that spans the floor joists. It’s almost always completely hidden under some type of finished-flooring material. Depending on when a home was built, a subfloor could be made from softwood boards like pine or fir, plywood, or OSB (oriented strand board). OSB is a composite of glue and strips of scrap wood, in sheets 4 feet wide and 8 or 12 feet long. OSB is fast to install and less expensive than real wood or plywood, making it the go-to material for modern subfloors.
Subflooring can last a very long time. Under normal conditions, a subfloor can last as long as the house itself. However, should a subfloor be damaged or defective, it may only last 20 to 30 years. Should this be the case, a homeowner might need to peel back the layers of flooring and get to work. Here are five signs it’s time to replace a subfloor.
1. Those squeaks could be calling for your attention.
It’s not uncommon for flooring to have a little squeak to it. Often, it’s so typical that it goes completely unnoticed. If your floor is starting to sound like the Tin Man without his oil can, however, it might require some attention. Squeaking occurs when the wood in your subfloor rubs against a nail. Under ideal circumstances, the nails hold the subfloor firmly to the joists, avoiding any squeaking issues. Should that subfloor begin to warp or twist (especially common in softwood subfloors), nails will begin to work themselves loose from the joists and those squeaks will begin to speak up.
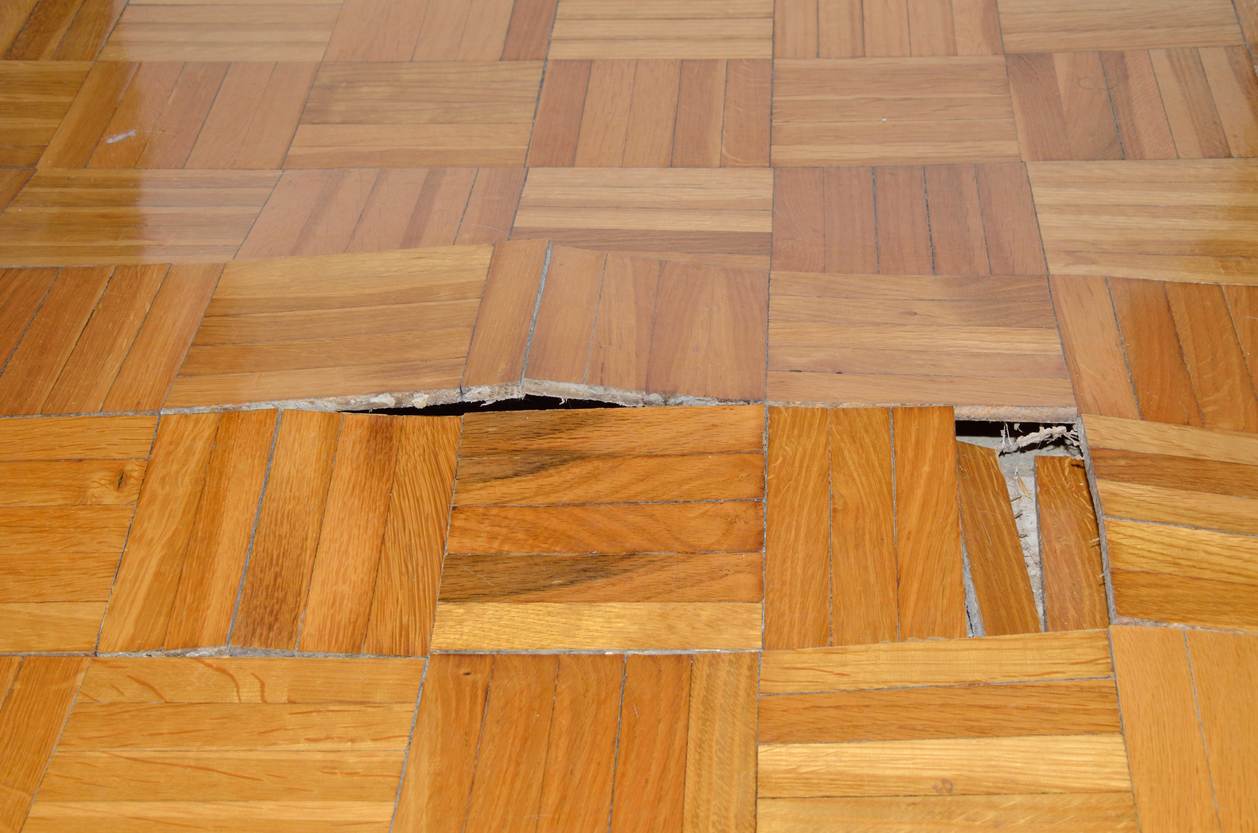
2. Sinking sections are tell-tale signs of subfloor failure.
Issues with a subfloor become far more apparent when walking through a living room feels more like a stroll through rolling hills. If a floor begins to sink between floor joists, it’s a sure sign that there is an issue. This is commonly caused by moisture issues deteriorating the wood, but it can also be caused by improper installation. When subfloors are installed, any end-to-end joints between boards or sheets are supposed to meet on top of a floor joist. Should that joint be off by only an inch, over time foot traffic will cause the end of the sheet to sink.
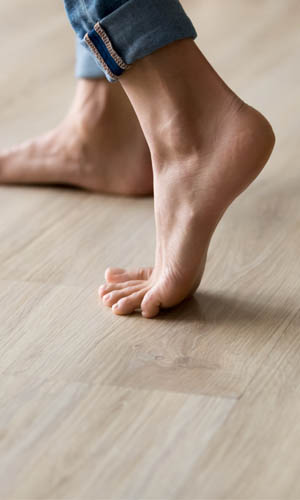
3. Moisture could be causing your cupping floorboards.
There aren’t many things in a home more beautiful than a well-maintained, well-polished hardwood floor. Even a small area of cupped floorboards can take away from the pristine appearance. Cupping occurs when hardwood floorboards begin to curl along the length of the board, somewhat like a taco shell but less pronounced. It’s most often caused by moisture. The moisture issue probably isn’t being caused by the subfloor but if the hardwood flooring above is cupping, it’s a safe bet that the subfloor is suffering as well.
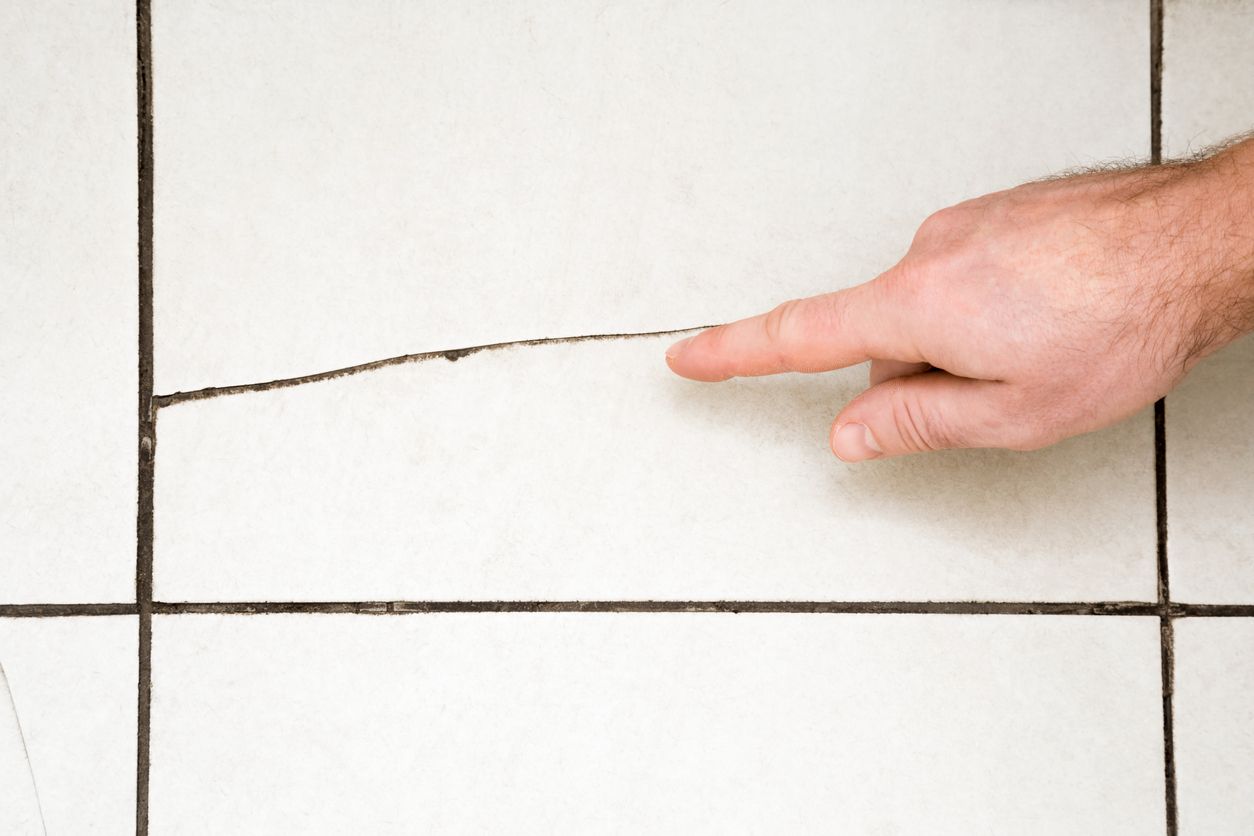
4. Cracked and popping tiles could be a material issue.
Cracking and popping tiles are a sure sign that something isn’t right. A properly-adhered tile should go in and out of style a few times before it works itself loose. If the back of the loose tile has dried thinset covering it completely with no signs of trowel marks, you’ll know that this is going to be a subfloor problem. While moisture can certainly be the suspect, it’s also common to find that the wrong material was used for the subfloor. Cement board (a sheet of lightweight concrete and fiberglass mesh) should be laid over top of the subfloor for any tile project. It strengthens the floor, removes bounce, and gives the tile a better substrate to stick to. Regardless of the reason, cracking and popping tiles are a sign that something’s going on with the subfloor beneath.
5. Possible water damage is always a concern.
Clearly, water is a floor’s mortal enemy. If there’s been water sitting in between the finished flooring and subfloor, there’s a good chance there’s some damage. If there was a leaking drain in the wall or a leaky sink nearby, or if there was a section of the roof that was leaking during the last storm, your subfloor might’ve taken on some water, and it’s time to investigate the extent of the damage.
How to Repair or Replace a Subfloor
Digging into the structure you normally stand on may be an overwhelming thought for some DIYers, but with a little knowledge and planning, it’s often a navigable course. Taking the job step-by-step is the trick to keeping a job like this manageable.
Assess the damage.
If you have the ability, the easiest thing to do is to get a look at your subfloor from underneath. This could mean bringing a flashlight into the basement, cutting some drywall from the ceiling underneath, or even heading to the crawlspace and pulling some insulation out of the way.
A quick inspection of your subfloor might reveal all there is to know about your problem, and the least invasive method is usually best. There may be a point where it’s necessary to remove a finished floor to truly understand the severity of the issue so be sure to understand that ahead of time. In the case of a dry subfloor with cracking tiles, it’s almost certain that you’ll need to remove the tile to come to a resolution.
Determine the type or cause of the subfloor’s damage.
Is this a water issue and if so, where is it coming from? Is this the result of a poorly-laid floor and the framers missing the joists when they laid down the sheathing? Has a joist broken due to a structural defect like a large knot? It’s important to know what you’re working with.
Stop the leak before you get started. If you have water damage, the cause of the water has to be resolved before taking any steps toward fixing the floor. Fixing the floor before fixing the moisture issue is like putting the cart before the horse. There’s a process that needs to be adhered to, so once you’ve identified the source, repair it before beginning any work on your floor.
Water damage. Resolving water damage is dependent on a lot of factors, but the most important of those factors is time. How long has the floor been getting wet? Long enough for the material to begin to deteriorate? Is there evidence of mold? The answers to these questions will determine the next steps.
If the water damage was a one-time thing, say from a heavy spill, a window left open during a storm, or other accidents, the current subfloor is most likely salvageable.
- Start exposing the floor to fresh air by removing any rugs or furniture. Mop up all the standing water.
- Any wet drywall needs to be removed anyway, so remove the ceiling drywall below the damage to expose the floor joists.
- Create air movement with box fans (available on Amazon), both on top of the finished flooring and the floor below. This will help to promote drying before anything can start to mold.
- Utilize a dehumidifier for a few days to draw out the rest of the moisture.
If the water damage has been occurring for a while and there are signs of flaking wood or mold, the only option may be to replace the affected section of subflooring.
- Start by removing the finished floor (hardwood flooring may be reusable once it dries, so be careful in the removal process) and exposing the subfloor.
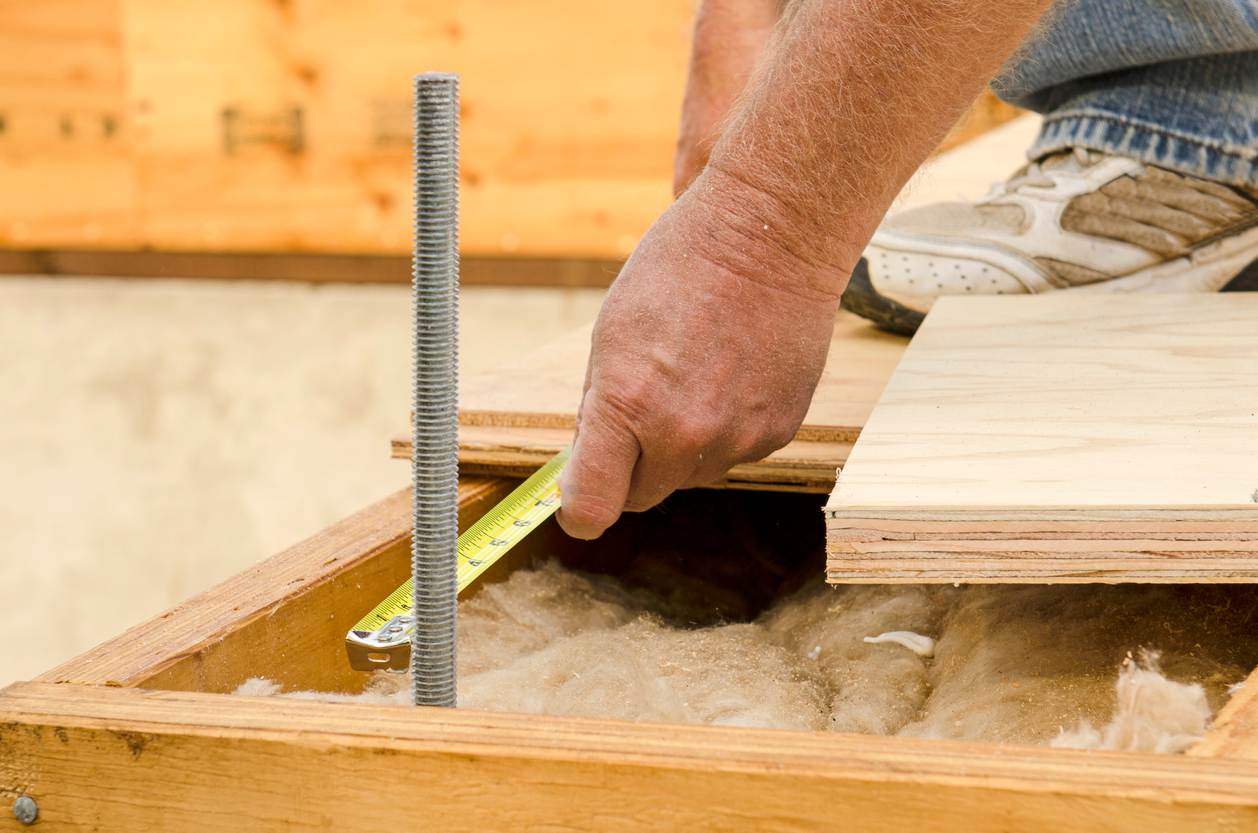
- Assess the damage and cut around it, then remove the damaged subfloor. When you replace the subfloor, the new ends have to sit on the joists, so cut out your wet subfloor along two joists on either side of the damage. Make sure to get all of the damaged or moldy subfloor to prevent it from coming back. Also, keep the cut as square to the joists as possible—this will save you a headache in the next step.
- Measure the opening and cut a piece of OSB or plywood of the same thickness and dimensions as the subfloor you removed. Test fit it in the hole to be sure that the ends meet on a set of joists.
- Using some construction adhesive like Loctite PL Premium (available on Amazon) in a caulking gun, run a small bead of adhesive along the top of the floor joists.
- Lower the piece of subfloor you just cut into the opening, screwing it into the joists below. This is also a good time to screw as much of the original subfloor down as you can. Screws hold much better than nails and won’t start squeaking.
- If this is for a tile floor, this is the point that you’ll want to screw down the cement board.
There’s also a chance that your subfloor suffered water damage and has since dried itself out. If that’s the case, the subfloor might be fine as far as mold and moisture are concerned but still feel a little soft. To remedy this situation, cut a piece of joist material (2×8, 2×10, or 2×12 depending on the circumstances) to fit crosswise between the two joists under the soft flooring. Drive some screws through the joists and into the ends of the new board you’re installing. This will add all the structure necessary to stiffen up the subfloor.
Loosened nails. As mentioned earlier, squeaks are caused by the subfloor rubbing against nails. These nails work themselves loose as a subfloor ages and sinks, despite retaining its structural integrity. Fixing this scenario can be as easy as running some extra screws through the subfloor and into the floor joists below.
If the bounce and squeak is caused by a broken floor joist, sistering or laminating a new joist to the old broken one is a good option. It can be a challenge to maneuver a joist into place over a bearing wall on one side and a top plate on the other, so employ the help of a friend. Once in place alongside the broken joist, glue and screw the new joist to the old broken one. Screw the subfloor material down to the new joist, and say goodbye to that bounce and squeak.