We may earn revenue from the products available on this page and participate in affiliate programs. Learn More ›
The cramped space behind the toilet is a difficult portion of the bathroom to maintain, posing a challenge when it comes time to dust and an even larger one when repainting. A toilet tank situated not quite flush against the wall leaves very little room to operate a brush or paint roller but just enough that it would be noticeable to leave the color unchanged while the rest of the room gets a refresh. Fortunately, DIY-inclined homeowners and renters have two easy options for how to paint behind a toilet, neither of which require moving the bulky ceramic out of the way.
- Option 1: Cover your toilet with a trash bag and line the floor with drop cloths so that you can work without fear of mess. This option is ideal when you are repainting your entire bathroom or the full wall where your toilet sits.
- Option 2: Enlist a specialty tool called the Jimmy Sponge Stix to slide into the narrow space behind a toilet and pad on paint. Use it together with Option 1 to ensure a complete and flawless paint job or alone as a “quick fix” to correct discoloration on the patch of wall directly behind the toilet.
Before you begin, make sure to select the right primer and paint. Bathrooms, of course, are exposed to a lot of moisture and humidity, so your paint choice should be designed to withstand the combination. Consider a paint with anti-microbial additives, like Benjamin Moore’s Aura Bath and Spa collection, or an interior paint with semi- or high-gloss finish—this sheen repels moistures better than matte paints. And don’t forget to start with a top-quality, moisture-resistant paint primer. The right primer will prevent peeling and water damage for years.
Tools & Materials
Bobvila.com may earn a commission from purchases made through these links.
- Cellulose sponge
- Terry cloths
- Fan
- Painter’s mask
- Drop cloth
- Garbage bag
- Painter’s tape
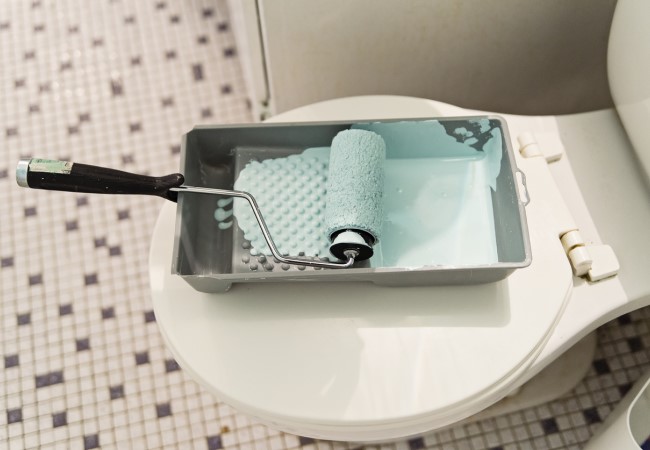
- Mini paint roller
- Paint tray
- Paintbrush
- Angled paintbrush
- Jimmy Sponge Stix
- Paper towels
OPTION 1: Completely cover a toilet with a trash bag, then brush freely.
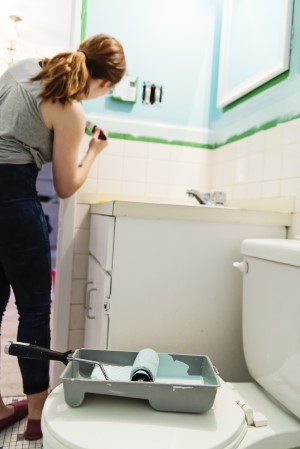
When painting the entire bathroom, prep the toilet with a drop cloth before you start but save the actual painting of the tight space behind your toilet for last—it requires the most detailed attention.
STEP 1: Ensure proper ventilation.
Bathrooms are often small, enclosed spaces with poor air circulation. Materials like shower curtains and towels that retain moisture also keep them consistently humid. To boost bathroom ventilation and minimize paint drying time, remove the shower curtain, floor rug, bath, and hand towels. If your bathroom has windows, make sure they are open. Run the ventilation fan or plug in a small circulating fan.
To prevent paint fume inhalation, you may also wish you wear a painter’s mask.
STEP 2: Dust and prep the area behind the toilet.
Remove dust and hair build-up with a mild cleanser (detergent mixed with water in a spray bottle will do) and a cellulose sponge around the floor, wall, and toilet surfaces. Dry thoroughly with terry cloths.
Next, cover the floor around the toilet with a tarp or plastic sheet secured with painter’s tape. This will prevent accidental paint spills from staining your floor.
Then, cover the toilet with an extra-large plastic garbage bag. (Tip: You’ll find contractor clean-up bags at your local home improvement store in sizes of up to 50 gallons, and these resist accidental tearing.) Tape the bag in place around the toilet’s base, and pay special attention to wrap any piping or base that might be exposed with painter’s tape.
STEP 3: Prime and paint
Start with one to two coats of primer to ensure the best paint adhesion. To reach behind the toilet and around pipes, you’ll want to do the following:
- Use a narrow paint roller to apply paint primer around the shape of the toilet, cutting in as best you can. Roll with the metal frame on the outside in order to get as close to the covered toilet tank as possible.
- Switch to a 3″-wide foam brush to paint behind the toilet. Carefully load just one side of the foam brush with paint primer and, when you reach behind the toilet, keep the paint-covered side in direct contact with the wall. Apply in small strokes.
- Use a 1″-wide angled brush for detail work around the pipes.
Let the primer dry thoroughly before applying paint. (Drying time will depend on the temperature and humidity level in your bathroom, as well as the paint primer you choose; refer to the can for an estimated dry time between coats and before paint.)
After priming, clean your paint pan before pouring fresh paint into it. To apply your paint, follow the same tips. After the first coat, wait the amount of time recommended by the manufacturer (longer, if your bathroom is not especially ventilated) so that the wall is completely dry before applying a top coat.
OPTION 2: Purchase a special painting tool to access the area behind a toilet tank.
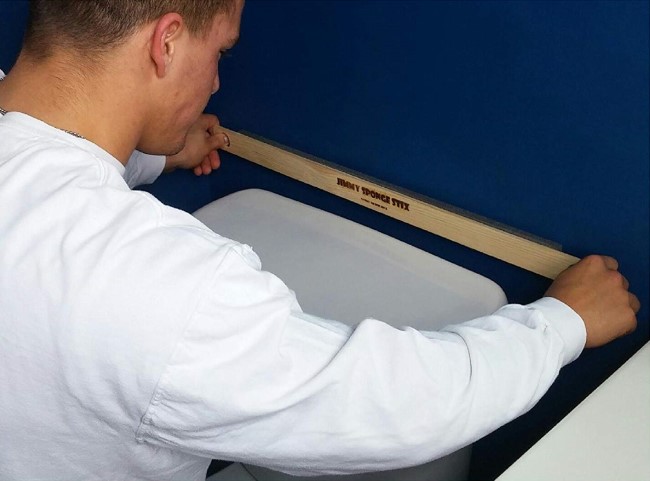
Painting the wall directly behind the toilet tank can be less of a pain when you use a tool designed to fit the narrow gap between your toilet tank and wall. Sure, it may be that you only have a paint job like this once every five to 10 years (maybe more, if you are a renter who appreciates a fresh coat of paint when you move in and then often needs to repaint before you move out). Thankfully, an innovative tool like a Jimmy Sponge Stix is available on Amazon for less than $13 per stick—a small price to pay for sanity a slim reusable tool. You can watch a short demo video to get a sense of how these sticks slide easily against the wall behind the toilet for smooth paint application.
STEP 1: Ventilate the bathroom, then prep for paint.
Proceed in establishing good bathroom ventilation and a clean slate for best adhesion, just as you would in Steps 1 and 2 of Option 1.
One twist: A Jimmy Sponge Stix can be used to clean the wall directly behind the toilet. Simply dampen the spongy side with soapy water and slide it firmly against the wall to remove surface dust, hairspray residue, or mildew. While the wall air dries, clean the stick and let it dry completely before painting.
Cover the bathroom floor with a drop cloth held in place with painter’s tape, but skip bagging the toilet. The Jimmy Sponge Stix only features an applicator on the wall-facing side, so you’re less likely to transfer paint onto the toilet if you bump into it. Just to be safe, though, keep a damp paper towel nearby to wipe up any marks.
STEP 2: Roll primer and then paint onto the Jimmy Sponge Stix, glide across the wall, and repeat.
Run a traditional paint roller through paint primer and roll it over the clean, spongey side of the Jimmy Sponge Stix. Then, glide the stick down the wall behind the toilet, pressing firmly to make sure the entire paint-saturated surface meets the wall. Its 27-inch length should extend past the toilet tank on either side so that you can grip through the hole in each end with your fingers.
Apply two coats of primer this way, leaving time between them as recommended by the paint manufacturer. Then, clean the stick with water and let it dry. Repeat the process with two coats of paint using the Jimmy Sponge Stix.