
We may earn revenue from the products available on this page and participate in affiliate programs. Learn More ›
It’s a dilemma shared by many homeowners: Yes, those tired Formica countertops and cabinet doors in the kitchen or bath date the room, but the cost to replace them exceeds your current budget. Don’t assume you simply have to accept that your space is firmly tethered to the 1970s by its avocado green or harvest gold Formica counters or cabinets, however. There’s another way to deal with outdated or ugly laminate, as long as it’s in reasonably good condition: paint.
Created in 1913 as a form of insulation, Formica—which is the brand name of the laminate made by the Formica Group—is not made entirely of plastic, despite the feel and appearance. It’s actually made from many layers of paper, which are soaked in resin, dried, and then sealed in clear melamine. Hugely popular from the 1950s through the 1970s as an inexpensive, colorful, and fairly durable countertop material, it’s no wonder that Formica is making something of a comeback today in new installations. Still, many homes still sport Formica counters or cabinets in yesterday’s colors and patterns.
While updating the color of Formica with fresh coats of paint can be a bit time-consuming, it isn’t especially difficult, even for a beginner to the do-it-yourself scene. As long as you prep patiently and properly—starting with a bonding primer to aid paint in adhering to the slick, nonporous surface of the Formica—you can achieve professional results. This detailed guide on how to paint Formica will walk you through transforming your kitchen or bathroom from ho-hum to wow.
Tools & Materials
Bobvila.com may earn a commission from purchases made through these links.
- Drop cloths
- Screwdriver
- Carpenter's pencil
- Sponge
- Protective goggles
- Work gloves
- Dust mask
- 150-grit sandpaper
- Sanding block
- Vacuum
- Putty knife
- Cotton cleaning cloths
- Foam paint rollers
- Paintbrush
- Painter’s tape
- Degreasing cleaner
- Epoxy putty
- Bonding primer
- Acrylic paint
- Acrylic or oil-based sealer
How to Paint Formica
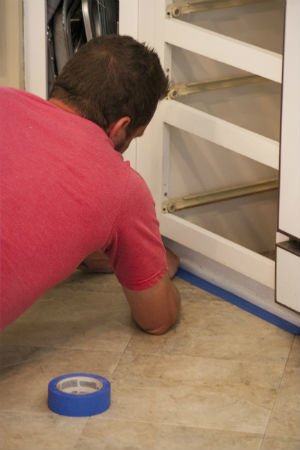
STEP 1: Prep your space with drop cloths and painter’s tape.
Whether you plan to paint Formica counters or cabinets, protect the surrounding areas—floors, namely, but also lower cabinets if painting countertops or countertops if painting upper cabinets—and any nearby fixtures using drop cloths held in place by painter’s tape.
At the same time, tape off anything near the Formica that you don’t want to get paint on.
- If painting a Formica countertop, tape off the sink, the backsplash, walls that edge the counter, and the lower cabinets. If painting cabinets, tape off surrounding walls (and, potentially, hinges if you aren’t planning to unscrew them).
- If you’re painting Formica cabinets, remove handles or knobs from doors and drawer fronts. Then unhinge doors and pull out drawers altogether. While it is possible to paint cabinet doors while in place, it can be easier to remove them and lay them flat during the painting process. One pro tip: If you do remove the doors and drawers, make sure to mark each with their location on the back or inside so each will be easy to replace them in their correct spot when you’re finished.
STEP 2: Remove all dirt and grease from the Formica.
Clean the Formica with a degreasing-cleaner-soaked sponge, working from top to bottom. Follow with a clean, water-soaked rag to remove any last traces of grease, and then wipe the laminate dry with a clean towel or rag.
STEP 3: Sand the Formica for better paint adhesion.
Protect your eyes, skin, and lungs from airborne laminate dust with goggles, gloves, and a dust mask. Then, use 120- or 150-grit sandpaper or a sanding block to scuff the glossy surface. (Because Formica is non-porous and slick, paint won’t adhere properly without first roughing it up a little.) Don’t neglect corners, divots, and edges, and don’t skip this step or skimp on the process—it’s tedious, but it’s crucial to achieving a professional-looking result.
RELATED: The 8 Painting Mistakes Almost Everyone Makes
STEP 4: Repair any dings that would show through a coat of paint.
Vacuum or use a clean rag to remove all traces of sanding dust so that you can inspect for imperfections. Then, repair any small holes, scratches, or cracks in the Formica surface with epoxy putty, spreading the putty as smoothly as possible with a putty knife.
Let the putty dry for the amount of time recommended by the manufacturer, and then lightly sand it until it blends in with the rest of the surface.
STEP 5: Clear the dust before you continue.
Again, vacuum the Formica counter or cabinet doors to remove sanding dust. Finish by wiping these surfaces with a slightly damp rag to remove any final traces of dust—these loose particles can prevent paint from fully sticking to your Formica.
STEP 6: Roll on a coat of bonding primer.
Open a window and set up a fan to provide good ventilation; the primer and paint you will apply is generally strong-smelling stuff because of the volatile organic compounds (VOCs) the products contain.
With a paint roller, prime the Formica with a coat of bonding primer intended for glossy surfaces. Bonding primer tends to be thick, so for the smoothest application, a foam roller is best.
Once it has fully dried, apply a second coat. Let the primer dry according to the manufacturer’s directions.
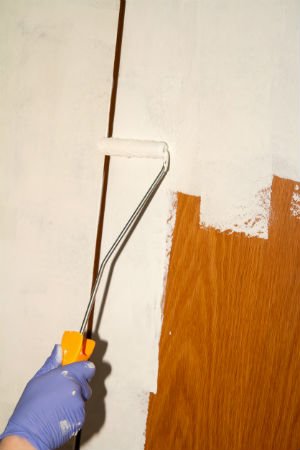
STEP 7: Paint Formica with your choice of paint and color.
You can top bonding primer with either oil-based or water-based paint. Extra durable oil-based paints may make a better pick for countertops that see lots of wear and tear, but, generally speaking, water-based paints are more popular because they dry faster and give off less noxious VOCs in that time.
Stir your paint, and apply a thin, even coat to your Formica using a clean foam roller or pad. Brushes aren’t the best choice for painting over Formica; they’re likely to leave stroke marks. If painting cabinets, work from the top down; if painting a counter, start at the back and work your way forward.
Let the paint dry completely, and then apply a second coat. If you primed properly, this should be enough. If you are painting a light color over very dark Formica, however, you might need to apply a third coat of paint for full coverage.
STEP 8: Peel away the tape before you wash up.
Remove any protective painter’s tape once the paint is tacky but not quite dry. This keeps edges clean and prevents the tape from sticking or tearing.
STEP 9: Wait the full recommended dry time.
Let the paint cure for the full duration recommended by the manufacturer. This could be anywhere from hours to days, but don’t get impatient—sealing paint that isn’t properly cured is likely to end in bubbled or imperfect results as the underlying moisture tries to evaporate.
RELATED: 12 Easy Fixes for a Botched Paint Job
STEP 10: Top with a sealer to protect your paint job.
Seal your painted counter or cabinets with a clear semi- or high-gloss protective finish. Use oil-based polyurethane over oil-based paint or clear acrylic sealer over acrylic paint. Apply two coats of sealant, allowing time to dry completely between the two passes. You’ll achieve the smoothest results with a natural-bristle paintbrush for oil-based polyurethane or a synthetic-bristle paintbrush for acrylic sealer.
STEP 11: Reassemble your kitchen or bathroom.
Replace hardware, return your cabinet doors to their proper positions if you removed them for painting, and clean up your work area. Your job is complete!
Go easy on your freshly painted Formica for a couple of weeks. Even though the primer may dry quickly, it needs time to cure completely. During this time, don’t scrub the surface—just wipe with a damp sponge if necessary.
Caring for Painted Formica
Congratulations! Now that you’ve completed the steps for how to paint Formica, you’ve given your kitchen or bathroom a whole new look—and you didn’t have to spend a bundle to do it. Follow these tips to keep your newly painted Formica counters or cabinets looking their best.
- Don’t cut directly on your painted countertop. Instead, use a plate or a cutting board to prevent scratches or dents.
- Avoid scorch marks by protecting your counters with a trivet, mat, or towel before setting down a hot bowl, plate, or pan.
- Even though the paint is sealed, overly vigorous scrubbing could still lift or strip the paint. Avoid abrasive scrubs, steel wool, or stiff scrubbing brushes. When removing grease from everyday cooking, for example, clean your painted Formica using a sponge or rag with a gentle liquid cleaner.