
We may earn revenue from the products available on this page and participate in affiliate programs. Learn More ›
Hold on a second! Don’t get rid of that old wooden dresser just yet. Give it a second look, and this time try to see past its paint job or cracked coat of stain. Do you like its design? Do the drawers hold enough? If you admire everything about the piece except for its current condition, you can—with less effort than you might expect—transform it from a dingy eyesore into a captivating keeper.
Anybody can learn how to refinish a dresser; there are no special tools or advanced skills required. All you need to be successful in the task are two things: a free afternoon and the willingness to get your hands a little sawdusty. Are you ready? OK, let’s go.
REMOVING THE OLD FINISH
Removing the existing finish is the first, hardest, and most important step of refinishing a dresser. In fact, that’s mostly what furniture refinishing is all about. Adding the new finish is a snap, comparatively.
How you go about removing the existing finish depends on whether the dresser is now sporting paint or stain. Not sure? If you see any wood grain, that means there’s a stain. If not, then you’re very likely dealing with paint.
Bring the dresser to an area where you can make a mess, and to facilitate cleanup, position the dresser over a tarp. Don your goggles and dust mask, then proceed.
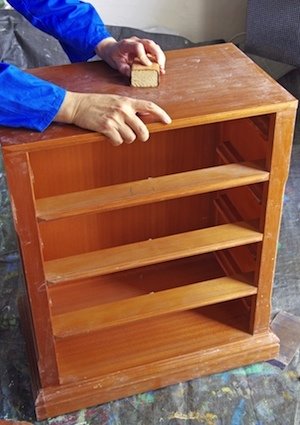
- To remove paint from a dresser, use sandpaper—or to make quicker work of things, a power sander. In hard-to-reach crannies, swap the sandpaper for a scraper or steel wool. It’s not necessary to take off every single speck of paint, but the closer you can get to bare wood, the better. After sanding, wipe the piece down with a tack cloth to pick up sawdust.If you’ve tried sanding and the paint will not budge, there’s another option: chemical paint stripper. Working with such a product absolutely requires good ventilation and proper protective gear. Instructions vary from product to product, but the process generally starts with a thorough cleaning. Next, the gel-like stripping agent goes on with a brush and is left alone for a period of time. Slowly but surely, the paint bubbles into an easily removable layer, which you can then peel off using a putty knife in combination with your gloved hands. Finish by washing down the dresser and letting it dry out.
- To remove stain from the dresser, use sandpaper or a power sander, just as you would with paint. Start the sanding process with coarse sandpaper and as the bare wood starts to show through, switch to medium-grit sandpaper. To complete the process, use fine-grade sandpaper. The sandpaper actually does double duty: It removes the old stain while also preparing the bare wood to accept a new finish.Just note that there are also chemical strippers designed specifically for use with stains. If you go this route, your best bet is to use a product that contains methylene chloride, which cuts through anything. As stipulated above, working with such toxic chemicals demands the observance of various safety measures. For specific details, make sure to read and follow the instructions printed on the container of the product you end up using.
Allow the bare wood to dry thoroughly before proceeding.
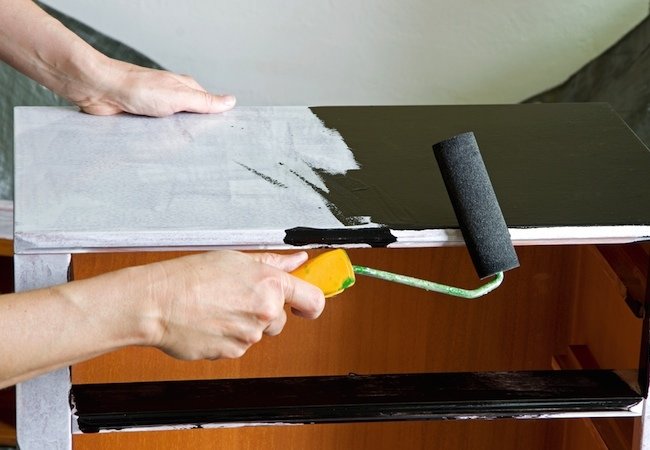
APPLYING THE NEW FINISH
At this point, the dresser is down to bare wood and ready for just about anything—the traditional paint or stain, or even something creative, such as decoupage or a faux finish. Yes, this is the fun part!
What new finish should you give to your old dresser? There is no right or wrong here, and the answer, of course, is entirely up to you. Heed your personal style preferences, and consider the decor already in the room where you plan to put the piece once it’s refinished.
- Stain. As the name suggests, stains are coloring agents that change the color or shade of the wood. Stains can highlight the grain, lighten or darken natural tones, or change them altogether. For detailed step-by-step directions on how to stain wood furniture, click here.
- Paint. Paint differs from other finishes in that it’s opaque. Remember that traditional paints are sold in a variety of lusters—flat, satin, and so on. If you wish to apply a traditional paint with a brush, click here for a tutorial. Interested in spray-painting? Right this way.
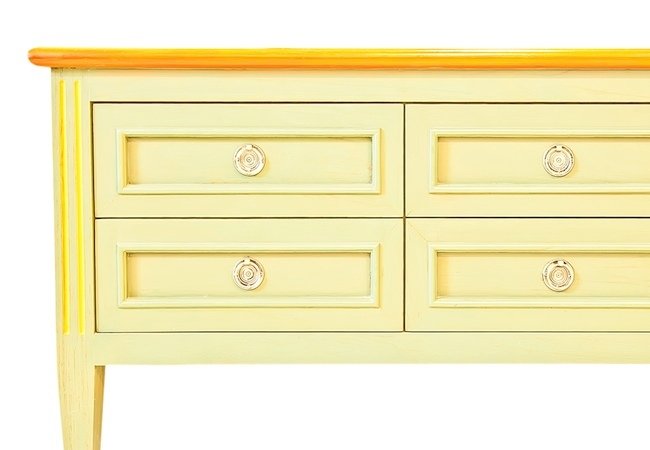
No matter your chosen finish, you can be certain that the dresser will look quite different from the one you were ready to say goodbye to. And instead of purchasing a new piece of furniture for hundreds of dollars, you were able to customize one for less than $50. Not bad!