
We may earn revenue from the products available on this page and participate in affiliate programs. Learn More ›
Homeowners rarely do their own plumbing, right? Wrong. Nowadays, intrepid do-it-yourselfers rely on their own skills and labor to get the job done. “This is a big shift,” according to Daniel O’Brian, a technical specialist with SupplyHouse.com. “Plumbing used to intimidate even those homeowners who really know what they’re doing.” Today? “There’s a whole different mindset,” says O’Brian, who chalks up the change to a relatively new plumbing product—PEX, or cross-linked polyethylene tubing, an innovative and increasingly popular alternative to conventional copper pipe.
Certainly, some purists remain convinced that you simply can’t do any better than copper pipe. But PEX tubing has many converts among both do-it-yourselfers and pros alike for a set of at least three strong, convincing reasons. First, there’s the fact that PEX costs less than copper pipe. Significantly less. Second, PEX offers superior freeze resistance, although only indoors. Finally, and most important: PEX makes plumbing easier than it’s ever been. After all, working with copper pipe almost always involves soldering—that is, fusing pipes and fittings together under high heat. Working with PEX requires nothing of the sort.
That said, if you’re only accustomed to traditional materials and techniques, or if you’ve never taken on a plumbing project before, there’s one thing you need to figure out first—the method by which you’re going to join one PEX tube to another. “There are basically four different types of PEX connections that you can make,” O’Brian explains. The reason it’s important to choose a connection method at the outset? Your choice largely determines the tools that you’re going to need by your side. Continue now for all the details on the four types of PEX connections and the minor-but-still-important differences between them all.
METHOD #1: CRIMPING

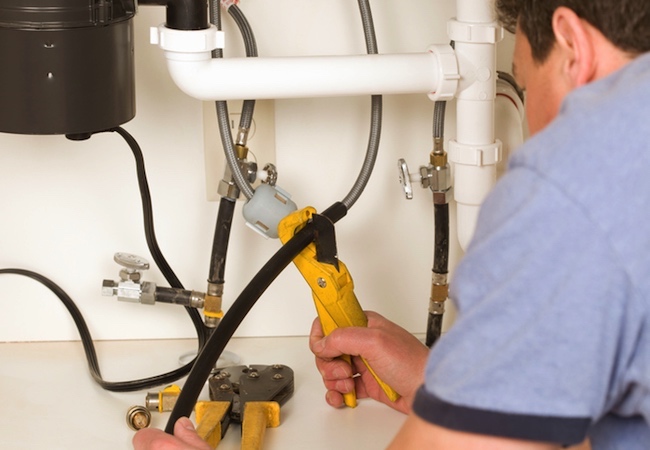
Right off the bat, know that each connection method involves its own special fittings and rings. No matter the connection method, the fittings and rings always perform the same essentials functions, but from one method to the next, their designs differ slightly. So too does the tool used to fasten the fittings and rings for a tight, complete connection. Therefore, crimping, perhaps the most common method, calls specifically for crimp fittings, crimp rings, and a crimp tool. Though not strictly necessary, O’Brian points out that to reduce the risk of leaks it’s also often handy to employ a go/no-go gauge. “That tells you whether you made the connection correctly or not,” he says. If you make a mistake? “Easiest is to use a de-crimping tool,” O’Brian says. If you don’t have one, “you can use a regular knife instead,” O’Brian concludes.
METHOD #2: CLAMPING

Next to crimping, clamping sounds like it wouldn’t be much different, and it’s not. For one thing, clamp connections rely on the exact same type of fittings as crimp connections. The rings are different, however, and instead of a crimp tool, you must use a clamp tool. Why choose clamping over crimping? One reason is that a clamp tool can do something a crimp tool can’t—self-adjust. Meaning, if your project involved PEX tubes of different sizes, you would need a different crimp tool for each size. A clamp tool, meanwhile, comes with adapters that enable it to size up or down to match that of the tubing. Another potential reason to choose clamping over crimping: Whereas crimp rings are copper, clamp rings are stainless steel. Because the latter better resists corrosion, clamp connections often perform better over the long term in direct-burial applications,” O’Brian says.
METHOD #3: EXPANSION

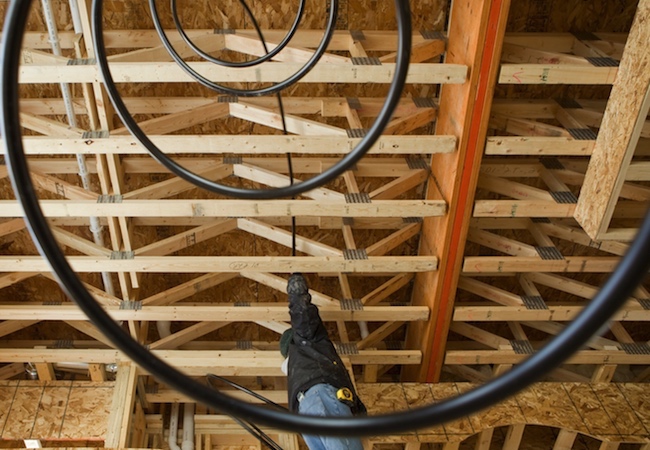
If you’re tackling a major plumbing project, consider the easy, speedy connection method favored by the pros. A proprietary system perfected by Milwaukee Tools—and possible only through use of tools made by the same company—expansion PEX connections stand out for reliability. “These types of connections are known for never failing in the field,” O’Brian says. The key? Expansion connections rely on oversize fittings, driven into place by the powerful ProPEX Expander Tool. Unfortunately, at nearly $400, the Milwaukee tool isn’t cheap. Even though the system saves time and effort, its cost turns off many DIYers, leaving its use largely limited to the trade. Another reason why expansion connections suit experienced pros but may not suit DIYers: It’s a pain to remove and reuse a fitting, and if you’re a novice, you’re more likely to make mistakes along the way.
METHOD #4: PRESS

Press connections are another type known and loved primarily by people who make their living as plumbers. As people who live by the old adage, “time is money,” pros appreciate the no-fuss system particularly for its ability to speed the installation of plumbing systems in new construction. Another proprietary method, press connections are to Viega as expansion connections are to Milwaukee Tools. To rely on press PEX connections, therefore, you need not only Viega-made fittings and rings (Viega calls them “sleeves”) and a Viega-made PEX Press Tool, but also—for best results—with Viega PEX tubing as well. It’s not impossible to pair run-of-the-mill PEX tubing with Viega fittings and rings, but as O’Brian says, experts typically recommend “keeping it all in the family.” The above video from SupplyHouse.com provides further details in addition to demonstration.
In any case, no matter your chosen connection method, bear in mind that pros and experienced DIYers keep several additional tools close at hand for PEX projects. For instance, to create clean cuts in the tubing, consider a PEX cutter. “A utility knife can do the job in a pinch, but with the right tool, you get better results more quickly and with less hassle,” O’Brian says. Also, O’Brian suggests a clip gun, whether a manual or pneumatic, if the task at hand entails fastening PEX to studs, joists, or subfloor. Finally, for especially long runs or installations involving many different runs, O’Brian recommends purchasing a simple, low-cost uncoiler. That way, O’Brian concludes, “Instead of having to make a special effort to keep the tubing neat and organized, it stays by your side, always ready to go.”
This article has been brought to you by SupplyHouse.com. Its facts and opinions are those of BobVila.com.