

We may earn revenue from the products available on this page and participate in affiliate programs. Learn More ›
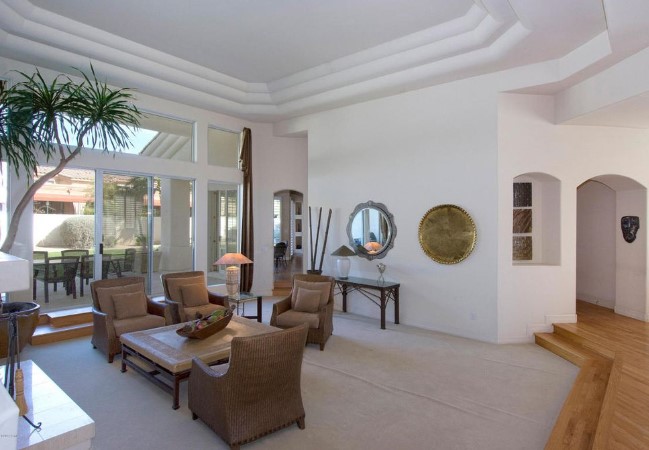
You may have hung the gallery walls and installed crown molding, but interior design needn’t stop at the top of the walls. A tray ceiling—also called an inverted or recessed ceiling—resembles a large upside-down tray set into a ceiling. The center section is situated several inches or feet higher than the perimeter, drawing the eye upward, adding visual interest, and creating a three-dimensional effect. A cousin to the coffered ceiling, which features multiple recessed areas in a grid pattern, a tray ceiling features only one recessed area but it can be an equally impressive focal point.
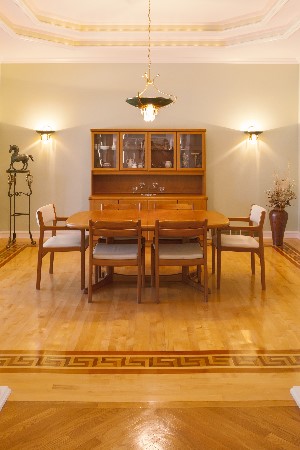
Simple and versatile, tray ceilings can complement virtually all styles of architecture and design. They impart a feeling of spaciousness to small rooms and add detail to the stark ceilings often found in expansive rooms. Because they’re frequently accompanied by ornate molding, contrasting colors, and special lighting effects, tray ceilings work well in open living areas, great rooms, and formal dining rooms where folks relax and linger—and can truly appreciate their appeal.
Keep reading to learn more about design choices, structural suitability, and construction methods to help you decide if a tray ceiling is right for your home.
Tray Ceiling Design Basics
The shape of a tray ceiling often follows the contour of the room, by means of a drop-down border around the perimeter of the ceiling. The inside tray recession can be anywhere from one inch to more than a foot deep, depending on the height of the ceiling and the desired effect the homeowner is going for. Because most rooms are square or rectangular, most tray ceilings are also square or rectangular, but there are no hard and fast design rules. Trays can be constructed in oval, circular, or other shapes if desired.
Tray Ceiling Functionality
A tray ceiling can be functional as well as attractive. In older homes built before the advent of central heat and air, ducting is often run on one side of a ceiling when a vent system is later installed. This creates a bulk header on only one side of the room. As long as the ceiling is high enough (see “Overhead Space Concerns” below), a tray ceiling can be constructed to match the dimensions of the bulk header, camouflaging it in the overall tray ceiling design.
A tray ceiling can also house other mechanical elements in its drop-down border, such as wiring or plumbing. This is a good option in homes where it’s not feasible to route those elements through the walls.
Overhead Space Concerns with Tray Ceilings
Tray ceilings installed during the building of a new house are likely to be constructed within the ceiling joists. The border surrounding the tray should be the same height as the ceilings in the other rooms in the house, while the interior tray will be higher, so headspace will not be affected.
Ceiling height becomes a factor, however, when installing a tray ceiling in an existing room, because the drop-down border will reduce headroom. Because of this, a tray ceiling is best suited for existing ceilings that are more than eight feet high. Most local building codes require a minimum ceiling height of eight feet, so if your existing ceilings are only eight feet high, the drop-down border would extend below eight feet, potentially making the room feel cramped. This is dependent, of course, on how deep the tray recession is. A drop-down border of only one or two inches may be fine, whereas a drop-down border of six inches or more would probably hamper the perception of spaciousness. Carefully consider headroom when making the decision to install a tray ceiling in an existing room.
Style and Effect of Tray Ceilings
Standard tray ceilings are constructed from dimensional lumber (to form the drop-down border) and then wrapped with drywall. The drywall can be taped and finished without trim for a clean, minimalist look, or corner molding can be added to cover the seams where the drywall meets.
A tray ceiling can be as simple or as ornate as you like to suit the style of the room. Crown molding is often added inside of tray borders for classic elegance, and the larger the molding, the more dramatic the impact.
Molding can be designed to conceal accent lights, which softly illuminate the tray part of the ceiling, and recessed lights can be fitted in the drop-down border. Because the drop-down border effectively frames the ceiling tray, it also makes a perfect surround to showcase a chandelier or ceiling fan.
Color can play a significant role in tray ceiling style simply by painting the recessed ceiling one color and the drop-down border a contrasting or a complementary shade. Molding, if installed, can be painted to match the tray color or the ceiling color, or even a third color, if desired. The stylistic possibilities are limitless. To give your ceiling an elevated effect, try painting the drop-down border a light shade and the recessed tray a deeper shade. The deeper color adds depth and creates the illusion that the recessed tray is farther away.
Faking the Look of Tray Ceilings
Homeowners stuck with eight-foot ceilings can achieve a faux tray by installing flat trim molding on the ceiling in the shape of a traditional border. After the trim is in place, the ceiling on the outside of the trim can be painted a different color from the ceiling inside the border to create a visual separation.

Installing a Tray Ceiling
The installation process for a tray ceiling differs, depending on whether the ceiling is constructed during the building of the home or a remodel.
New Construction
- During the original construction of your home, your builder will arrange to install a tray ceiling that does not require lowering the ceiling height to accommodate the drop-down border. If the builder is ordering roof trusses instead of stick-framing, the trusses will be engineered by the truss manufacturer to accommodate the tray ceiling. Both stick-framing and truss-setting are jobs to be done by building professionals.
Retrofitting
- Recessing a tray ceiling within an existing ceiling requires modifying the ceiling joists or trusses, which should only be undertaken after consulting a structural engineer or the manufacturer of the roof trusses for instructions. In some cases, it may not be structurally sound to modify the framing. This project also requires obtaining permits because the home’s structure is being altered. It’s strictly a job for the pros.
- If ceiling height allows for the installation of a drop-down tray ceiling, the process is much simpler than recessing the tray within the joists or trusses. It involves constructing the drop-down frame of the tray ceiling border, which is then covered with drywall and finished. A handy do-it-yourselfer with carpentry knowledge might be able to build this type of tray ceiling.
- A faux tray ceiling can be DIY-installed by attaching trim molding to the ceiling where you’d like to create the tray effect and then painting the center of the ceiling a darker color than the surrounding border to create a three-dimensional feel.