Building a Pitched Roof
Bob reviews the construction of the pitched roof, from the framing to the shingling.
Clip Summary
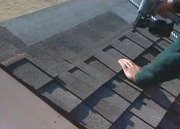
Bob takes a look at the Certainteed Landmark shingles selected for this project. Fabricated with a dragon's tooth angle, the Landmark shingles give the impression of a handsplit shake roof.Next, Bob flashes back to the construction of the roof. After the of raising of the laminated veneer lumber (LVL) ridge beam onto the gable ends, Bob walks through the various steps in the process-- laying out 20-foot 2-by-10s for the rafters, marking a ridge cut at the top of each rafter and a crow's foot at the bottom, positioning and securing the rafters to both sides of the ridge, applying the CDX plywood sheathing followed by an ice and water barrier (as underlayment for the first course of shingles), nailing on the aluminum drip edge, and the application of the first course of shingles.
Once the first course is finished, felt paper is stapled to the rest of the sheathing as underlayment. After the roofers have finished shingling all the way to the top, workers add ridge vents and soffit vents to prevent moisture from building up under the shingles.