The next thing we have to do out here is work on the shutters on the windows.
As you can see here, we have one of the old shutters that had come off.
It's in a lot of disrepair.
We have some broken areas here.
It's more than likely also covered with lead paint.
So, between trying to retrofit these and to fix them up and put them back on, it's really not worth the time and effort.
So we have these new shutters from J & L Shutters.
They're a Permex synthetic material.
They are pre-painted from the factory with a 10-year guarantee warranty, on the painting itself.
They are movable.
They also have metal reinforcements down through the stiles so that it's a much stronger shutter, and you never have to worry, for the next ten years anyhow, as far as repainting them or fixing them.
These shutters from J&L also come with some historic style hinges.
You can see on the back we've already installed the hinge section to the shutter itself.
All the screws are stainless steel, so you don't have to worry about them rusting over a period of time.
And there's also the hinge part, the hinge pen which goes on the window casing itself, which will eventually slide in.
And it will be a working shutter, as well as decorative.
I've already taken the time and done my measurements.
You can see here, I've already identified the drilling holes that I want to put a pilot hole in.
You always want to make sure that you drill a pilot hole,
Frequently, if you don't, what will happen is when you try to put the screw in, it will actually split the wood and your screw will not , will eventually weaken and let go.
With the pins on the outside casing, then you pick up the shutter, you line up the hinges on the back with the pins on the casing, and then it just slides right down in place.
There you have a shutter now that is operable and functional.
The last thing to do is to put on the shutter dog, which goes down at the bottom, which actually holds the shutter in an open position.
First thing we have to do is line it up where we want it, and then make a mark on the wall so that we can drill a hole.
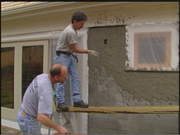
Now because this is a stucco house we're going to use a masonry bit initially to drill a hole into the stucco itself.
If we tried to do anything else, chances are the stucco itself would just flake off.
Once we've gotten through the stucco we change over to a standard bit because we want to be able to drill a pilot hole into the sheeting itself.
If we didn't, what would normally happen is once you put in the lag bolt it would have a tendency to want to crack the sheathing over a period of time and once again you'd lose the strength of it.
You could just screw these right to the house, but then you'd lose some of the historic value or appeal.
You have the old-style hinges, when you want you can actually use them and close the shutter, so that it actually can protect the windows in the case of a bad storm.
And these are also made of Permex material which will not rot, warp or, crack, so they'll last a very long time and you'll really enjoy them.
And that will wrap us up for today.
Next week we're going to be showing you a recap of the waterproofing system we've put in the basement as well as window treatments, some nice new appliances for the laundry room and a whole house audio system.
So then I'm Bob Vila, thanks for joining us.