We may earn revenue from the products available on this page and participate in affiliate programs. Learn More ›
The holiday season comes with so many traditions—cooking and baking, house decorating, caroling, and cocoa making—but few are as beloved as the gingerbread house. While some folks opt for the ease and convenience of a kit, I always think it’s worth it to make a gingerbread house the old-fashioned way—that is, from scratch. Follow these steps, and you can achieve results that are good enough to eat, whether it’s your first attempt or something that your family does every year.
MATERIALS AND TOOLS
– Gingerbread cookie dough
– Rolling pin
– Flour
– Cookie sheets
– Parchment paper
– Pizza wheel
– Scissors
– Royal icing
– Pastry bag
1. Choose a Template and Make Your Dough
You can easily find gingerbread recipes and gingerbread house templates on the Internet, free of charge. Select your favorite recipe and template, then set to work. Remember that gingerbread dough is very sticky, so it’s easiest to work with when it’s chilled. Keep lots of flour on hand for your rolling pin and work surfaces.
2. Roll, Cut, and Bake Your House Pieces
Larger pieces of dough will be difficult to transfer onto the cookie sheet, so I recommend rolling your dough onto a piece of floured parchment paper. Next, lay your gingerbread house template sections over the dough. Cut around the template with a pizza wheel, removing excess dough as you go. Continue until you have cut one piece of dough to correspond with each part of the house, as dictated by the template. Now transfer the parchment paper, with the cut dough on top, to the cookie sheet. Bake the gingerbread slightly longer than your chosen recipe recommends, as softer pieces are much harder to manipulate than well-done ones.
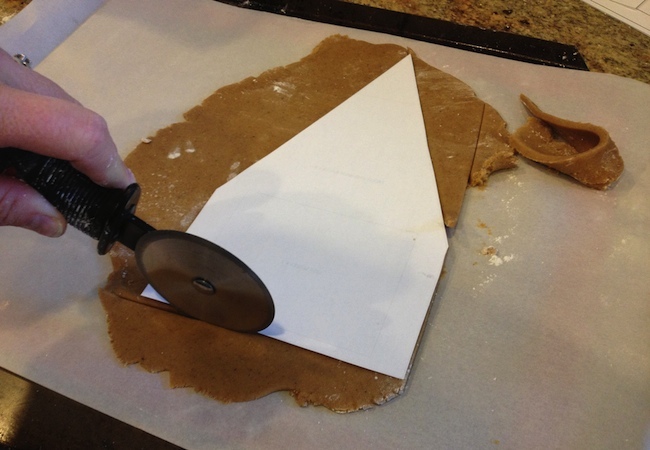
3. Trim Your Pieces
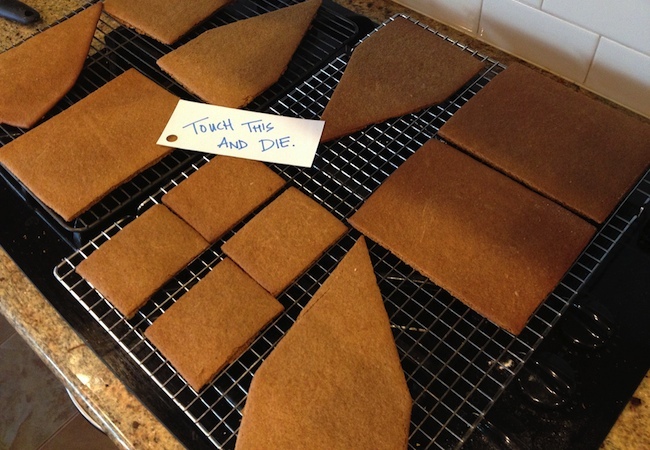
Inevitably, your gingerbread is going to morph a bit during baking. That complicates matters, because your gingerbread house will not stand properly if the pieces do not conform more or less precisely to the dimensions specified by your template. Therefore, immediately after removing the gingerbread from the oven (don’t even waste 10 seconds), lay the appropriate template back over each piece so that you can trim each one to its correct size. Feel free to eat any of the excess—hey, you deserve a snack! Before continuing on to the next stage, allow the gingerbread to sit on wire cooling racks for several hours or overnight.
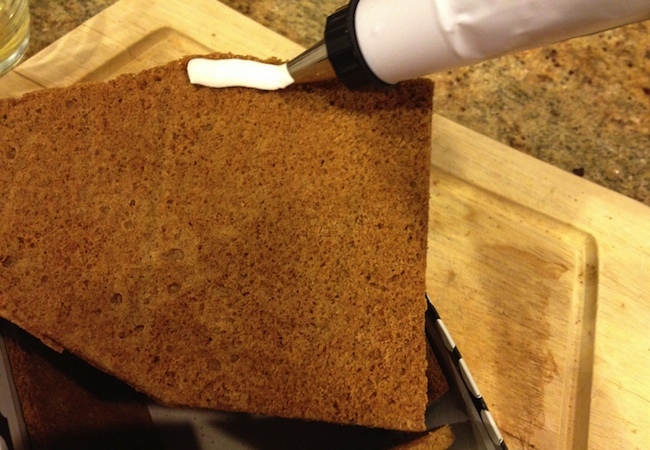
4. Make Royal Icing
Be sure to choose a recipe for royal icing that includes cream of tartar (it helps to keep the eggs from separating). Once you’ve finished making the icing, put it in a pastry bag fitted with a large piping tip. If there’s any icing left over, you can prevent it from drying out by keeping it in a bowl covered with a damp tea towel.
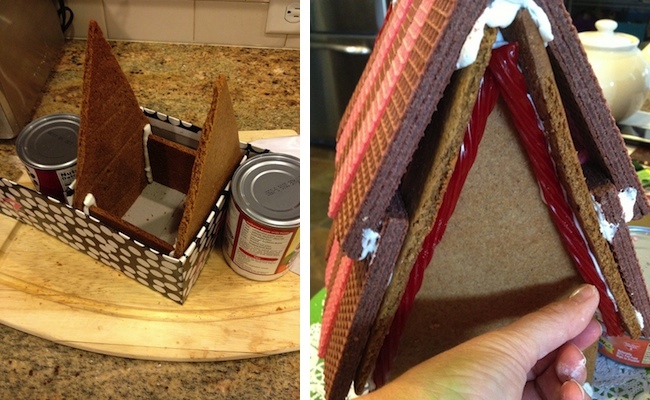
5. Build the Walls
If the walls of your gingerbread house are meant to form a rectangle, I suggest using a shoebox or something similar as scaffolding to lend support while the icing dries. First, dry-fit the gingerbread pieces to test that they align as planned. Next, pipe a thick bead of icing at each right angle. Finally, connect the pieces. Slide your shoebox against the walls, and if further support seems necessary, use canned food or heavy glass tumblers. Let the icing dry for several hours or overnight.
6. Raise the Roof
Remove any items that you were using to support the gingerbread walls, then proceed to add the roof pieces, again using piped icing as a bond. To keep the roof pieces from sliding down, prop them up with as many cans or tumblers as necessary. Allow several hours for the icing to dry, by which point the roof should be firmly attached.
7. Attach the House to a Base
Pipe icing onto the surface you have chosen to use as a base for your gingerbread house. Any stiff piece of cardboard will do the trick. (If you wish to dress it up, options include painting the cardboard, wrapping it in foil, or covering it with doilies). Carefully place the gingerbread onto the icing you’ve piped onto the base.
Related: 12 Architectural & Appetizing Gingerbread Houses
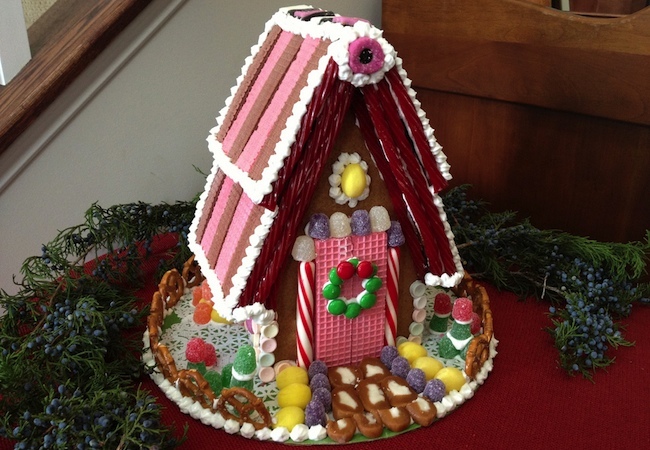
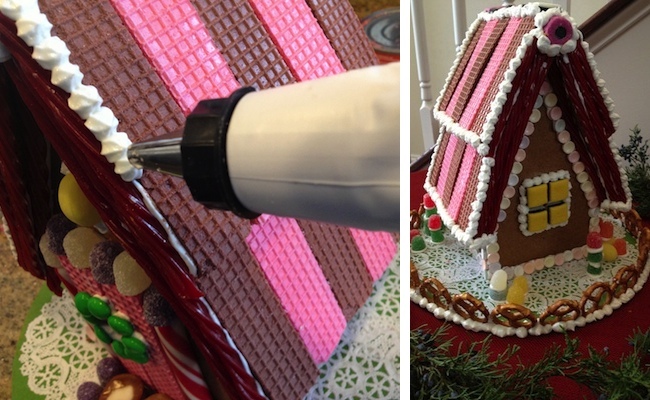
8. Decorate!
There are as many ways to decorate a gingerbread house as you can imagine. Those experienced with a pastry bag may wish to use only royal icing to create a simple, gorgeous, economical, and delicious effect. Or use the icing (applied with a smaller piping tip) as “glue” for your favorite candies in your favorite colors.
It takes time and patience to make a gingerbread house from scratch, and although completing one yields a tremendous sense of accomplishment, you may not have the energy or the spare hours required. Fortunately, there are plenty of shortcuts:
- Use a kit that includes prebaked pieces and everything you need to decorate.
- Buy a gingerbread house mold (you push in your dough, then bake, and your pieces come out perfect every time).
- If you don’t care about the gingerbread house being 100 percent edible, you can use hot glue to connect your walls and roof pieces.
- Rather than making a gingerbread house that stands on its own, go easy on yourself by attaching your pieces to a shoebox or something similar.
- Almost any kid would be happy to make a gingerbread house out of graham crackers—no baking necessary, and the construction stage is more forgiving.
However you choose to make a gingerbread house, concentrate on having fun! That way, you’ll have a new family tradition to anticipate year in and year out.