
We may earn revenue from the products available on this page and participate in affiliate programs. Learn More ›
Walls framed by baseboards and crown molding exude unmistakable character and polish, most notably in historical homes adorned by ornate crown moldings, built-in bookcases, and pocket doors. Decades of paint, however, can detract from the craftsmanship of these beautiful elements, blur their clean lines, and obscure the wood’s natural beauty.
Whether you’re trying to restore antique wainscoting, window casings, or a once-beautiful built-in bookcase, the most crucial—and, unfortunately, also the toughest—part will probably be stripping the old paint from the sections of decorative trim before applying stain or a fresh coat of paint. Don’t get discouraged. While removing layers of paint from intricate trim is labor-intensive, the right tools and techniques (and a little patience) can return even the most elaborate moldings and custom woodwork to their former good looks.
Tools & Materials
Bobvila.com may earn a commission from purchases made through these links.
- Protective goggles
- Respirator mask
- Work gloves
- Drop cloth
- Chemical paint stripper
- Paintbrush
- HYDE Quick-Release Contour Scraper
- 80-grit foam sanding block
- 80-grit sandpaper
- 120-grit foam sanding block
- 120-grit sandpaper
- Rotary tool with sanding bit
- Cotton Rags
- Tack cloth
STEP 1: Protect yourself and the room, and ensure adequate ventilation.
First, pull on your protective gear—old clothing, goggles, a respirator mask, and solvent-resistant gloves—and then start prepping your work area.
Drape a chemical-resistant tarp or drop cloth over the floor as well as over any large furnishings that can’t be moved or built-ins that aren’t part of the job. While a few of the newer paint strippers on the market are low-VOC, which means that they contain fewer volatile organic compounds, many emit toxic fumes, so adequate ventilation is essential. Open a window and use fans to create a cross breeze, and if your stripping project is on the larger side, consider erecting barriers to reroute foot traffic around the project area—especially if you’re living in the house while you’re working on it.
The upside to stripping paint from trim is that you can do a little bit here and there, as time permits. You won’t have to set aside an entire weekend and work from dawn to dark, but you should still steer your household members away from the work zone in the meantime.
STEP 2: Brush a paint stripper onto the molding.
Next, apply paint stripper to the trim or molding with a natural-bristle paintbrush. (Plastic bristles can melt when dipped in stripper.)
The trick to dissolving old paint successfully is to follow the manufacturer’s instructions to the letter. Not all strippers work the same way. Some aggressive strippers soften paint in as little as 30 minutes, while others require hours of wait time and repeated applications. Some are runny, and some have a gel consistency. Make sure, no matter what type of stripper you’re using, to apply it carefully to all the creases and tiny nooks found in detailed trim, working it in with the tips of the bristles.
Brush on only as much stripper as you have the time to scrape after the paint loosens. If the stripper dries before you scrape it away, you’ll have to reapply it.
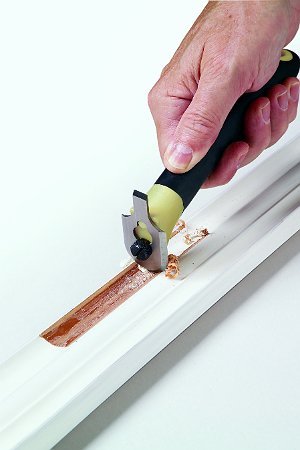
STEP 3: Scrape away the softened paint.
Once the solvent has set for its required amount of time, peel away softened paint with a contour scraper, such as the HYDE Quick-Release Contour Scraper (view on Amazon). This handy tool replaces a dozen separate scraping devices thanks to its six swappable stainless steel blades—each featuring two distinctly different scraping tips—that will fit virtually every size curve and contour you will encounter on wood trim. And with the tool’s quick-release feature, it’s a cinch to switch blades. Once you have affixed the appropriate blade for the section of trim you’re working on, begin scraping the softened paint, keeping one hard-and-fast rule in mind: Pull, don’t push! By pulling the blade at an approximately 45-degree angle, you will safely remove loosened paint without digging chunks out of the wood.
If the trim has multiple layers of old paint, as is common in many historical homes, you may have to repeat stripper application and scraping until you reach bare wood.
STEP 4: Sand the molding in the direction of the grain.
Sand the trim with 80-grit sandpaper or, better yet, an 80-grit foam sanding block, which more easily fits itself to the curves and creases found in trim work. Always sand in the direction of the wood grain to avoid leaving cross-sanding marks. When the wood is no longer rough and the dried bits of residual paint have been rubbed off, switch to 120-grit for extra smoothness.
For intricate wood rosettes or detailed trim ornaments that you can’t adequately sand with sandpaper or a foam sanding block, you can try using a handheld rotary tool fitted with a pointed sanding bit. Proceed with great caution, though, as one slip can gouge the wood. Make sure the lighting is good, use extremely light pressure, and take frequent breaks until the job is complete.
STEP 5: Bleach the wood molding if you plan to stain it next.
In some cases, the old paint may leave behind a tinge of color on the wood grain. If you plan to apply a smooth layer or two of fresh paint, this seeped-in color won’t affect your project. But, if you’re going to stain the wood, you will first need to bleach it. Wood bleaching removes color stains, but it also lightens the natural wood grain. If you’re refinishing a walnut staircase, for example, plan on applying a quality walnut stain afterward to restore the wood’s natural tones.
Choose a wood bleach formulated to remove pigment-based color, rather than household bleach, which irritates skin and mucous membranes and removes only dye-based color. Take the same safety precautions with the wood bleach that you took when applying the stripper, and follow the manufacturer’s application instructions closely. Most wood bleach products come in liquid form, which is then wiped on with a clean rag and left to dry. As bleaching wood raises its grain, lightly sand the color-free trim again until it’s smooth enough to wipe a tack cloth over the surface without snagging. Make sure the wood is thoroughly dry before applying stain or other coating.
This post has been brought to you by Hyde Tools. Its facts and opinions are those of BobVila.com.