Hi, I'm Bob Vila.
Welcome home again.
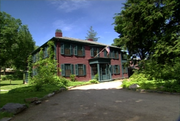
As you can see, we've finished all the exterior painting on the house.
And boy, I love the color.
Today we're working indoors.
We're going to be showing you how to install a brand new lavatory in the powder room under the staircase, and how to put in the brass spinnings.
And then we're going traveling to Kohler, Wisconsin to visit the folks at Kohler who make all those plumbing fixtures.
And I've also got another delivery from California Closets.
I'm going to show you these beautiful mahogany built-ins in my closet.
Stick around.
It's good to have you home again.
Bob Vila's Home Again.
You know, for a shingle-style house, or any style house, it's unusual to have this kind of front porch which is almost a square notched out of the house itself.
And I think what happened here is that originally this was a veranda all the way across.
And they enlarged the living room and enclosed part of that veranda and just left this as a new front porch.
I love the details here, though.
We've picked this color scheme on purpose.
It'sClearly a Victorian color scheme with the mulberry on the shingles and the very dark essex green on all the trim.
And then we've done other things like blacken the actual sash so that all the mutton bars become really very thin, slender and you hardly notice them.
And then things like the ceiling here in the porch which is a beadboard ceiling.
The Victorian's very often would have painted them blue.
Actually, even earlier houses would have had ceilings like this painted sky blue.
We've done that.
The railing that will go back here is still being milled, but these are the original columns and they're kind of a tusk in a order.
They're very simple column that just tapers a little bit towards the top and has a very, very simple capital of just some concentric rings.
We've taken this as inspiration for a new detail in the front hall.
Come on in.
Now this house was renovated probably around 1970.
And one thing that happened was that most of the detailing, picture moldings, chair railings, door trim were thrown in the dumpster and when we got here, we had flush doors as you see here and we had very little detailing of any sort and what the architect has done is to give me more detail that would be more appropriate to a house of this age.
In fact, this, as I said a minute ago, is echoing the columns that we see on the front of the house.
And I want you to look at how it has been designed, because the proportions are important.
The base is just made out of poplar.
All of this is going to be painted, but we continue to repeat this motif of the recess panels with the molding that matches the original doors in the house.
And then of course we've got two of these columns which are of the Tuscon order which is basically a renaissance version of an ionic column, and then the most beautiful detailing is what's known as an architrave, which is basically a header.
But if you look at this.
This is all made from one piece of wood up here hich was originally a 5 quarter thick piece of poplar about 12 inches across and there is a Machine that will actually bring the wood through the cutter and move it at an angle in order to create that curve all out of one piece.
Now the wood is an expensive but the machine time adds up to a few hundred bucks just to make these cuts as I was saying.
And I am going to interrupt David Ive here.
David you have been doing a beautiful job on this.
Thank you.
Congratulations.
Where did the columns come from?
These are from Pennsylvania, they are staved units that got 11 pieces in them.
And when you are saying staved that means that each well, like a barrel is staved.
Exactly like a barrel.
Indeed and you can see it there.
And so that's the way they would have been made a hundred years ago, right?
Yes they would, and they turned them on a lave to get this column, design like this, and they did the same thing out of the front porch.
The same type of a column unit.
Now you've created the same kind of pedestal here .
And you backed it up with what i guess would be called the pilaster of the up against the wall.
And this all these elements coming together really helped define and separate what is our vestibule from the main hall, now how do you put that column in there?
Well, we have these measured just exactly to fit and what they they do is fall right in place, all marked and laid out, so that they go in very soon, because this is the final detailing here and this has to go in its clean as possible.
And that's just exactly how it goes in, just a few adjustments here and that's it.
And then will you actually put nails through there?
Yes, it will be tacked with fine tacks, and it is set to go.
Great.
Thank you.
Okay.
Lets take a look at the end of the hall where we have a beautiful new floor in the power room.
The case work in this hall really is gonna be a spectacular when it is painted out and we put the wallpaper in.
And, look at this floor, this is a true mosaic it's made out of several colors of marble that have been tumbled to give them kind of a warn and ancient kind of a effect, very very beautiful product, and in here we always had a half about room under the staircase, at least probably for the last 50 or 60 years.
We have just totally redone it, new plaster etc.
We got a new collar toilet in tender grey which is a very very nice color, but what I like is the design of this, kind of reminiscent of early toilet fixtures from the turn of the century where they had a tank like that lifted up a little bit.
And then in the corner this is small space and you got to fit things.
In the corner we have got, a vanity this has this half circle designed in to it, and circular doors, these were made by our friends out in New Holland Pennsylvania, Heritage.
And then what we are dealing right now is spitting a Carola marble top that has to be precisely fit in, and also we are installing the sink and fittings.
If you think about it, you don't ant to do it here, you want to do it-- well, let's go in the living room, we will get together with Ron Idorola, who is the middle of doing this.
Hi Ron.
Hi Bob.
Pretty obvious, how you are doing, you turn it up.
Upside down, and you install the sink and the fittings in this position, so you don't have to go like a garage mechanic on your back.
That's right.
Inside the bathroom.
So, let's talk about the sink here.
How have you attached this sink to the marble top.
Ok.
We've used the vinyl adhesive caulking and.
So there's a bead of vinyl adhesive caulking all the way around the sink.
Yes there is.
And
And then just these clamps here.
And then there are these clamps that are supplied by the factory, the coal factory.
Yeah.
With lead shields that have been drilled into the marble by the marble company.
Yes so it's a pretty complicated thing, you got to specify exactly the size of the marble of course the architect made a template for the marble company to work with.
Tip this up so we can all take a look.
Isn't that beautiful?
Yeah, again its the same gray and this is a very close approximation to the type of early plumbing installations you'd see in the 1890's.
Careful with that.
OK.
Whats next?
We're ready to put this other faucet in.
We're ready to put this faucet in it but we have to put some seal, sealant here, you really shouldn't be using any plumber's putty because They claim that it will damage the marble.
Oh yes, anything with an oil base to it.
If you use it as a caulking product around marble, it can ruin the marble, because it is a very porous stone.
And, you don't want that to happen.
Ok, we position this, this way.
Bronze and copper .
Beautiful.
We have to be very careful not to crack the marble and the marble is very easily cracked.
So you can't apply too much pressure on that.
Yeah, that's correct.
OK and now the mix review i see in the middle but you are connecting with, well this is new to me.
It's kind of a vinyl tubing?
It's a vinyl tubing that has a woven fiber glass mesh inside and it's.
Lot easier to work with I'd say.
Yes, it is.
Okay.
It's easy to work with.
Okay.
Let's put that on.
And it's very difficult to kink it, which is good for the installer.
All right.
Well, let's tighten that up, and we'll go test it on the vanity.
But first, we gotta break for some messages and when we come back, we'll be visiting the colder factories, and cooler Wisconsin.


