
We may earn revenue from the products available on this page and participate in affiliate programs. Learn More ›
If you love tackling DIY home projects, then you know that a dedicated workshop in your garage, shed, or basement can be special. It’s a little corner of creativity and problem-solving right at home where you can make and fix anything and everything with your hands. It may even be your sanctuary where you can escape from the rest of the house and whatever is stressing you for a while.
But even the most well-intentioned workshop with a well-designed workbench can quickly turn into a chaotic mess of half-finished projects, mystery screws, and tools that seem to always get lost, which could end up stressing you out. “A workshop that’s well-organized is more enjoyable, more productive, and far safer,” says Gary Baxter, owner of Baxter General Contracting in Canton, Georgia. “With just a few systems in place, DIYers can keep their projects on track and their spaces usable year-round.”
We spoke to several experts about the best tactics to keep a home workshop in tip-top shape so you can relax and enjoy the space as much as possible.
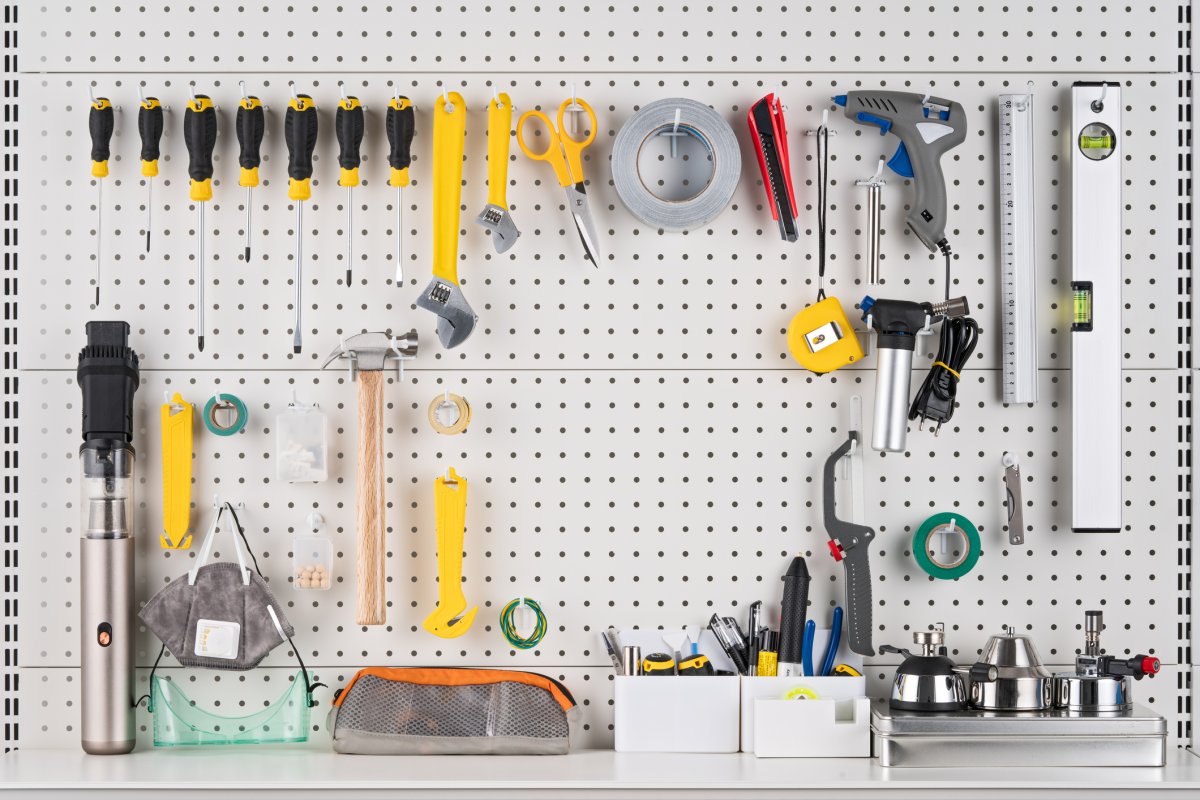
Give every tool a home.
Whether your work area is in your garage, shed, or basement, keep your workshop in order by designating a specific place for each tool, whether it be a hook, drawer, or labeled bin. “A home for everything and everything in its home,” notes Caden Wilding, vice president of marketing at Wilding Wallbeds in St. George, Utah. In his workshop, he traces the tools on the wall where they hang with a sharpie to leave a silhouette of what goes there and then writes the name in the silhouette. “So, on the 18-gauge brad nailer hook, there’s actually an outline on the wall of that tool and a label with the tool’s name on it.”
And Baxter recommends storing small parts together, such as nails, screws, bolts, and drill bits. “Store these items in clear bins, jars, or drawer organizers with labels so you never waste time digging for the right piece,” says Baxter. “An organized parts system saves frustration and money by preventing duplicate purchases.”

Organize by task.
Instead of organizing workshop products by type (e.g., keeping all screwdrivers together in one place), try storing them together based on task. This can help create a smoother workflow, save time and energy, and minimize clutter. “Group your tools based on what projects you use them for,” suggests Wilding. “For example, you will frequently use a brad nailer with your chop saw, so keep them next to each other. Better yet, store your glue bottle right there as well because you’ll be needing it at the same time.”
Take advantage of vertical space.
Using vertical storage solutions can be a game changer when it comes to organizing your DIY workshop, helping to free up floor space. It also prevents tripping hazards and makes cleanup faster, says Baxter. Consider installing wall-mounted pegboards, different-size hooks, shelving, overhead racks, and magnetic strips to keep frequently-used tools visible and easily accessible. This will also help keep your DIY workbench clear of extra clutter.
Designate zones for different work.
Another common tip is to create dedicated areas in the workshop for different materials. “A clean workshop starts with layout,” says Baxter. “Set aside one area for woodworking, another for painting/finishing, and another for general repairs. This keeps tools and supplies from overlapping and makes it easier to find what you need.”
Josh Qian, COO and co-founder of LINQ Kitchen in City of Industry, California, uses an organizational technique that allows him to keep all project items in a designated area, such as a container, tray, or rolling cart. “Containing all the tools, materials, and hardware for one project can eliminate the unwieldy and chaotic mess that stems from working on multiple projects simultaneously,” explains Qian. “When I finish the previous project, I put everything back in its place before starting the next project.”
“An organized parts system saves frustration and money by preventing duplicate purchases.”
Gary Baxter, Baxter General Contracting
Clean and declutter daily.
Another helpful way to keep your workshop in the best shape possible is to clean up as you go. “Instead of waiting until the end of the project for one big clean-up, start making a habit of cleaning the messes you make when you make them,” advises Qian. When you finish cutting a piece of wood, for example, sweep the sawdust off the work table and dispose of scraps right away. “All of the little efforts will feel less overwhelming than a single massive effort to correct the mess, thereby allowing you to maintain a consistent flow and pace while working on your projects.”
Invest in an effective vacuum to control dust in your workspace to help protect your health and tools. You may also want to add a dedicated air filtration system to deal with the finer airborne dust. “Keeping sawdust and other debris cleaned up regularly, especially when working on a project, will prevent dust from entering the motors of your tools,” explains Qian.
