We may earn revenue from the products available on this page and participate in affiliate programs. Learn More ›
When faced with a project like removing paint from furniture or adhesive from metal, plastic, or wood, and a hair dryer isn’t doing the job, a heat gun can be your new go-to tool. Unlike hair dryers, which reach a max temperature of about 140 degrees Fahrenheit, heat guns can reach 1,000 degrees Fahrenheit or more.
With great temperature comes even greater responsibility. It’s essential to never use a heat gun with its constant stream of intense heated air around pets or children, and donning personal protective equipment like thick heat-resistant gloves, long sleeves, and eye protection is a must. In addition, you should always conduct a lead test for paint that could have been applied before 1978.
Beyond safety, there’s a lot to know about heat guns. A handy tool that is growing in popularity, a heat gun has versatile attachments, specific set-up requirements, and a wide range of projects for which DIYers can reach to the tool for help. Here’s what you need to know before you pick up a heat gun and how to use a heat gun to remove paint.
Parts of a Heat Gun
Before you buy a quality heat gun that’s right for your projects, it’s important to know about the tool’s common features. Some heat guns offer just a few temperature settings, while others have more. Some models come with helpful hanging hooks and safety shutoffs. Here’s a quick look at some heat gun parts.
- Temperature control: Can be a dial or an LCD display.
- Fan speed: Adjustable speed control allows for lower fan speeds for detailed work and higher speeds for when you want to tackle a large area.
- Safety shutoff: Can turn off automatically so the heat gun does not overheat.
- Nozzles: Cone nozzles, spoon reflector nozzles, and flat nozzles are among the most popular. Flat nodules often help with pain removal, slot nozzles for air welding, and reduction nozzles for soldering.
- Hanging hook: Helps make it easier to store the tool.
- High-temperature protection: Helps hands stay safe while using the tool.
Common Types of Heat Guns
There are four types of heat guns: electric, gas, industrial, and infrared. Electric heat guns are either corded or cordless, and usually the least expensive. Gas heat guns use propane or butane gas and require the use of gas canisters to operate. Industrial heat guns offer higher levels of heat and fan settings, and are mostly used in heavy-duty applications and industrial settings. Infrared guns are newer and offer temperatures greater than is needed in most home projects. These days, the most popular types used in homes are corded and cordless electric heat guns.
1. Corded Electric Heat Gun

Among heat guns that DIYers turn to for home improvement projects, corded electric heat guns are the most common. With the cord running to a constant power source, the heat gun offers unlimited runtime, so this is a good pick for jobs that take a long time, like removing paint. Since they don’t have a battery that adds weight, they are lighter than cordless options and they cost less. Corded electric heat guns often offer higher temperatures than cordless, too. Just don’t ever use an extension cord with a corded heat gun, since that could create a fire hazard. Always plug directly into a wall outlet.
Our Recommendation: DeWalt D26960K Heat Gun at Amazon for $129.99
Inside the included carrying case are seven attachments, along with the heat gun. The heat gun has an LCD display that allows you to change the temperature and an overload feature that prevents overheating by shutting down the tool.
2. Cordless Electric Heat Gun

Portable and convenient, cordless electric heat guns have no need for an outlet so you can use them wherever your project is located without worry about plugging into a wall outlet. Newer on the market than corded heat guns, they are still a little less powerful and a better option for light-duty tasks like making craft projects, removing adhesives or melting plastic. Without the cord, they offer easy maneuverability. However, cordless electric heat guns are more expensive than corded models and the battery adds weight.
Our Recommendation: DeWalt DCE530P1 20V Max Cordless Heat Gun at Amazon for $179.99
With a kit that includes two nozzles, the DeWalt 20V Max Heat gun offers two heat settings and is battery-compatible with other DeWalt tools.
Heat Gun Safety Tips

Since a heat gun creates a constant stream of hot air wherever it is pointed, it’s important to first learn how hot does a heat gun get, read all of the safety information in the user manual, and follow basic safety precautions. Heat guns can create temperatures up to 1,200 degrees Fahrenheit, so this is not a tool that you can just mess around with to figure out how to use it. Stay safe and follow these heat gun safety tips.
- Wear personal protective equipment, including thick gloves, long sleeves, and eye protection.
- Make sure your gloves don’t have any solvents on them.
- Keep a fire extinguisher nearby.
- Always start with the heat gun far off of the surface and then gradually move closer.
- Use a heat gun in a space that’s ventilated.
- Use the nozzle safety shield.
- Keep the heat gun away from anything flammable.
- Never point the heat gun at a person or pet.
- Do not use a heat gun on lead paint.
- Never point the heat gun in the same direction for too long.
- Always turn off the heat gun before setting it down.
- Wait until the heat gun is cooled fully before storing it.
Best Fire Extinguisher
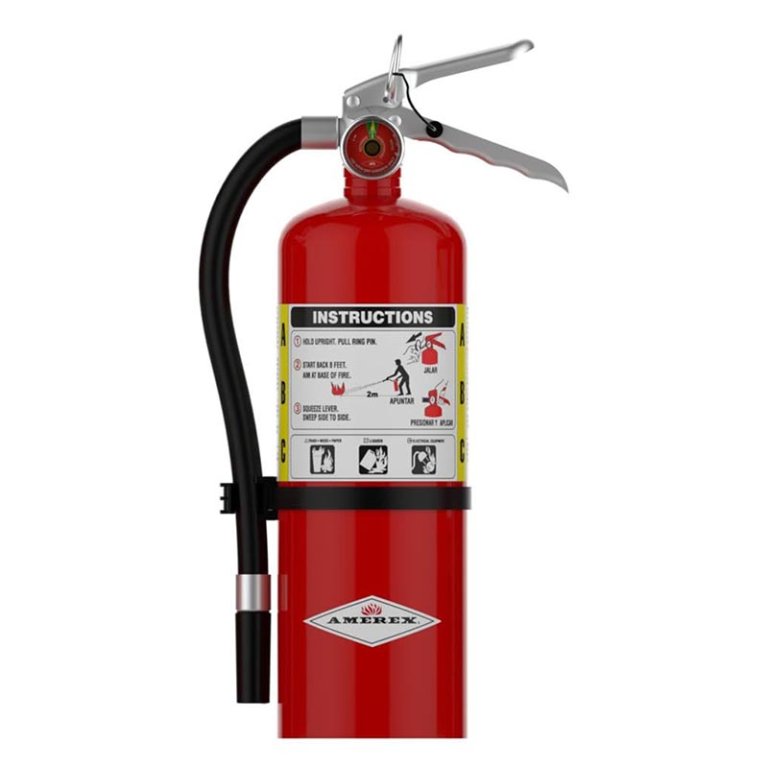
Amerex 5-Pound B500 ABC Fire Extinguisher
A tried-and-true, ABC-rated extinguisher with an easy-to-read pressure gauge. Read the full review.
See ItInitial Setup
Setting up a heat gun is fairly straightforward. After familiarizing yourself with the user’s guide, make sure you have an insulated area to set the heat gun after use. You can use a heat shield or soldering block. With the heat gun turned off, attach the desired nozzle and then plug the heat gun into a wall outlet that’s grounded. Wear the nozzle safety shield, gloves, face mask, and long sleeves while using the heat gun.
Tools & Materials
Bobvila.com may earn a commission from purchases made through these links.
How to Use a Heat Gun to Remove Paint
A fairly common use for heat guns, stripping paint from furniture or trimwork is a task that many DIYers can safely tackle. Considered a heavy-duty job for a heat gun, stripping paint benefits from up to 1,100 degrees Fahrenheit from a heat gun. If this is your first time using a heat gun, use a lower setting until you are comfortable with the tool and make sure to review the safety information listed above before turning it on.
Note: Do not use a heat gun on plaster walls or lead paint. We recommend using a lead paint test kit to find out if your paint contains lead.
Best Lead Paint Test Kit
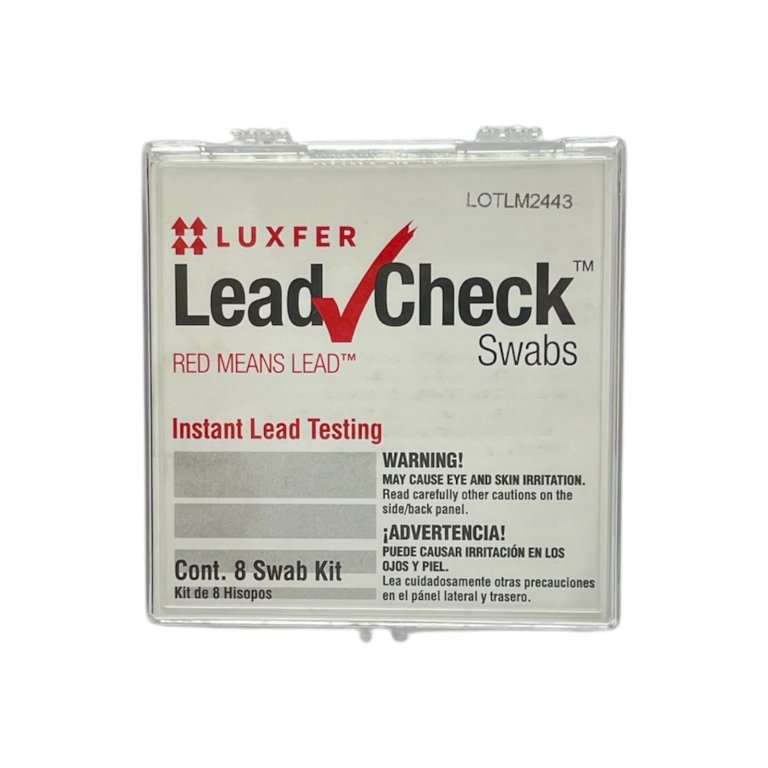
LeadCheck Disposable Lead Test Kit
This easy-to-read test with eight swabs turns red if lead is present. Read the full review.
See ItStep 1: Set up the work area and the heat gun.
Set out a drop cloth, put on gloves, safety glasses, and a mask. Make sure your space is well ventilated. Then with the nozzle safety shield in place and the heat gun turned off, plug the heat gun into the wall outlet if it’s corded. Don’t use an extension cord, as it could overheat. Then set the heat gun on the included kickstand.
Step 2: Check that the air inlets are clear.
A heat gun relies on a constant supply of air through its slitted air inlets at the back of the tool. When these are clogged—like from sawdust in your workshop—the heat gun can overheat to the point of it catching on fire. Make sure the air inlets are clear. If they aren’t, blow air to clear them.
Step 3: Choose the nozzle and attach it to the heat gun.
A nozzle attachment can help direct the flow of heat from the gun. For removing paint from a large surface, try the flare nozzle that is designed to concentrate the heat over a large area. If you are removing paint from crevices on detailed furniture, you might want to choose a more targeted nozzle and a thinner putty knife than you use on flatter surfaces of the furniture.
Step 4: Select the right temperature setting.
If this is your first time using a heat gun, set the temperature at the lowest setting and practice the following steps before setting the temperature to the user manual recommended temperature, which is typically at least 700 to 1000 degrees Fahrenheit. This is usually an effective temperature setting for removing paint.
Step 5: Keep your heat gun at least 2 inches from your work surface.
With your heat gun positioned about 2 inches from the painted surface and at a 45-degree angle from the surface, turn on the heat gun. The paint should start bubbling up. The goal is to loosen the paint with the heat but not burn the paint.
Step 6: Move the gun back and forth over small sections.
Keep the heat gun moving back and forth over a small area. Do not let it linger in one spot, as it could burn the surface. Then, use a scraper to help remove the softened paint at a 30-degree angle to the work. Push the paint away from you with a putty knife or paint scraper. For detailed areas, use a contoured scraper. Dump the scraped paint into a metal bucket or coffee can as you work.
Step 7: Turn off the heat gun.
Always turn off the heat gun before putting it down on an insulated surface like a steel heat shield or soldering block. Use the tool’s kickstand, if it’s included.
Step 8: Let the heat gun cool before storing it.
Wait until the heat gun is fully cool before storing it away. It usually takes at least 30 minutes for a heat gun to cool to room temperature.
Heat Gun Uses

There are a variety of heat gun uses, from heavy-duty jobs like paint stripping and bending plastic to arts and crafts projects or defrosting metal pipes during the winter. For bigger jobs, like removing paint from siding, consider using an infrared heater instead of a heat gun.
- Removing paint from wood, metal, or plastic is a common use for a heat gun. Make sure you use the appropriate temperature setting as detailed in the tool’s user guide.
- Bending plastic plumbing pipes is a common use for plumbers or DIYers.
- You can use a heat gun for crafts, usually at lower temperature settings. For example, you can use a heat gun for heat embossing, drying inks, and applying glitter.
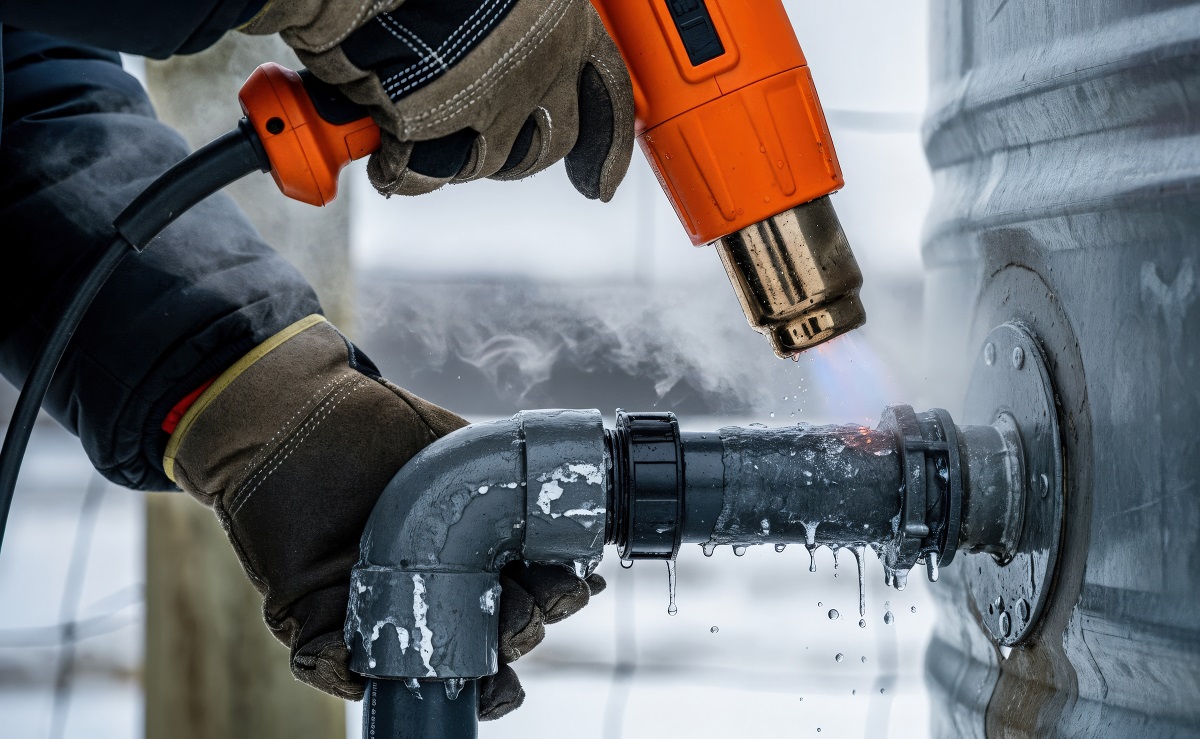
- A heat gun can help defrost metal pipes during the winter.
- Repairing plastic materials is possible with a heat gun, but it’s an advanced task.
- Soften adhesives from floor tiles or other materials around the house with a heat gun.
- Applying shrink wrap is a heat gun task, but sometimes a hair dryer can do the trick.
- Help along the task of loosening bolts and screws with a heat gun.
- Remove wallpaper, as the heat gun loosens the wallpaper adhesive.
- Loosen solder joints or solder circuit boards with a heat gun. However, a propane torch might be a better bet for soldering.
Heat Gun Maintenance Tips
Just like all of the other power tools in your arsenal, it’s important to maintain a heat gun so that it’s safe and effective to use. Also, proper maintenance extends the useful life of the tool, which can be a big money saver down the road.
- Clean a heat gun regularly, according to the manufacturer’s directions.
- Use the cool-down setting when available, and always cool down completely before storing a heat gun.
- Store properly in the case to keep it clean.
- Take breaks while using a heat gun so you are less likely to make fatigue-related mistakes.
- Replace any worn parts and inspect abnormal sounds before using your heat gun.
- Avoid the highest temperature settings for extended periods of time.
Final Thoughts
A heat gun can be a handy DIY tool for so many types of projects, from crafts to home improvement. But the most important part of using a heat gun effectively is being cautious and safe while using the tool. It’s always important to read all of the directions before turning on a heat gun, so you know when it’s safe to turn on and how to avoid causing an accidental burn or fire. Keep a fire extinguisher nearby and maintain your heat gun according to the manufacturer’s directions so that it remains a reliable and safe tool to use in your projects.
