
We may earn revenue from the products available on this page and participate in affiliate programs. Learn More ›
There are a wide range of tools that can be used for DIY projects and in professional settings, but an angle grinder tool is one of the most versatile because of the variety of angle grinder uses. Depending on the angle grinder wheels or discs you have, using an angle grinder to cut steel or other metals, to sand surfaces, or to grind away old paint and layers of metal is well within the possibilities for this tool.
I have used angle grinders for a wide variety of professional jobs during plumbing installations, repairs, and wire runs, and for tasks that range from cutting through old galvanized iron water pipes or conduit to grinding mortar lines and even cutting tile.
However, if this tool is not used properly, it can put the user and anyone nearby at substantial risk, which is why it’s so important to learn the various parts of an angle grinder, as well as angle grinder safety. Use this guide to discover the ins and outs of this versatile tool and find out how to use an angle grinder properly.
Essential Gear

The DeWalt 20V MAX* Cordless Angle Grinder packs serious power into a compact, brushless design with a paddle switch and kickback brake for added safety. This pro-grade tool is built to handle tough grinding, cutting, and polishing jobs without the cord. For more recommended options, check out our guide on the best angle grinders.
Important Angle Grinder Parts
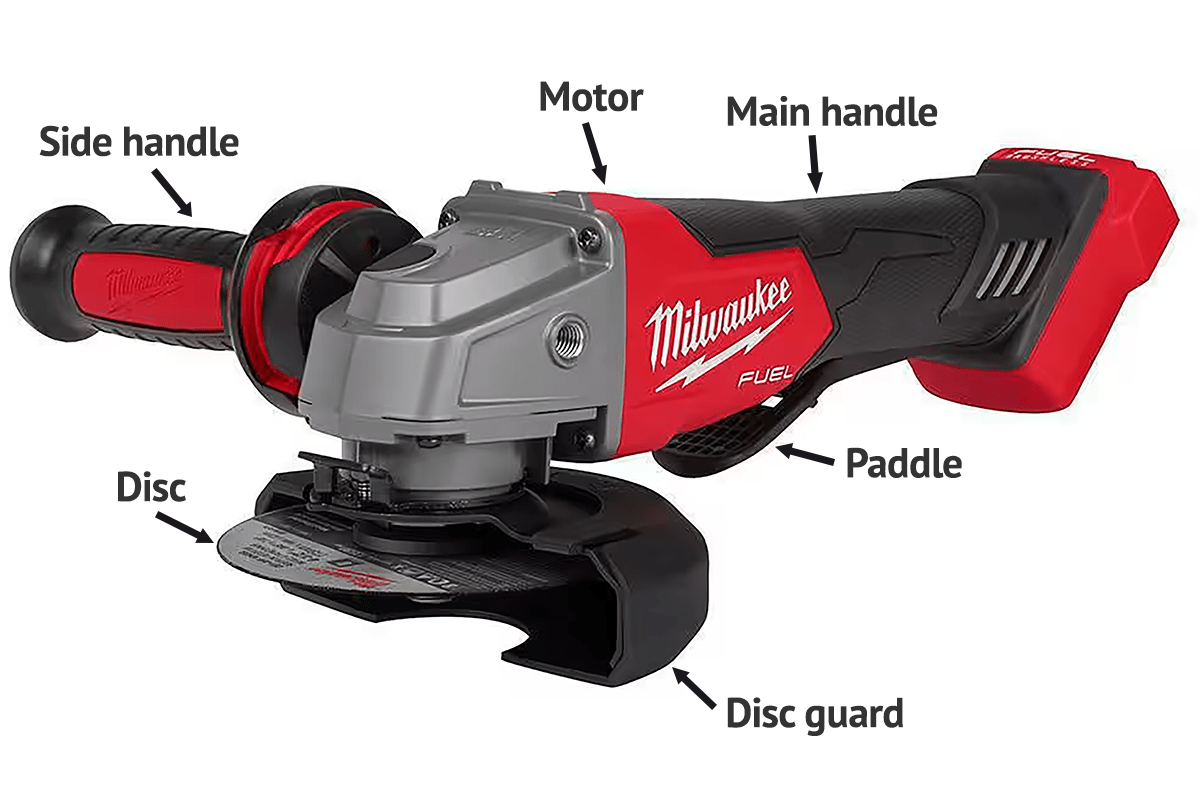
I have always found that knowing the key parts of a tool like an angle grinder is essential for avoiding mistakes. Learning these important angle grinder parts will help you use and maintain the grinding tool safely. You’ll also find out which parts are involved in switching out the disc.
- Disc: The main part of the tool for material removal, it rotates rapidly to provide abrasive force and can include cutting, grinding, or sanding discs.
- Trigger, switch, or paddle: A button, trigger, or paddle that is pressed or squeezed to turn the grinder on.
- Safety lock: A safety feature present on most angle grinders that must be pressed at the same time as the trigger before the grinder will start.
- Disc guard: This semicircular piece of metal sits around half of the disc and can be removed or rotated for the best protection.
- Main handle: Located at the back or front of the body, this is the main handle you grip to control the angle grinder.
- Side handle: A removable handle that attaches to the side of the angle grinder for two-handed use, improving control and accuracy.
- Spindle lock: A button that can be pressed or held to lock the disc in place while you loosen the arbor nut and change the disc.
- Arbor nut: A nut located on the underside of the disc that secures the disc to the grinder.
- Battery or power cord: Cordless models have a rechargeable battery that sits at the back of the tool, while corded models have a power cord that extends from the back of the body.
- Motor: Typically located at the back or front of the body, the motor provides the power necessary for the disc to rotate at high enough speeds to cut, grind, or sand.
Our Recommendation: Milwaukee M18 Cordless Angle Grinder – Get it at The Home Depot for $229.
This Milwaukee angle grinder is a cordless model, increasing the user’s mobility and preventing the restriction of a power cord. It features a powerful motor that can rotate the disc at up to 8,500 RPM, as well as a paddle switch design that makes it easier and more comfortable to operate the angle grinder in various positions and for extended periods.

Angle Grinder Safety Tips
Like most tools for grinding metal, sanding, or cutting through hard materials, DIYers and pros alike need to be cautious to avoid personal injury. I have personally seen the aftermath of a worker who chose to use an angle grinder with a damaged disc while working upside down in a crawlspace, leading to permanent damage to his left hand when his tendons were severed due to the disc catching on the pipe he was cutting and kicking back. This cautionary tale should be a clear warning that very real consequences wait for anyone who doesn’t respect the tool and take proper safety precautions.
- Make sure to always use proper personal protective equipment (PPE), including safety glasses, a mask, hearing protection, and cut-resistant gloves.
- Before use, check to make sure the disc is in good condition and that it is properly mounted and secure.
- Improve control and accuracy by using both hands to operate the angle grinder.
- Always be aware that the tool may kick back if you apply too much force or if it catches on the material, and maintain a firm grip to resist any force.
- Let the disc do the work, applying consistent pressure instead of forcing the disc into, across, or through the target material.
- When using an angle grinder to cut metal, like screws or pipes, always make sure the disc is up to full speed before engaging the workpiece.
- Unplug or disconnect the battery before changing discs, and use the provided wrench to tighten the arbor nut, but do not overtighten.
- Keep the work area clear of any obstructions, hazards, or flammable materials.
- Open windows and doors for proper ventilation to avoid dust and fumes.
Initial Setup and Calibration
Even the best angle grinder will require an initial setup and calibration before you start using it. This ensures that the tool is safe and that you have the right disc for the job. First and foremost, make sure to inspect the disc and the tool for any damage. If you are sanding, grinding, or even cutting steel with an angle grinder, switch to an appropriate disc to handle the task.
Check to ensure that the guard is secure and adjusted to the right position to deflect debris away from you, as well as making sure that the disc is properly aligned. I prefer to add a side handle to my grinder and use two hands whenever possible for better control and accuracy, as well as to prevent kickback. Side handles can also be removed for work in tight spaces, but you will need to maintain a firm grip on the main handle to avoid costly mistakes.
How to Use an Angle Grinder for Grinding
Angle grinder uses include grinding a variety of materials, such as metal, stone, concrete, tile, and even wood, but you need to equip them with an appropriate disc suited for both the purpose and the material.
Step 1: Prepare the angle grinder and workpiece.
Begin by securing the target material or workpiece, if necessary. Some surfaces, like a tiled wall or an installed pipe, will already be held in place before you begin. Press the spindle lock and undo the arbor nut to switch out the grinder disc for one that is appropriate for grinding and then secure the grinder disc with the arbor nut. Put on personal protective equipment and check the angle grinder once more to ensure the disc and the tool are in good condition.
Step 2: Apply consistent pressure using the flat part of the disc.
The grinder disc will do the work for you, so you only need to apply light, consistent pressure to the target surface using the flat part of the disc for surface grinding and polishing. The speed and abrasion of the disc will remove material quickly and efficiently, but you need to hold the angle grinder securely to avoid losing control if it kicks back.
Any excessive force on the disc could increase the risk of damaging the material or even damaging the disc, causing it to shatter. If you are grinding narrow materials, like grout lines, use the edge of the disc to work between the tiles.
Step 3: Move back and forth in a smooth, continuous motion.
Hold the angle grinder at about a 15- to 30-degree angle with the flat part of the disc moving back and forth over the target surface. Make sure to move the angle grinder in a smooth continuous motion to avoid creating any grooves or accidentally damaging the work surface.
As you remove layers of material or polish the surface, keep the angle grinder moving as long as it is in contact with the material. If you need to take a break or when you are finished grinding the target area, pull the angle grinder away from the work before stopping the motion of the tool.
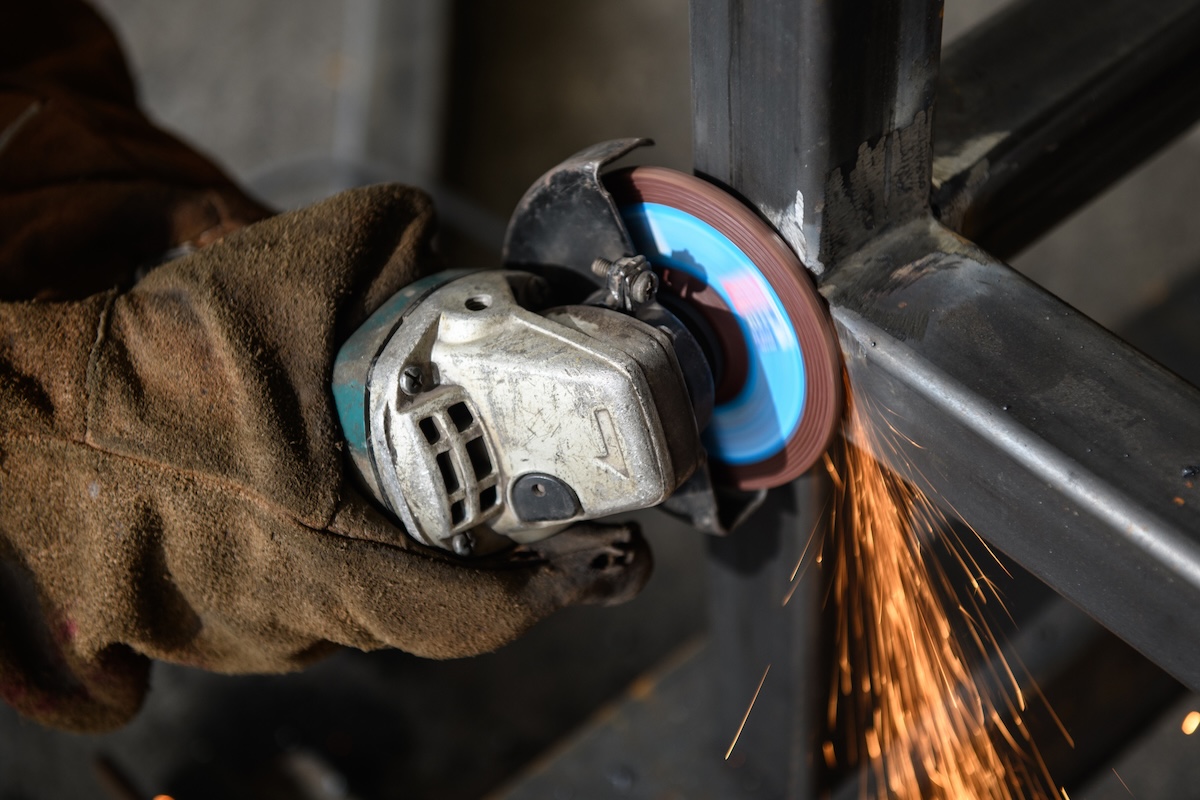
How to Use an Angle Grinder for Cutting
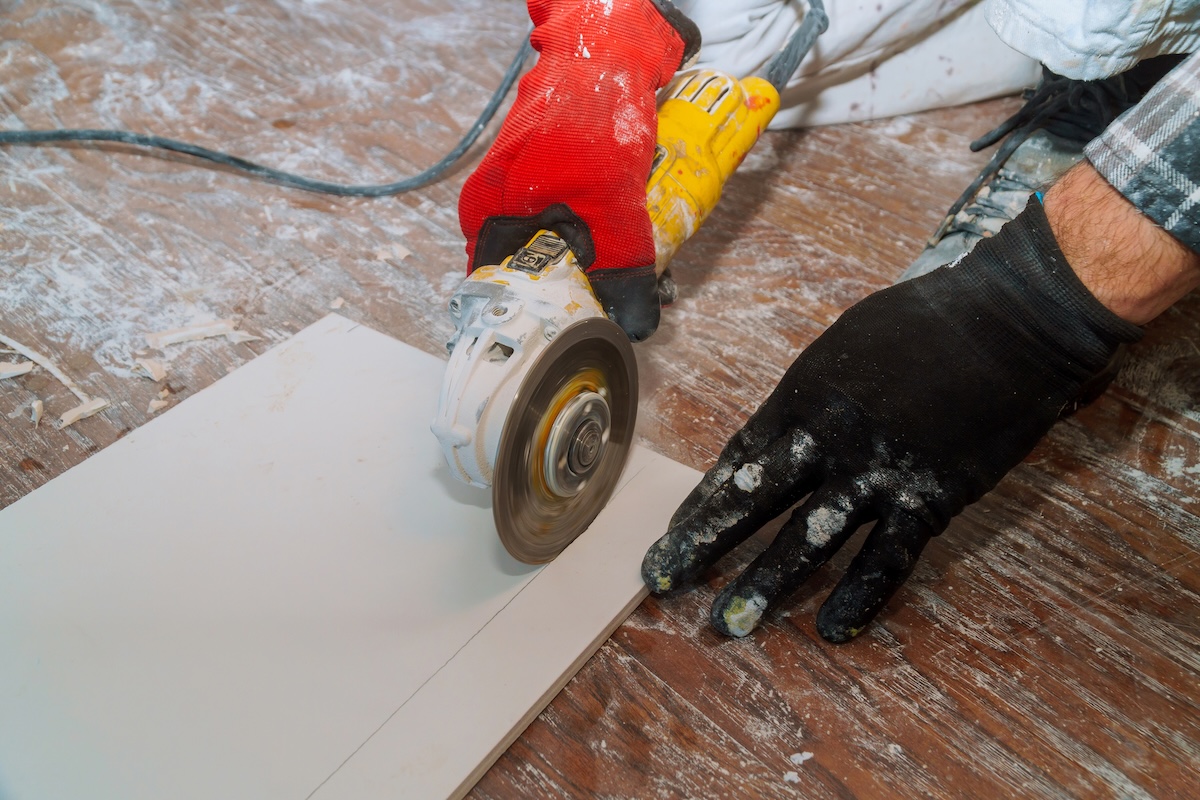
A common use for angle grinders is to equip them with a cutting blade that can cut through metal, tile, stone, concrete, or wood. I have frequently used this method to cut through old pipes that are too badly rusted, damaged, or aged to be cut effectively with a normal pipe cutter.
Step 1: Prepare the angle grinder and workpiece.
Before you begin, put on proper PPE to stay safe while you work. Secure loose workpieces by clamping the material to a stable surface. If the material is already secured, like an installed waterline, then you can focus on the cut, instead of keeping the material in place. Use the spindle lock to lock the disc in place, then loosen the arbor nut to switch the current disc for one that is designed to cut through the target material.
Keep in mind that you should use a disc with a larger diameter if you need to make deeper cuts through broader materials. Secure the disc with the arbor nut and check both the disc and the tool to ensure they are in good condition.
Step 2: Mark the cutting line clearly.
Use a marker, pencil, or chalk to clearly mark the cutting line so you have a visible guide for where to cut. When you are cutting thicker materials, I recommend lightly scoring the surface along the cutting line before you make any deeper cuts into the material.
Step 3: Apply consistent pressure using the edge of the disc.
The cutting disc will provide all the abrasive force you need to cut through the target material, so it’s important to only apply light, consistent pressure to avoid accidentally damaging the disc. Before you start cutting, turn the angle grinder on and allow the disc to reach full speed, then lower the edge of the disc to the material where the cutting line has been clearly marked. Move the grinder smoothly and consistently along the cutting line.
Step 4: Move through the material with a smooth, continuous motion.
When you are cutting through material, instead of holding the grinder at a 15- to 30-degree angle, rotate it so that the disc is at a 90-degree angle to the target surface. Hold the angle grinder securely and move through the material with a smooth, continuous motion. If you find that the disc binds or catches, stop what you are doing and reposition the grinder. Additionally, if you are cutting thicker materials, plan to make multiple passes along the cutting line to deepen the cut instead of forcing the disc through in one pass.
How to Use an Angle Grinder for Sanding

Since you can switch freely between different types of discs, angle grinders can be used for a wide variety of purposes, including polish and sanding. However, it’s important to always use the correct disc for the job. Thankfully, discs are typically clearly labeled, both in online shops and in home improvement stores. But if you are ever unsure, ask the tool brand or a store employee.
Step 1: Prepare the angle grinder and workpiece.
Put on your PPE and check both the disc and the grinder to ensure everything is in good condition before you begin. Secure the workpiece by clamping it to a stable surface to prevent it from moving while you sand. Then use the spindle lock to lock the disc in place and remove the arbor nut to switch the current disc for one that is appropriate for sanding. Generally, this will be a flap disc for lighter use or a resin fiber disc for heavy-duty applications.
Equip the disc with sandpaper, starting with a coarser grit, like 80 to 120, then switch to a finer grit, like 180 to 240, for finish sanding.
Step 2: Apply consistent pressure using the flat part of the disc.
Similar to using the angle grinder for grinding, use the flat part of the disc when you are sanding with an angle grinder. Let the disc do the work for you, applying light, consistent pressure to make sure you are removing the material efficiently, while avoiding any excessive force that could damage the material or the sanding disc. I also recommend changing the direction you are sanding every so often to avoid creating any ridges in the workpiece.
Step 3: Move back and forth in a smooth, continuous motion.
Keep the angle grinder held at about a 15- to 30-degree angle to the work surface, ensuring that the tool is gripped firmly in your hand for both control and accuracy while you work. Move the disc back and forth in a smooth, continuous motion across the surface of the material to evenly remove thin layers and to avoid making grooves or damaging the material.
Make sure to pull the grinder away before stopping the motion of the tool if you need to take a break or when you are finished sanding the target area.
Angle Grinder Maintenance Tips
Keeping your tools in top working condition is essential for both quality and safety. I find that regular cleaning and proper storage are some of the most important actions that help preserve the functionality of an angle grinder and prevent the arbor nut from becoming seized.
- After using the tool, make sure to wipe down the exterior and use a brush or vacuum to remove any dust and debris from the vents, moving parts, and internal components.
- Inspect the angle grinder for any signs of wear and tear, like cracks, loose screws, or damaged guards, as well as inspecting the disc and replacing it if it is damaged, chipped, or severely worn.
- The power cord and battery should also be regularly checked for signs of damage. Replace the angle grinder or have it professionally repaired if you notice significant wear or damage to the cables. Similarly, you can replace the battery if you spot signs of damage, like cracks in the body of the battery.
- Check the gear housing for any excessive grease build-up, and keep the motor clear of dust, dirt, and debris with a fine brush or a small vacuum.
- Store the angle grinder in a safe, dry location and use a protective case or cover to prevent dust and debris from accumulating on and inside the tool while it is not in use.
Final Thoughts
At first glance, many DIYers wonder what is an angle grinder used for, but the reality is that this versatile tool has a wide number of purposes. When the angle grinder is equipped with the right disc, it can be used on many different materials, allowing you to cut, grind, polish, and sand everything from stone, brick, and metal to tiles, grout, and wood. However, it’s important to recognize the power and potential risk of this tool to ensure that you use it properly and safely.
Additionally, it’s worth looking into angle grinder reviews to find a suitable model for you to use on projects around your home. Consider whether a corded or cordless angle grinder would be best and take time to research the appropriate discs so you can achieve the best quality and highest degree of safety while you work.
