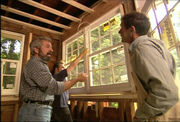
Okay, we're up on the third floor, and I'm going to interrupt our plastering contractor in a minute, but let's look at what's already been done.
This is a vast room.
It's about 24 by 28.
It's a large room and it has a cathedral ceiling and when you're doing a room like this, if you're going to attempt to hang your own drywall or blue board, be careful.
But, I mean, it makes a lot of sense, first of all, to pay attention to the direction that the strapping is in.
Our strapping, which are the pieces of wood that are attached to the actual roof rafters, are horizontal like this.
So that means that you want to put your blue board or your dry wall in the opposite direction, perpendicular to those lines, so that you get lots of nailing and then the other thing that you want to keep in mind is, that the larger the board that you use, the fewer cracks that you're going to have down the line, the fewer seams you're going to have to fill.
And here we've got twelve foot sections, four by twelve foot sheets of blue board.
that...you know come down and make it a much quicker and easier job.
Then the detailing.
If you've got openings such as here where we have a skylight.
This is absolutely the most important thing you have to put in the corner beam, because this is going to assure you a neat crisp corners.
But then, wherever you have sheets butting together.
They come with factory agent and you see presecution and intentation through the factory.
And the reason is that is there so that you can put table worth into it, you can rough in or put in a..a..
push coat like he is doing over here, which will give you a much stronger joint in between those sheets.
But, Carlos, our plasting contractor who is from..
How are you?
Ecuador, but lives here in Cambridge.
I won't interrupt you now, because
first of all this always looks so simple when you just ch ch ch, let me see you, how you're, how you're putting it on.
I mean you, right off the Effortless, right?
A little bit, yeah.
It looks effortless, but the fact of the matter is that it takes a lot of skill and if you've really never tried it before keep in mind that if you do it wrong you've ruined it.
Let's talk about the plaster first, Carlos.
What is the type of plaster that you're using?
We're using Unical base, which is mixed only with water.
The minute that you add the water you have about an hour to an hour twenty minutes.
And after about an hour you have this.
The rock.
Which is otherwise known as garbage.
Ok, so you've got to be quick and fast.
Let's watch you load up that pot.
Okay, you normally want to take just enough so you don't spill it all over the place.
And um.
And let's just watch him go.
I guess there's something that it's in your wrist.
There are...with time you get to use your trowel a little better.
About how thick are you laying it on?
It's about an eighth, eighth of an inch.
About an eighth of an inch.
Yes.
OK.
All right, it's my turn.
OK.
Can I borrow what's, what's -
Sure
- already on there?
Now the, the part of it that I can never get right is this part of it.
Loading it on.
How can you tell that you're putting on the right thickness, Carlos?
Well, as you can see, you know, over there you are good.
And over here a little less the amount.
But, you try to lay it in a way that is even around because you have to come back again to go over it and start knocking it down.
OK.
I'll let you do that.
loaded up.
So eventually.
Okay so you don't want to be bashful, you want to put a good amount.
Yes because you gotta back to the wall you about four times by the time the wall is hot so you actually remove some of it off.
And then once you got it on, you have to wait how long before you can start steel trolling?
Well normally a person like myself will do a couple of walls and then as soon as I'm done with it I would come back again and I would start to just going over it again.
And you start taking out all the impurities that you left the first time around.
OK, so you come back and hit it a second time while it's still workable.
While it is still wet, yeah.
and then, your third time you would add water because the mix starts to get hard as we continue on.
As time goes by, sure.
So, on the next one you would come back and you throw lightly water over it and you would do the same thing over again.
OK.
So you go four times over the work that you have laid on.
Okay, Carlos, get to it, we don't want to lose the room.
Thank you.
We've got to break for messages.
Don't go away.
And that wraps things up for this week.
But come home again next time.
We're going to be doing more work up here in the third floor giving you a few hints on how you do the finish carpentry work.
Out in the front yard we'll be digging a trench to bring in a conduit for a new electrical service, and a new water pipe.
That's it 'til next time.
I'm Bob Vila, it's good to have you home again.