Hi I am Bob Vila.
Welcome home again .
We have got an exciting day planned today.
A double window's being installed in my kitchen that's going to give us a fabulous view of the backyard, also a door that's all made out of glass panes.
I'm taking you out to Stockbridge, Massachusetts to visit a house known as Naumkeag.
It was designed by McKim, Mead and White around the same time as this house but really on a much grander scale.
And then when we come back here we'll be showing you, how to put the plaster, over the blue board.
Stick around.
It's good to have you home again.
Bob Vila's home again.
Fenestration is a fancy word for window placement on the facades of a house.
If you think about a classic Cape, it always has a center door, flanked by two pairs of windows.
If you think about a shingle style house it pretty much is a different animal.
Architects approach the whole issue of window placement at random almost, and if you look at this house on the right hand side, right over here, we've got a pair of windows that doesn't really match the other pair of windows.
below it, and what we've design for the kitchen corner of the house is again an over-sized pair of windows right next to what would be called a French door, I guess.
And this is so that we lot and lots and lots of daylight coming into the kitchen area.
And when you see it in reality here you'll get to understand it.
One thing that the architects were concerned about was keeping that shingled skin of the house uninterrupted kind of, not to many shadow lines.
Hi Riley.
Hi Bob.
Hi Danny.
How are you doing?
Hi Bob.
So are we painting the window I see?
Well.
Isn't that a little bit premature?
Well we just back fry them in the seal which we just put on.
OK.
And we want to make sure that everything that goes up against the house is going to be pre-primed to seal it.
And this is an alcohol based primer that dries in about.
Dries real quick.
Five or ten minutes, yeah.
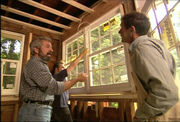
Now tell me about this window, Riley.
This is a double Marvin window.
It's a custom item right?
That's right.
This is a thermo-pane window, it has applied muttons to give it that true true divided look.
Yeah, yeah.
It's custom to fit our opening this isn't a stock window .
Yeah.
Let's look at the one behind you that's already been installed here.
Right.
Because, it's unusual installation, it's an unusual design, right?
It is, what we're trying to do is duplicate what was here, at the very beginning.
Yeah.
And in order to do that what they've done is given us a window with the jambs are flush , all the way around.
Then we apply the casings, in this very rugged sill.
Yeah.
And its flush surface here, from the sheathing to the...
This is what's interesting.
Right.
The casing and the sheathing are flush, so that when you put the skin back on.
What we're going to do is, on top of this we'll put the supplied molding.
Yeah, but the architect was really thinking about keeping water out, making sure the shingles kept the water out.
So that when the shingles come back on, they cover over this joint, in between the sheathing and the casing.
Correct.
It's a very nice detail.
It's, it's very time consuming.
It's very Yeah, alright well while you guys get ready to bring that up in place.
Let's look at the inside of the kitchen here so that we can understand that, in order to create fenestration like this, you have to first think about structure .
And up above you can see that we had to replace much of the structure in this area of the house because it was damaged, had been cut up, and we have a built up, engineered beam that goes across the whole span , from here, back to that point.
It's broken.
The span broken by a post here and another post here.
So there's a series of three short spans, but look what happens over here, okay?
You got that, sitting right here with nothing underneath it.
And what's happening is that another engineered piece of lumber is helping all this load transfer itself down to here and come down this post all the way to the foundation.
That makes it possible to really have an opening that's almost ten feet interrupted right here, but it makes it possible for it structurally to work out just fine.
So are we ready to bring the window into place?
I believe we are.
Yeah.
Yeah.
OK.
Now you've done some of this work already.
You've already got shims in place.
And you dry fitted right?
Yes we have, yeah.
So, it should go right in.
Now Railly, when you're putting in, you just have to go back to about an an inch.
There we go.
Thank you.
Back to me?
OK, tight.
OK, because the casing butts up against the other casing and that's the detail.
There's no shingling in-between the windows.
Right, but the key to installing these windows is being sure that the shims are underneath the horns of the window, because that's what's carrying the wind inside.
The horns of the window are the structural part of the window, right here.
That's right.
That comes right there.
And this is what's gonna be carry in the weight and once we nail, we nail it into Move the frame and the headers all the way around.
We want to be sure that we get some space in here so that the insulators can come behind us and tuck some insulation in there loosely.
If this is too tight.
They'll have a tendency to jam it in and that would cause the window to not open.
Absolutely, absolutely, that's a very important point.
If they put too much in the, in the window its jammed up.
Its jammed up.
You'll have trouble operating.
What about the header of you put the windows straight up against the header of there?
No, the header is just carrying the weight of the beam and everything above, it is not anything structural for the window.
We try to do that when the header started moving around, which it's going to do eventually, it may damage the windows.
Here you have less like link up, the structural number moving on you if its an engineered piece of wood like this is, but if it's a regular dimensional two by twelve, say, it might shrink, it might move.
And if there is movement between that and the window.
you might have some cracked glass, right?
Oh, definitely.
Boy, the door's really nice too, isn't it?
One thing I love about this type of door is that the hardware has the shaft in a bolt so that when you close it, it actually throws a bolt right in at the bottom of the sill where you see this striker plate down here and another one at the top.
So you have a very very tight lockup .
OK, and that's all there is to it, right?
Just driving the nails through and then we'll apply the moulding and we'll get the shingling all done.
Nice job fellows.
Thanks.
Okay, we're gonna have to break for some messages and when we come back, we'll be in Stockbridge Massachusetts in the beautiful Berkshire Mountains visiting Naumkeag, a most unusual house.
Stick around.