One of the home improvements that we wanted to do here, was to repair the chimney.
Because, old houses often have chimneys that need some work done.
From the masonry to sometimes relining and it even gets more complicated, but we also install the Rinnai insert.
Watch.
We actually had two chimneys to deal with on this house.
The furnace chimney flue needed to be lined to meet code.
Especially, since we'd just replaced the heating system.
You never know when an old brick chimney is going to become a fire hazard, since it's usually built into the structure of the house.
It's important to use a flexible, stainless steel liner to protect your home from any danger of fire or carbon monoxide poisoning.
This is a B vent stack.
It's specifically designed to vent gas appliances.
It's a double wall pipe.
It has a concentric construction.
So we have a pipe inside a pipe.
That protects the heat of the natural draft that we need to properly vent the flue gas products out of this chimney.
The pipe is manufactured in various length sections.
We're using three-foot lengths today.
And it basically is a Banna lock system and it's just a twist lock and that locks it in place.
So once we are up on the roof, he will be able to assemble this and simply drop it down from the top of the chimney.
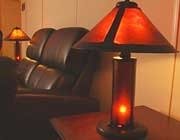
The fireplace chimney needed some attention urgently, inside and out, so we could safely install a new gas fireplace insert.
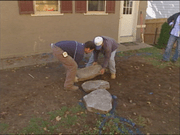
There was a lot of damage to the brick at the top of the chimney, so those bricks were removed and replaced by Tim Martinson of Upside Down Chimney Sweeps, here in Melrose.
I noticed that these bricks are all solid, and down on the bottom these bricks seem to be loose, so I pulled one of the bricks out just to see how loose it was, and the mortar and everything came right out.
So, what I'm going to do is just take these bricks out and just re-mortar them back in.
The vent pipe connects This hub on the out light of the fireplace.
It will then have the gas and electric connections made over here on the right side .
We are drilling the heart of the fire place to run the gas line up through to supply gas to the fire place.
Would the corrugated stainless steel gas line, brought up into the the bottom of the fireplace.
We've then brought it over top, connected through a straight adapter, into the black urn pipe, which is equipped with a drip T.
That's the nipple and cap on the bottom and then we go directly end of the side of the fireplace into gas valve.
The unit is equipped with two pilot assemblies similar to this.
We then have our log set burner.
There are two burners here, and this will supply the gas to the log set itself.
And then what is unique to the renai is that we have our high efficiency heating burner which is separate and sits The log set, and that will give us the great comfort and great heating efficiency.
It comes equipped with the remote control, and the programmable thermostat will allow you to have the unit come on the morning, and then shut itself off when you go to work or school.
It could then come back on in the afternoon, and it would shut itself off after everyone has has gone to bed.
It can be operated on its thermostat, or it can be operated off that programmable control.
Giving excellent heating efficiency and comfort.
Once we have the unit in place, one of final things in the far boxes to take the log set, and to locate it in the firebox.
OK, what we're going to do now is we're going to insert the finished surround.
And this is going they act as a transition behind the Rennai fireplace is going to be our finish around up against the masonry fireplace.
And this is the last piece of trim we need to finish the installation.
And the best part is, there's no messy pile of wood outside.
There we go.
Here come the BTUs.
And we're back in the new family room, and the fellows have installed just about all the units that are going in here.
So this one is actually going to be the part of the room where you have some storage, kind of a work surface.
I think they're planning a little bar area here, a wine fridge.
And how are you doing over here?
Have you?
Yeah, you've got all the shelves in place, right?
Yeah, I'm just finishing up here.
Just putting the shelves in, the last touches.
Now, one of the interesting things here is that this stuff is originally meant to be garage storage furniture, right?
Yep.
And we have put it in family room space.
Nice.
And it looks like nice furniture.
Yeah, and one of the really great things about this cabinet is plywood based product.
There's absolutely no particle board in these cabinets at all.
Yeah, you said that.
That's a good point.
Yeah.
And it looks great, Thanks.
Thank you.
And, of course, in the back where he's installed two big kind of top to bottom units I want to point something out.
This is an old house, an old slab and if you look over there, you can really see how the floor dips.
It's not at all level, and if you look at the bottom line of these storage units with their adjustable legs.
That makes such a big difference because the whole line and the whole unit is nice and level.
But, that's it for this week.
Next time we'll be gardening.
We'll be putting in some very interesting new products, some of them man-made, and we'll also be putting in aluminum gutters.
Till then, I'm Bob Vila.
Thanks for joining.