
We may earn revenue from the products available on this page and participate in affiliate programs. Learn More ›
These simple tools haven’t changed much in generations (no doubt the old cliché about not fixing things that aren’t broken applies here). For marking off straight lines parallel to the edge of a workpiece, for certain cutting tasks, and for laying out mortises and tenons, these tools are unsurpassed, as they are fast, efficient, and easy to use. You’ll master them in a matter of minutes.
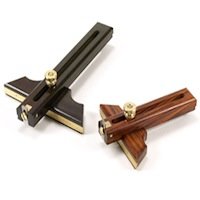
Each consists of a shaft or beam (it’s usually square in section) along which slides a donut-shaped stop called a stock. The stock is locked in place with a thumbscrew threaded through its side that presses a brass shoe against the beam. The stock, preset in this fashion to a specific position, acts as a fence when butted to the workpiece.
These gauges are usually made of hard, stable woods like beech, mahogany, or rosewood, and occasionally of steel. Some particularly handsome models have brass strips let into the face of the stock, which add an ornamental touch to the face as well as reinforcing it.
The Marking Gauge. Also known as a butt marking gauge, this tool has a brad-like steel pin or spur fixed near the end of the beam that scribes the workpiece as the stock is pushed along the edge of the piece. The pin helps make this the accurate tool that it is, as a scribed line is thinner than a pencil line.
The marking gauge is especially useful for marking out a number of identical pieces. Using the marking gauge will save measuring time (you set it once, then mark as many pieces as you wish) and helps ensure that the pieces will be the same. Marking gauges are usually between eight and ten inches long.
Let me offer a few hints for using the tool. First, when marking with the grain, make two light passes rather than a single harder one. Second, keep the pin sharp by filing its tip. Most marking gauges have a scale inscribed onto the stock, so, third, check the scale periodically to be sure the spur hasn’t bent, making the scale inaccurate.
The Cutting Gauge. Instead of a scribing pin, the cutting gauge has a flat blade wedged into a mortise in the end of the beam. In all other ways, the cutting and marking gauges are identical.
The cutting gauge is also used for marking, especially when laying out cuts across the grain, because the sharp blade cuts the grain instead of tearing it. The cutting gauge can also used to cut veneer and thick strips of woods when worked from both sides.
Keep the blade of the cutting gauge sharp. An occasional honing is all that is necessary, but if you let the tool dull, your cut lines will be more like tear lines and the tool will be of little use in veneer work.
The Mortise Gauge. On first glance, the mortise gauge looks identical to the marking gauge. In fact, it is a marking gauge, a purpose-made tool for marking out mortise and tenon joints. But instead of having a single pin at one end of its stock, it has two, one of which is adjustable along a track in the gauge’s beam. The stock is also adjustable, making it possible to lay out cuts for both the mortise (the mouth, or opening) and the tenon (or tongue, which fits into the mortise).
Profile Gauge. Sometimes called a shape tracer, a profile gauge is a tool used as a pattern for matching shapes. It can be used for tracing or copying existing moldings, pipes, or other irregular shapes around which materials are to be fitted. It’s also very useful for marking cuts around trim, when doing siding work, or applying other wood surfaces.
One variety consists of a center bar that acts as a frame for a row of neatly packed needles; another features plastic blades. Whatever the design, when the edge of the tool is pressed against a piece of molding or another irregular shape, the tool will conform exactly to that shape. It is especially useful when dissimilar materials are being joined.
Depth Gauge. A deceptively simple tool, the depth gauge is little more than a rigid steel rule with a headpiece that slides along its length. The rule is positioned at the bottom of a hole or slot to be measured and the sliding head is set flush to the surface above. Or the head is preset, using a thumbscrew or knurled nut, to a desired depth.
Antique depth gauges are often found in antique shops, usually made of hardwood like beech. Modern depth gauges (sometimes of steel, often with plastic heads) are sold with a rule with dimensions clearly incised on its length.