
We may earn revenue from the products available on this page and participate in affiliate programs. Learn More ›
Nothing can ruin a summer barbecue or evening by the pool like the threat of a wasp’s sting. Mind you, wasps aren’t all bad—the adults are nectar-eating pollinators, and they kill other insects (often those harmful to crops) to feed their carnivorous larvae. Still, a nearby nest can be dangerous, especially to those who are allergic to their sting. Should you find an infestation around your own home, you have a few options: call one of the best pest-control companies (such as Orkin or Terminix), kill them yourself with wasp sprays, or trap them. While wasp traps are available for purchase, save yourself some money and get rid of your buzzy problem by crafting this hands-off solution using items you most likely already have sitting in your house.
Tools & Materials
Bobvila.com may earn a commission from purchases made through these links.
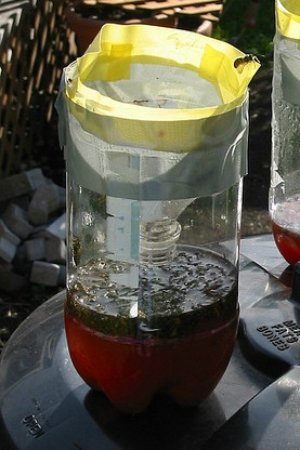
STEP 1: Cut up a 2-liter plastic bottle to create the trap.
Dig through your recycling to get the materials you need to make this trap, and get crafting. First, remove the bottle cap and cut the 2-liter soda bottle just under the neck, where the bottle becomes a straight cylinder. Invert the top portion of the bottle to serve as a funnel, and fit it inside the bottom half of the bottle. Tape the two pieces together around the cut edge so the funnel stays in place. Finally, poke two holes on opposite sides of the rim and attach some string to make a handle for hanging.
STEP 2: Prepare the bait for your trap.
You’ll never catch any wasps without the right kind of bait—and the perfect lure is wholly dependent on the season. In early spring, when wasps are reproducing, they are looking for protein; later in summer, they want sugar.
Start with a base of water and a few drops of dish soap. (The dish soap will break up the surface tension of the water and aid in drowning the wasps.) In spring, add grease from cooked meat to the soapy solution; in summer, try vinegar and something sugary like jam. Pour the bait solution into the bottle, leaving an inch or so underneath the funnel so wasps can enter.
Note: Do not add honey to your trap. That particular sweet will attract honeybees, and you don’t want to kill these very important, nonaggressive pollinators.
STEP 3: Position your trap off the ground.
You can set your traps out on the ground, but hanging them about four feet high will probably attract and catch more wasps. Find a good tree limb or fence post on your property—one that is at least 10 yards away from your family’s play, work, and gathering spaces—and hang up the homemade trap by its string handle.
STEP 4: Clean and reload the trap as necessary.
Check back often to dispose of the drowned wasps and refill the bait. Be sure the wasps are dead before you open the trap to remove them—an escapee will go back to the nest and warn the colony.
Bury the wasps you’ve caught, or shut them tightly in a plastic bag to dispose of in the garbage. Be sure not to crush the wasps while disposing of them, as the bodies release a scent that alerts other wasps of danger, potentially attracting a swarm. Even easier, just dispose of the whole trap altogether and make a new one from the week’s recycling. There’s no need to wait for a colony to become well established before making your traps. As the old adage goes, “an ounce of prevention is worth a pound of cure.”
