

We may earn revenue from the products available on this page and participate in affiliate programs. Learn More ›
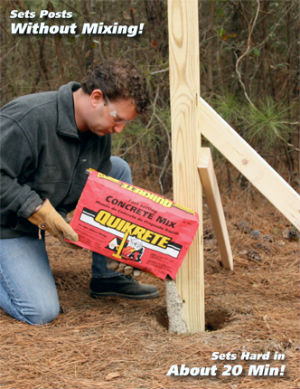
Good fences start with good foundations. Installing fence posts in place with concrete is the best way to guarantee that they remain upright and unmoving, but you might not relish the idea of mixing batch after batch of concrete to fill each posthole. The good news? You don’t have to! With a surprisingly low-effort product from Quikrete and the following technique, you’ll avoid the mess and your fence posts will be able to withstand virtually anything Mother Nature dishes out.
How to Install Fence Posts
MATERIALS AND TOOLS
– Metal or treated wood fence posts
– Posthole digger (or auger)
– Quikrete All-Purpose Gravel
– Gloves
– Protective eyewear
– Dust mask
– Quikrete Fast-Setting Concrete Mix
– 1-gallon bucket
– Carpenter’s level
– Sharpshooter shovel
STEP 1
For a fence, it’s imperative to start with posts that are arrow-straight. This isn’t an issue with metal posts, but wood posts have a tendency to twist or warp slightly. If you’re using treated wood, select the straightest posts you can find to avoid running into problems.
STEP 2
Dig the postholes using a manual posthole digger or an auger. The standard rule of thumb is to bury at least a third of the length of the fence post in the ground (half is better), but local building codes may require a minimum depth, such as 30 inches, so check with your local building authority before you start. After you determine how deep the hole should be, add six inches to allow for the addition of gravel in the bottom.
STEP 3
Make the holes wide enough to fill with concrete. The minimum recommended diameter is three times the width of the posts. So, if you’re installing standard four-inch-wide treated wood posts, the holes will need to be 12 inches in diameter.
STEP 4
Add six inches of gravel, such as Quikrete All-Purpose Gravel, to the bottom of the holes. Gravel provides a solid base for the fence post to sit on and prevents it from coming into direct contact with the soil below, which might increase the risk of rotting.
STEP 5
Tamp down the gravel using the bottom of the fence post. To do this, set the post in the hole and, with gloved hands, lift the post up a few inches and bring it back down hard on the gravel. Repeat this three to five times to even out the gravel.
STEP 6
Position the post in the center of the hole and hold it upright. This is where you’ll need an assistant who can hold the pole in place while you fill around it.
STEP 7
Grab your work gloves again and also put on protective eyewear and a dust mask—pouring dry concrete mix is a dusty job, and you don’t want to inhale it or get it in your eyes. Then, pour dry Quikrete Fast-Setting Concrete Mix into the hole, getting an even amount around all sides of the post.
Keep the post upright and centered as you fill the hole, but do not lift the post—if you do, you’ll have a tough time getting it back to the gravel bottom.
STEP 8
Continue filling the hole with the dry fast-setting concrete mix until the mix sits approximately three inches below ground level.
A 50-pound bag of mix will make approximately 0.375 cubic feet of concrete. So, to fill a 30-inch-deep hole that is 12 inches in diameter, you’ll need five bags of Fast-Setting Concrete Mix. If you don’t want to do the math, enter the depth of the hole into the Quikrete Fast-Setting Concrete Mix calculator. It will tell you exactly how many bags of mix you’ll need to set for standard post sizes and hole diameters.
STEP 9
Pour water on top of the dry concrete mix at a ratio of about one gallon per 50-pound bag. For the 30-inch-deep hole mentioned above, that would require about five gallons of water. Add slowly, allowing the water to seep down and saturate the mix. As you’ll see in this video from the concrete experts at Quikrete, the dry mix will react on its own without more work from you!
NOTE: For holes deeper than 30 inches, it’s a good idea to add the dry concrete mix and the water in two steps. For example, if you’re installing a tall post in a four-foot-deep hole, add half of the estimated amount of dry mix, then add half of the water, followed by the rest of the dry mix and the rest of the water. By doing this, you’ll ensure that the dry mix at the bottom of the hole receives adequate water.
STEP 10
Level the post as soon as the mix and water have been added to the hole. Place a carpenter’s level along two adjacent sides to make sure the post is plumb.
NOTE: While you can level every post by hand this way, it’s not the most efficient process for installing three or more fence posts in a straight line—see the tips for “Creating a String Guide,” below, instead.
When the post is perfectly level and plumb, use a narrow sharpshooter shovel (even a stick or pole will do) to press the wet concrete firmly around the post’s base.
Work quickly. Quikrete Fast-Setting Concrete Mix will set in 20 to 40 minutes, and once it hardens, the post can no longer be adjusted. Wait four hours for the concrete to cure before continuing construction of your fence.
STEP 11
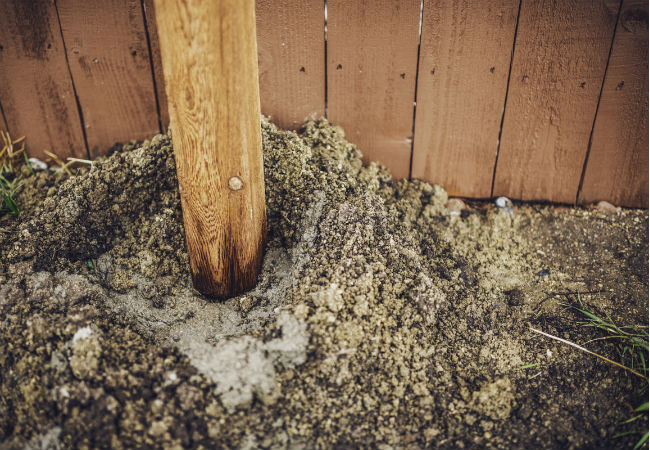
Fill in around the top of the post with soil, if desired, for a finished look.
NOTE: If you live in an area that gets a lot of rain and you’re installing treated wood posts, you may want to top off the hole with sloped concrete to help direct water away from the post to prevent the wood from rotting. See tips for “Topping Off the Hole with Concrete,” below.
Tips to Keep in Mind
Creating a String Guide:
When installing multiple fence posts in a straight line, the simplest way to guarantee professional results, with all posts level and perfectly aligned with one another, is with a string guide. To get started, you’ll need a hammer, nails (8d is a good size), and resilient string or twine.
- Dig all the postholes and then set just the two end posts following the step-by-step above. Let the concrete cure four to six hours.
- Insert two nails into the outer side of each end post, one six inches from the bottom and the other six inches from the top. Leave the heads of the nails sticking out 1/8 inch from the posts.
- Run two strings taut between the posts, one on the upper set of nails and the other on the lower set of nails. Push the strings outward, toward the heads of the nails, to create a string guide that’s 1/8 inch away from the posts.
- To set the subsequent posts, position each post in its hole, keeping it 1/8 inch away from both the top and bottom strings.
- Repeat Steps 4 through 10 while your assistant holds each post in place. Don’t allow the posts to touch the strings—maintain the 1/8-inch gap, and your fence should be in line and level with the first two.
Topping Off the Holes with Concrete:
Live in an area that gets a lot of rain? Instead of filling in the top of the hole with soil that could hold moisture at the base of your fence post, add a little more concrete to divert rainwater away from the post and protect it from rot at ground level. You’ll need just a bucket or wheelbarrow to mix the concrete and a trowel to smooth it in place.
- After all the posts are set and the concrete has cured, mix some extra Quikrete Fast-Setting Concrete Mix in a wheelbarrow or bucket, following the mix-to-water ratio on the bag. One 50-pound bag of mix will top off approximately four 12-inch-wide holes.
- Shape the semi-solid wet concrete around the post using a trowel to create a gentle slope away from the post. A slope of about ½ inch is all that’s necessary.
- Top off all the holes in the same manner so that when it rains, the water will run down and away from the posts.
This content has been brought to you by Quikrete. Its facts and opinions are those of BobVila.com.