We may earn revenue from the products available on this page and participate in affiliate programs. Learn More ›
Do you have a flaking eyesore of a fence that plagues the perimeter of your property? While there are no shortcuts to a quality prep job, using the right tools and techniques greatly reduces the time it takes to get the work done. In just a weekend, you can refresh your weather-worn fence armed with little more than a sturdy scraper, a multi-talented 5-in-1 tool, and your painting essentials. Follow this guide for how to paint a fence.
MATERIALS AND TOOLS
– HYDE X2 Dual Blade Carbide Scraper
– Extension pole
– Wood nails or screws
– Replacement wooden pickets
– HYDE Black & Silver® 5-in-1 Multi-Tool
– Handheld random orbital sander
– 120-grit sandpaper
– Exterior primer with a blocking agent
– Exterior alkyd or acrylic paint with UV protectants and mildewcide
– HYDE Painter’s Assistant
– Paint tray
– Paintbrush
– One- and two-quart containers
– Narrow roller with an extension handle
– Drop cloths

STEP 1: Remove Loose Paint
Do not ignore the cardinal rule of repainting anything: Never paint over peeling paint. Eventually, the loosened paint beneath will start flaking off again, potentially taking the new coat of paint—and all your hard work—with it. Make sure you don’t end up with a slapdash-looking finished product; instead, scrape off all the loose paint at the get-go.
A wide scraper works great on the flat surfaces of a fence picket, but the blade is too large to remove peeling paint from small gaps between boards, rails, and posts. You could choose to weigh your pockets down with a variety of scrapers—and waste time switching between them—but it’s so much easier to just grab the HYDE X2 Dual Blade Carbide Scraper. Its dual blade can be quickly switched from a 2½-inch-wide blade to a 7/8-inch-wide blade that’s great for reaching into tight spots. You simply rotate the triangular blade as needed.
Work with care, especially if you’re scraping older, weathered wood, which is easy to gouge. Hold the scraper against the surface of the wood with the blade at a 20- to 25-degree angle, then slip the scraper blade underneath the loose paint, being careful not to catch on the wood and dig out a chunk. It takes some practice, but remember: You’re trying to remove only the flakes and not the stuck-on paint.
Can’t quite reach the top of a high fence picket? Grab a standard extension pole and connect it to the X2’s Acme-threaded handle so you can scrape high spots while keeping your feet planted firmly on the ground. And with the X2, you won’t have to slow down too much to deal with popped nails, which can quickly wear out and damage a carbide blade. When you’re armed with the X2, there’s no need to go running for a hammer when you come across a popped nail. Simply flip the scraper and use its hammerhead end cap to reset the nail—and get back to scraping—in mere moments.

STEP 2: Prep and Repair
Once you’ve thoroughly scraped away the loose paint, it’s time to examine the fence and make repairs. Inspect every picket to confirm that they’re all firmly attached to the fence rails. Secure loose boards with additional nails or screws as necessary. Also check the boards for signs of wood rot, especially wherever fence posts come into contact with the ground (though this deterioration can also occasionally be found on exposed posts and pickets). Note: Fresh paint will not stick to rot, so you’ll need to remove and replace any rotted fence parts as well as those warped beyond repair.
Narrow splits in the wood and visible nail holes can be fixed with a little paintable latex wood filler. First, use the sharp point on HYDE’s Black & Silver® 5-in-1 Multi-Tool to scrape splinters and loose debris out of the gaps, because here, too, loose material can protrude and even fall out over time, taking your paint with it. Then, turn the multi-tool so you can use the flat front end of the blade to scoop up wood putty and patch any holes in the fence. Its 2½-inch-wide blade perfectly levels out putty over splits and holes.
After you’ve finished these simple steps, rough-grain fences such as cedar should be ready to paint. If, however, you’re prepping to paint an ornamental fence with a very smooth surface, sand the pickets with 120-grit sandpaper for a more finished look. A handheld random orbital sander can speed this task along.
STEP 3: Prime and Paint
Gather all the materials and supplies you’ll need before you start to paint: cans of primer and paint, a narrow roller with an extension handle, a paint tray, a paintbrush, drop cloths, and HYDE’s Painter’s Assistant. Use the rigid bottom end of the Painter’s Assistant to slip around the paint can and pop off its lid, then clip it to your roller tray; the magnet will firmly hold your paintbrush without letting it sink into the paint until you’re ready to dip it again.
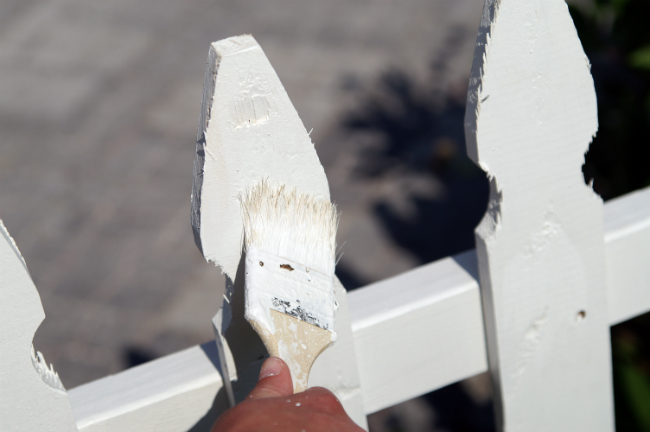
Before you even take out the paint, though, cover the entire fence with a quality exterior primer that contains a blocking agent to keep the excess oil in wood knots from bleeding through your paint job. Start at one end of the fence and work your way to the other, and paint a fence’s posts and pickets from the top down. (The Painter’s Assistant is ideal for these sorts of jobs, because it snaps to one- and two-quart containers to create a handle for easy carrying as you travel down the length of your fence.) While most wood fences can be painted by brush, you can speed up the process by working primarily with a narrow roller. Use its narrow width to coat individual pickets, then back-brush to work the primer into the grain and between boards. Though primer may dry quickly outside, follow the instructions on the can to be certain that you’ve allowed enough time before moving on.
When the primer coat is ready, bring on the paint—preferably an exterior alkyd or acrylic paint that contains UV protectants and mildewcide. Do check that the paint is compatible with the primer. If you’re unsure, ask at the paint store. When you’ve invested this much time in your fence, you won’t want to cut corners by selecting a bargain brand that may not withstand temperature, moisture, and the harsh rays of the sun as well as a higher-quality paint will. Some exterior paints are designed to cover fully with only one coat, so whether your paint job will take one coat or two to cover completely may depend on the product you choose. Apply the paint as you did the primer, working from the top down on posts and pickets so you can catch any runs as you go.
When it’s a wrap, grab your Painter’s Assistant to make short work of cleanup. The tool’s curved shape fits right over your paint roller cover and allows you to squeeze excess paint directly into the paint can. There are no wasted materials—or time—with this hardworking multi-tool, which means you’ll soon be lounging in your yard and enjoying the sunset after one highly productive weekend.
This content has been brought to you by Hyde Tools. Its facts and opinions are those of BobVila.com.