We may earn revenue from the products available on this page and participate in affiliate programs. Learn More ›
Whether you want to create a countertop or expand your sidewalk, cutting concrete yourself may not be as daunting as you imagine. Slicing through slabs thicker than six inches is best left to a pro, but anything less than six inches—a depth that would include most concrete walls, patios, and sidewalks—can be cut by a DIYer with the right equipment and proper know-how.
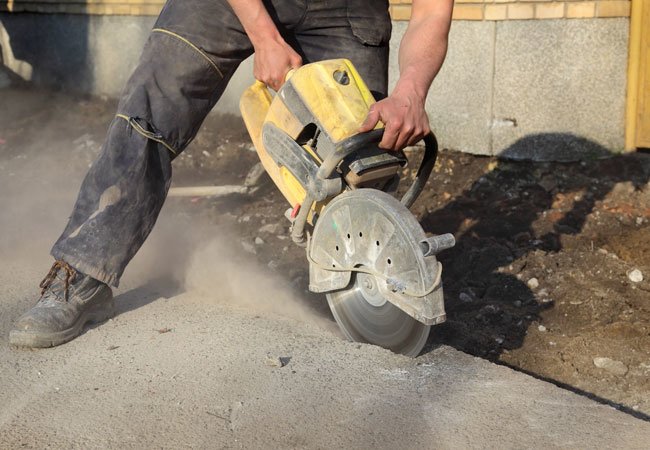
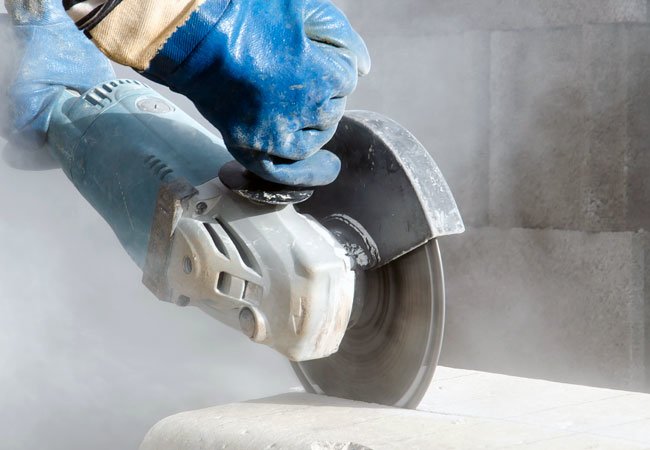
Any handy homeowner looking to cut concrete needs one crucial tool: a diamond blade. While abrasive blades can cut concrete, they wear out quickly, potentially needing to be replaced multiple times in the course of one project. Abrasive blades may lead you to “force” the saw, a dangerous move that could result in losing control of the saw and suffering a potentially life-threatening cut. Don’t take the risk; instead, invest between $30 and $55 for a diamond blade (view example on Amazon).
On the subject of safety, take note: All of the protective gear listed below is necessary. A filtration mask will keep you from breathing in concrete dust that can damage lung tissue, potentially causing lung cancer and silicosis. Kneepads and shin guards, on the other hand, will protect your legs from injury.
The ground fault circuit interrupter (GFCI) protected extension cord will not only protect you from power surges, shocks, and overloads, but the waterproof exterior is designed to withstand dangers posed by rain and any other contact with water. Manufacturers recommend plugging it into the power source and then, if needed, plugging in an indoor/outdoor extension cord from there. (Though GFCI cords as long as regular extension cords can be triple the price, they’re worth it for anyone who routinely works outdoors.)
Finally, if you’re doing a large project requiring more than seven feet of cutting, consider renting a “walk-behind” wet-cutting saw instead of using a diamond blade. Although it can be a pricey rental (around $100 a day, plus wear of blade, for a cutting depth of nearly seven inches) and heavy to work with, a wet-cutting saw will ensure the straightest and deepest of cuts, with far less work overall—no chiseling, no hammering, and no need for repeated shallow cuts. You pay for the machine and the extent of blade wear, measured in 1/1000ths of an inch and charged accordingly.
These instructions on how to cut concrete focus on smaller projects, which are completed with a diamond blade.
Tools & Materials
Bobvila.com may earn a commission from purchases made through these links.
- Circular saw
- Handheld cut-off saw
- Dry-cutting diamond blade
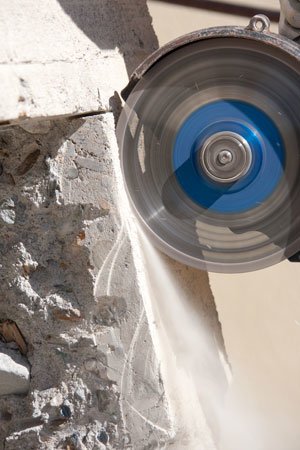
- Wet-cutting diamond blade
- Drop cloths
- Shin guards
- Knee pads
- Steel-toed boots
- Protective eyewear
- Hearing protection
- Full face shield
- High-filtration dust mask
- Extension cord
- Garden hose
- Broom
- Dustpan
- Wet/dry vacuum
- Sledgehammer
- Prybar
- Claw hammer
- Mason chisel
- Duct tape
- Chalk
Step 1
Choose the type of blade you prefer to work with for the job: dry-cutting diamond or wet-cutting diamond. The former works with a circular saw or handheld cut-off saw, although you will want to wet the concrete to minimize the dust that flies while you cut. Wet-cutting blades, on the other hand, require water on the blade constantly—which can be achieved with most tools but works most easily when you rent and use the proper “walk-behind” concrete-cutting saw. By renting this job-specific saw, you’ll also get a greater cutting depth than using a circular or handheld cut-off saw. A 7” circular saw, for instance, can only cut to 2-¼ inches deep, meaning you’ll need to sledgehammer the rest of the concrete away; a 14” wet-cutting blade attached to a concrete-cutting saw, on the other hand, gets you to 4-5/8 inches of clean cut.
Step 2
Prepare the workspace to keep concrete dust from entering your home. If working in a basement or garage, tape drop cloths to any doors; if outside, ensure that all nearby windows are closed. If close to any air intakes, tape a drop cloth or plastic sheet over them.
Step 3
Mark the places you want to cut on the concrete slab either using chalk line (good for long, straight edges) or chalk. Apply the line as thick as possible. You’ll ideally run a trickle of water over the concrete as you cut in order to keep airborne dust at a minimum, and you don’t want the line to disappear.
Step 4
Take every personal safety precaution necessary: Don your heavy clothes, shin guards, knee pads, and steel-toed boots, plus protection for your eyes, ears, and face. Always wear a properly fitting filtration mask. If using an electric saw as opposed to a gas-powered saw, plug the GFCI-protected extension cord into the power source to eliminate power surges, shocks, and overloads, as well as any dangers that come with using a power tool near water.
Step 5
If possible, position a garden hose to distribute a trickle of water directly over where you will make the cut. When working on a flat, horizontal project like a patio slab, extend the hose to the work area and turn the water on to a trickle, in order to keep the surface damp. Hold the hose in place so that the steady stream flows over your chalked line.
If working on a vertical job, like cutting into a concrete retaining wall, then water can be trickier to employ. Ask a friend to spray water on the slab of concrete as you work, or nix this step altogether. Without water, you’ll just have a bit more dust and need to run the saw in the open air between cuts to let it cool off.
Step 6
Starting at one end of the cut area, whichever side is easiest for you, put a “guide board” (any 1”-deep scrap wood as long as the cut line) along the outside of the chalk line.
Step 7
While the saw is still completely off, set its blade depth using the depth lever or knob (refer to the owner’s manual for instructions) so it cuts a maximum of a half-inch deep. This will keep you in better control of the saw as you work with shallow cuts. Proceeding with a series of shallow cuts is safer—offering more control and a chance for your blade to cool off—than going all-in at once, unless you’re pushing a big walk-behind saw that can handle the depth.
Power up the saw at the lowest revolutions per minute (RPM) setting, and begin your first cut along the guide board. Maintain a constant, firm, two-handed grip on whichever saw you’re using, and slowly move the saw forward tightly against the guide board. Always let the saw do the work; simply guide its direction, but don’t push it down into the concrete. You only need a quarter-inch cut at this point, but if the saw bites in a bit deeper, that’s fine too. This first guided cut will ensure you keep your cuts straight during the rest of the project.
Cut for 30 to 45 seconds.
Step 8
Remove the saw from the concrete and let it spin freely; this provides an opportunity for the saw blade to spit out any dust clogging it up and cool down. Alternate cutting for 30 to 45 seconds and cooling for the same amount of time until you finish the project.
Step 9
After you’ve made the guided cut, remove the guide board. Go back into the ¼”- to ½”-deep cut and continue doing intermittent cuts that are no longer than 30 to 45 seconds of running the saw. Nice, shallow, straight lines will soon add up to a 2”-deep cut in the concrete.
Step 10
Dust will collect during the cutting process, despite your efforts to keep the concrete wet. Take breaks to clear it out. Sweep it up or enlist a wet-dry vacuum to suck it all up.
Step 11
To proceed with deeper cutting, shut the saw off and increase the blade depth by ½-inch increments with the depth lever or knob. Resume cutting when you’ve set the new width following the technique outlined in Steps 7 and 8.
Once you have cut as deep as you can using the maximum blade depth on your saw, you’re ready to switch to a sledgehammer. A walk-behind wet saw may have finished cutting through the concrete completely; if this is the case, you can skip ahead to Step 14.
Step 12
Clean up the work area of dust (using either a broom and dustpan or a wet-vac), and put away the saw and power cord. Then, with protective gear still on, hammer away at the cut concrete. Start near the cut line, but not on it, working outside of the cut area. Staying one to two inches away from all cut lines, swing the sledgehammer with enough force to break the concrete. As you split the concrete, use a prybar to dig chunks out and remove them.
Once you’ve knocked away most of the concrete around the cut line you’ve made—and perhaps cut through the concrete altogether—you can go back and carefully tap away the excess concrete for a cleaner line. If you’ll be pouring new concrete to replace a weathered, crumbling, cracked driveway or patio slab, however, leave the edge jagged and jutting out by an inch or two, as it’ll give the new concrete something to bond with.
Step 13
To achieve a cleaner edge beneath the saw-cut line, you’ll need a claw hammer and mason chisel. Starting at the bottom of the clean cut line at one end of the project, position the chisel blade flush against the concrete, tap the top of the chisel firmly with the hammer so that concrete crumbles away bit by bit until you’ve cleaned up the rough edges to your liking.
Step 14
Move whatever crumbled concrete remains to the yard as fill, sell or give to someone else to use as fill, or haul it to a landfill for proper disposal.