
We may earn revenue from the products available on this page and participate in affiliate programs. Learn More ›
One of the most overlooked parts of a bathroom sink is the sink plug; this is because many people don’t understand the full purpose of the bathroom sink stopper. Even when the stopper isn’t in the closed position, it is working to restrict the flow of water into the drain opening. This helps catch any debris that should not be washed down the drain, like hair or cotton balls.
However, to keep the sink drain stopper working properly, it should be removed and cleaned on a semi-regular basis. Learning how to fix a sink stopper isn’t difficult, but it is necessary to maintain your pop-up drain. With this helpful guide, you can also find out how to put in a sink stopper replacement if your pop-up stopper is damaged beyond repair.
Tools & Materials
Bobvila.com may earn a commission from purchases made through these links.
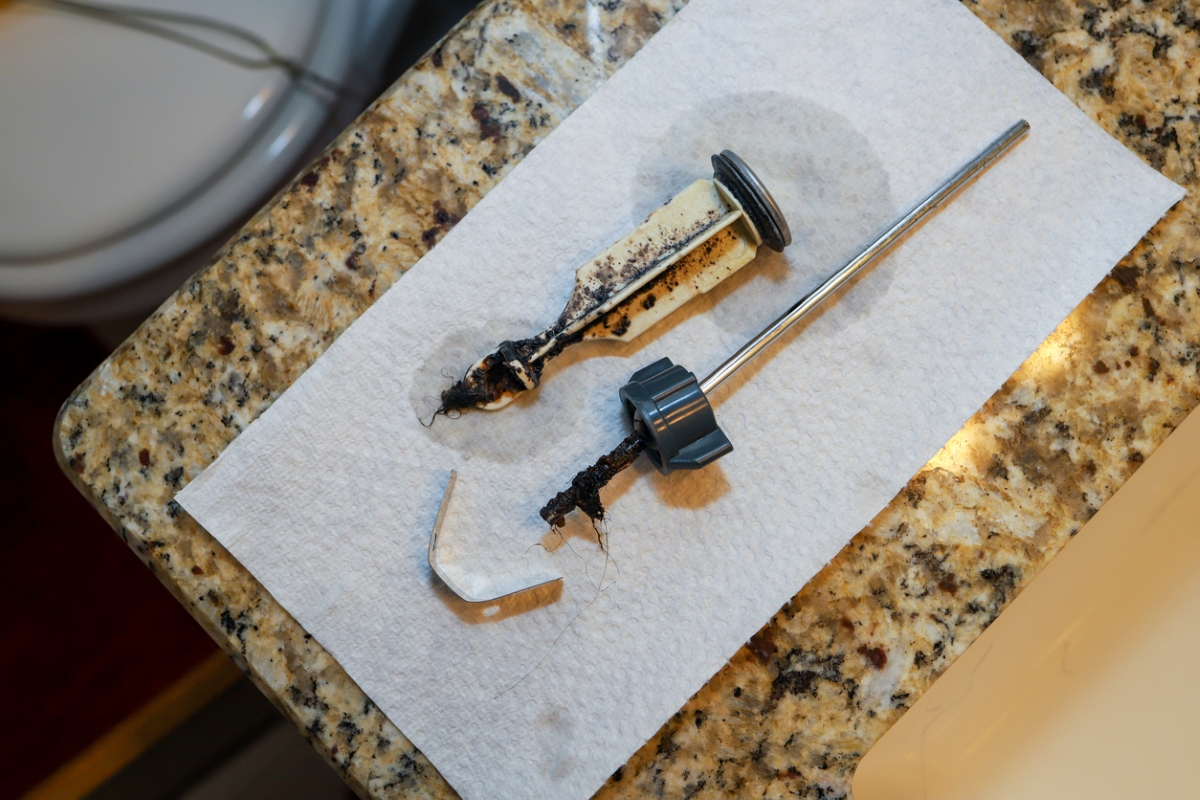
Bathroom Sink Stopper Parts
Before you learn how to fix a sink drain stopper, first familiarize yourself with the most important parts of a sink stopper assembly.
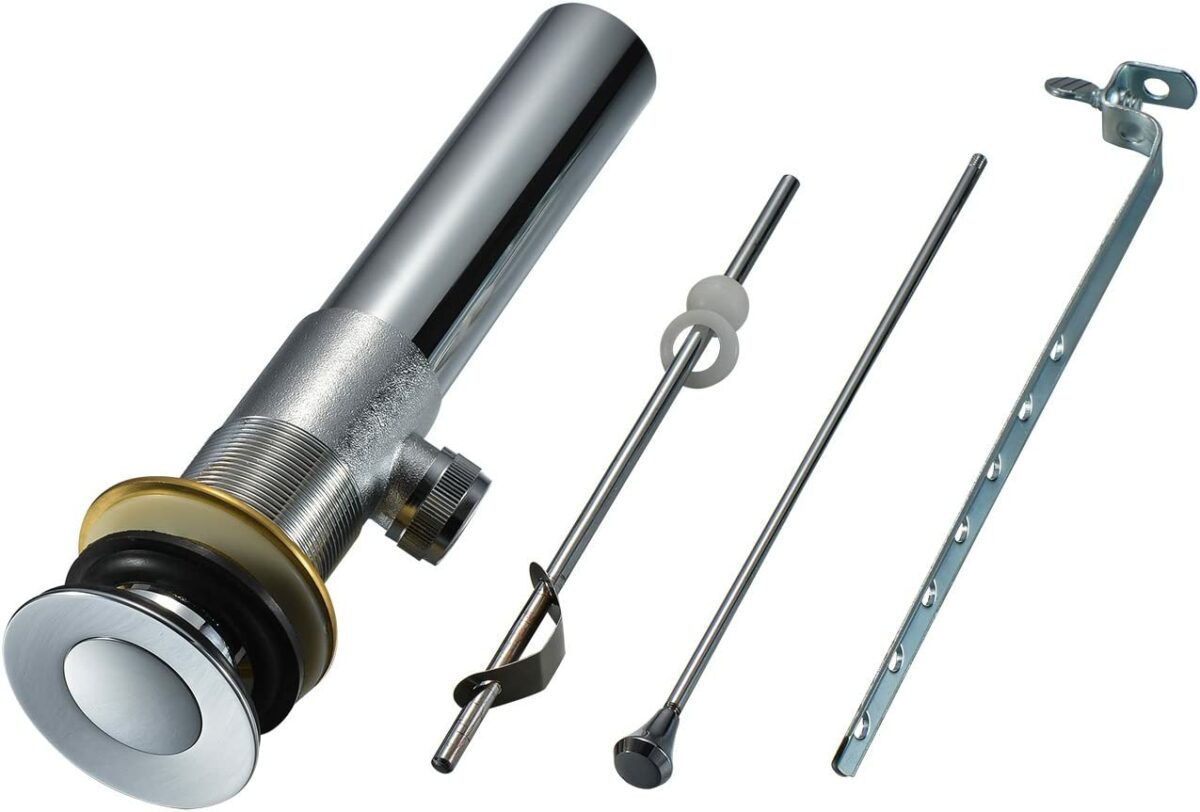
- Pivot rod: The pivot rod extends out from the drainpipe to the extension bar. It moves up and down to open or close the sink stopper in response to the lift rod being pulled up or pushed down.
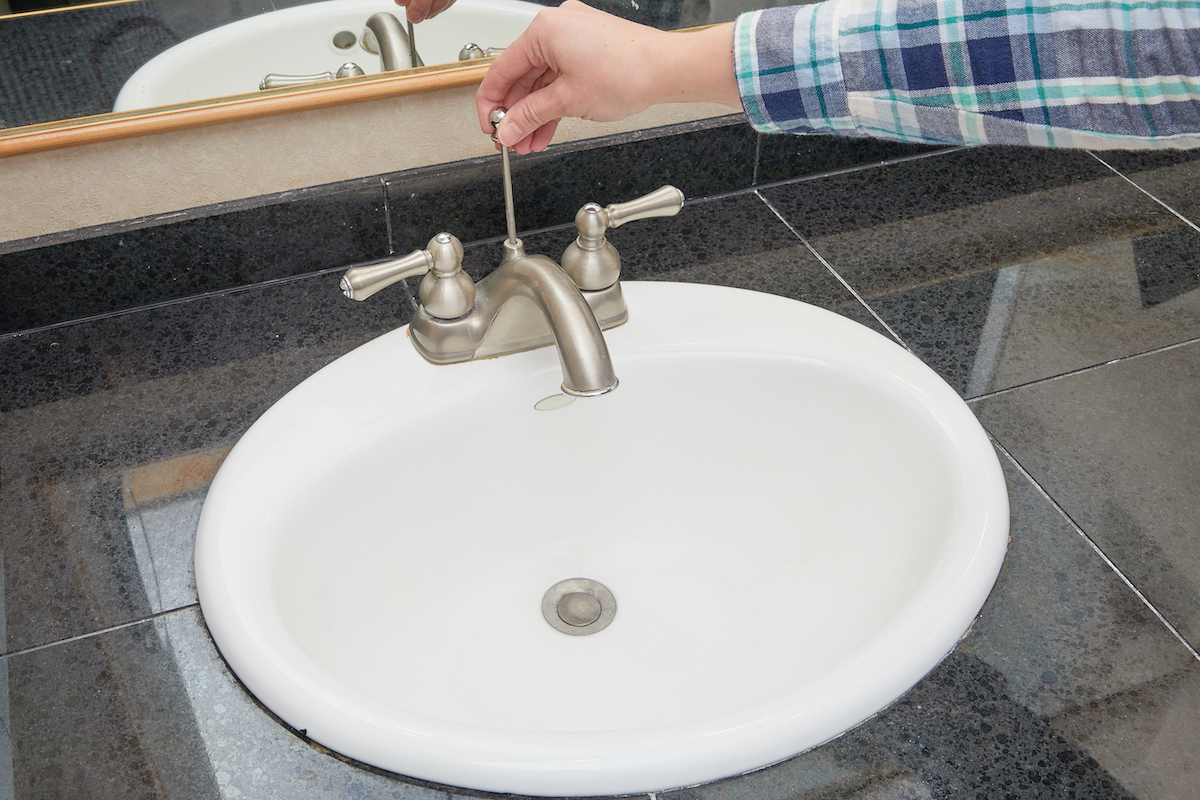
- Lift rod: The lift rod is typically located between the faucets on the top of the sink, and pulling up on the lift rod closes the sink stopper while pushing down opens the stopper.
- Extension bar: Sometimes called the clevis strap, this piece of metal attaches the lift rod to the pivot rod.
- Spring clip: A V-shaped clamp that connects the pivot rod and extension bar.
- Pivot nut: The nut used to secure the pivot rod to the drainpipe.
- Gasket: This circular piece of rubber gets squeezed between the stopper and the sink to create a seal that prevents leaks.
- Stopper drain: Sink stoppers with a built-in pivot rod typically have a short, dedicated piece of drainpipe with an opening for the pivot rod to extend out to the clevis strap.
- Sink stopper: Used to seal the sink and help prevent clogs by catching larger debris that should not be washed down the sink. This part can come with a full pivot rod, lift rod, and extension bar assembly, or it may be a stand-alone pop-up bathroom sink drain stopper that can be used without disassembling the drain line.
Before You Begin
Sink stopper assemblies come with many small parts, so it’s recommended to have a bucket or another container nearby that can hold the parts when they are not in use. This simple step can reduce the chance of losing these parts before the sink stopper is reassembled. Additionally, when you are learning how to remove a bathroom sink stopper, keep in mind that you should avoid using force if the sink stopper is stuck.
Too much pressure can damage a porcelain sink, creating a more difficult situation to resolve. Instead, use a utility knife or putty knife to cut through the old plumber’s putty in order to help loosen the sink stopper. Remember to wear protective gloves to help avoid personal injury when working with sharp objects.
Step 1: Determine what type of sink stopper you have.
The first step of cleaning and repairing your sink stopper is to determine whether you have a traditional sink stopper assembly with a pivot rod, extension bar, and lift rod to operate the stopper, or if you have a universal pop-up stopper with an internal spring mechanism.
Full sink stopper assemblies are easy to spot because they have a lift rod, which is typically located behind the bathroom faucet or between the hot and cold handles. You can pull up on the rod to close the sink stopper. If you take a look under the sink, you’ll spot the pivot rod extending out from the drain line to the extension bar, which attaches to the pivot rod.
A universal sink stopper does not have this assembly. Instead, you can close this type of stopper by pushing down on the stopper itself. Open the stopper by pushing down again. This simple spring mechanism is easy to use and can be installed in any sink drain with the appropriate drain diameter. You do not need to install a stopper drain pipe for this type of sink stopper.
Step 2: Take apart the existing bathroom sink stopper assembly.
If you have a universal bathroom sink stopper, simply open the existing stopper and pull up to remove it from the drain. The stopper should slide out relatively easier without tools, but if it seems stuck, try using channel lock pliers to get a better grip. Do not wrench the stopper out of the drain, as too much force can damage the sink. Gradually work the stopper loose by wiggling it back and forth as you continue to pull up on the stopper until it comes free of the drain.
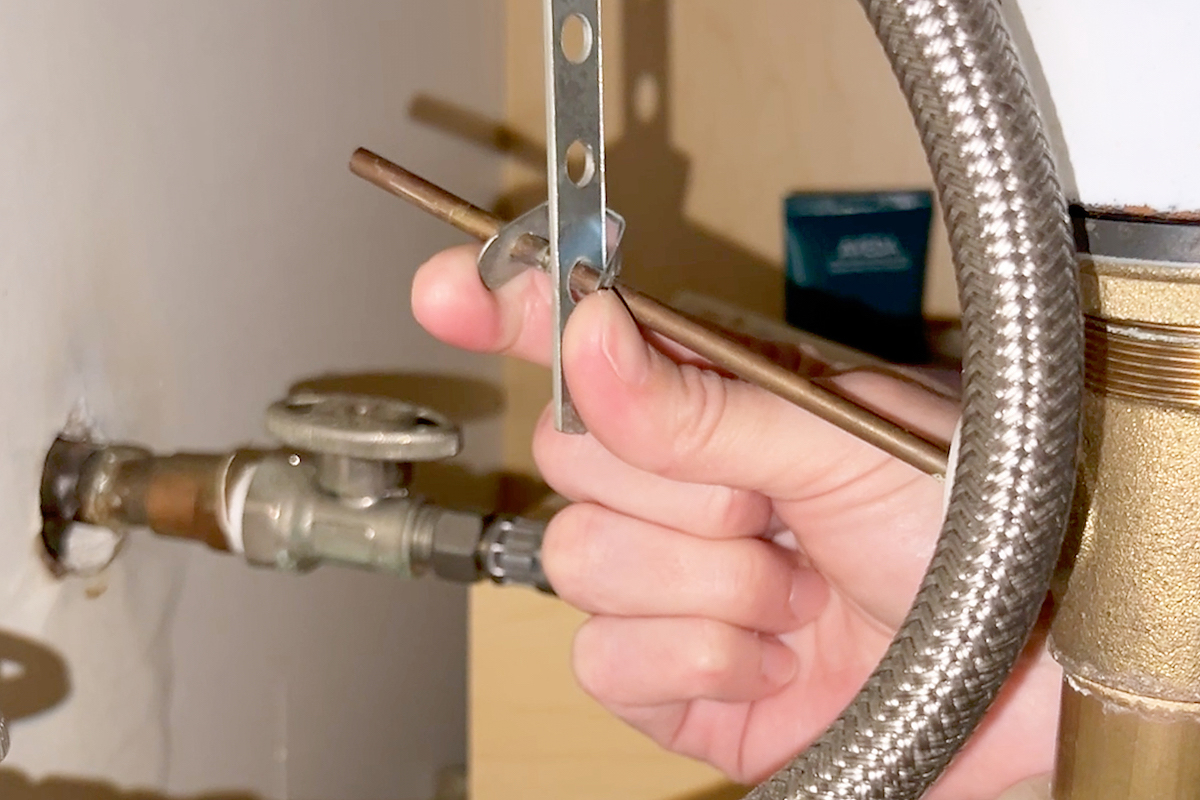
For sinks with a sink stopper assembly, you will need to start by squeezing the spring clip on the extension bar and disconnecting it from the pivot rod. Next, unscrew the pivot nut and pull it out of the stopper drain. You will also have to disconnect the extension bar from the lift rod, then pull the lift rod up and out of the faucet.
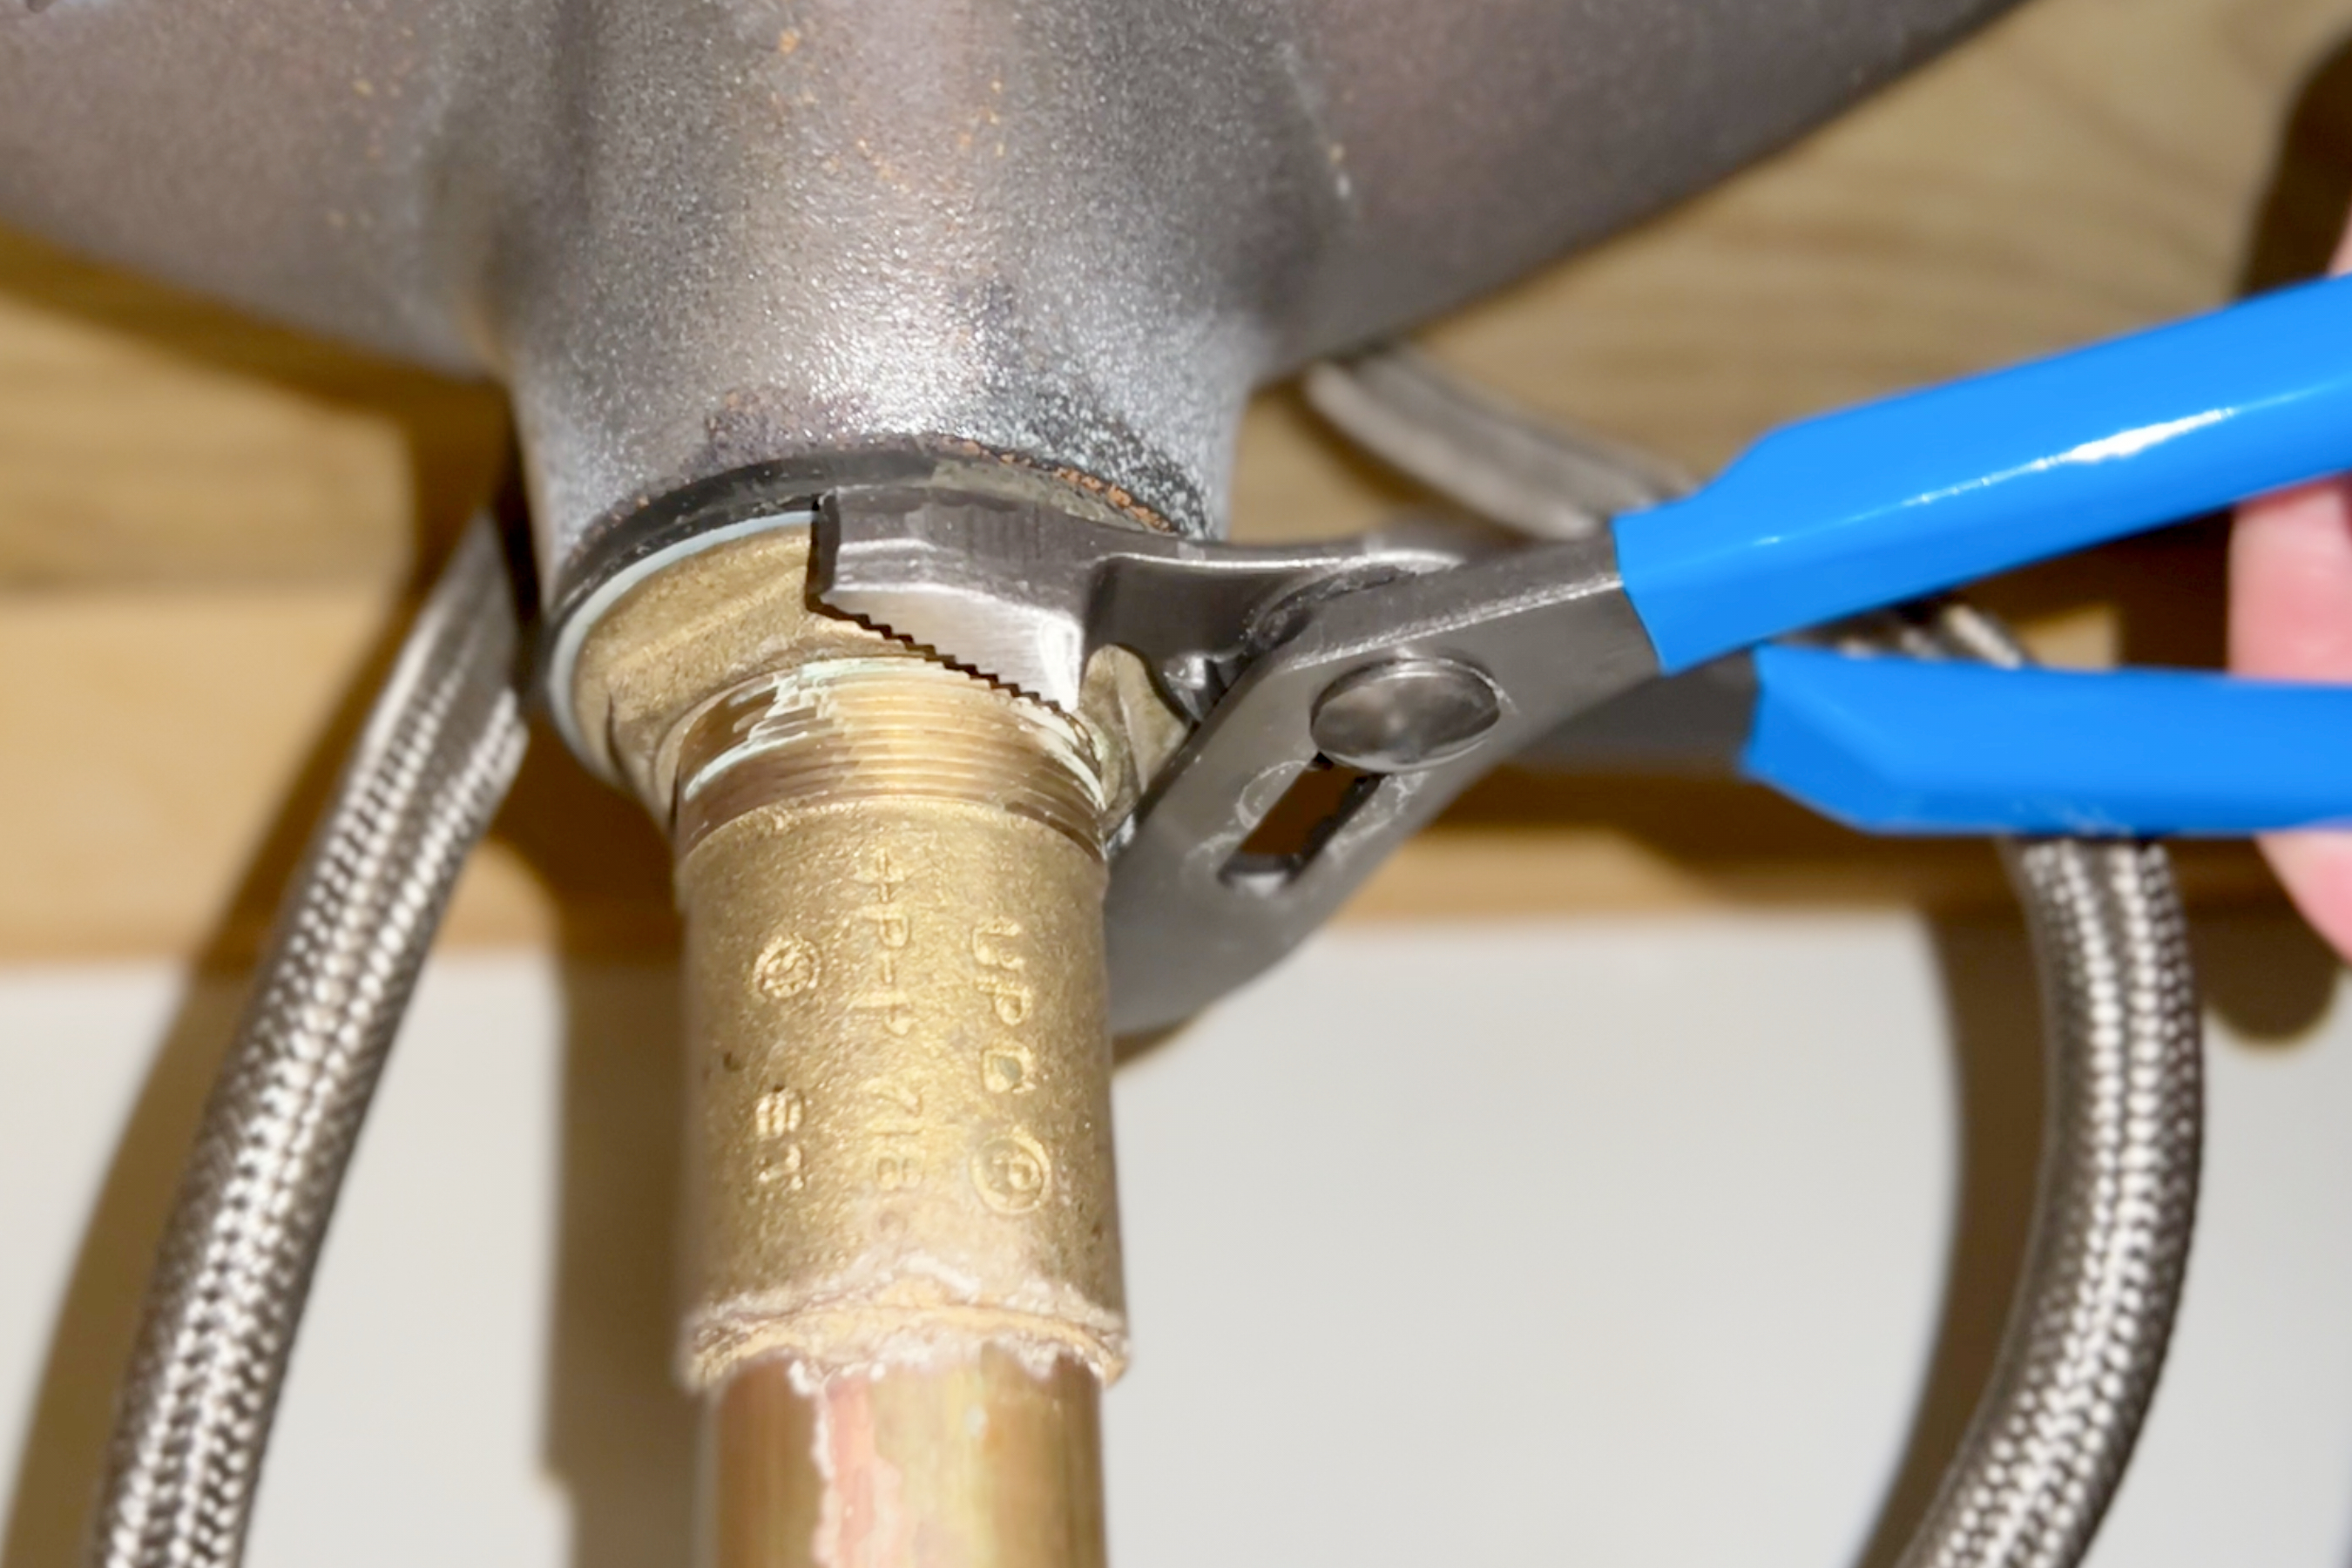
Lift up on the sink stopper to pull it out of the drain, taking care to avoid damaging the stopper. Loosen the nuts on the P-trap and disconnect it from the drain line to give yourself enough space to unthread and remove the stopper drain tail pipe from the underside of the sink. Finally, use a set of channel lock pliers to loosen the locknut that holds the drain in place, then push up on the sink drain from below until there is enough protruding from the sink to get a good grip. Pull it out of the drain hole, and set the parts aside for inspection, cleaning, and reassembly.
Step 3: Thoroughly clean and inspect the parts.
Stoppers can create sink clogs if they are not regularly cleaned due to the buildup of debris. Often, if you are having problems with your sink draining slowly or the stopper not sealing properly, the issue can be resolved by cleaning the parts. Use a soft-bristle brush with a mild cleaning solution or even vinegar to thoroughly clean the various parts of the sink stopper assembly.
When the parts are cleaned, you can inspect them for any signs of significant wear or damage. If the parts are in good condition, skip to Step 5. However, if the parts are damaged or significantly worn, then you will need to get individual replacement parts that are compatible with the current stopper or replace the entire stopper assembly.
Step 4: Replace broken or severely damaged parts.
During your inspection, you may find parts that are severely damaged or broken entirely, but this doesn’t mean that you will need to replace the entire assembly. Head to your local home improvement store or search online for replacement parts that are compatible with your existing sink stopper system.
You could also purchase an entirely new sink stopper assembly, or take this opportunity to switch to an easy-to-maintain universal pop-up stopper with an internal spring mechanism. Regardless of your choice, be sure to check the product information before purchase to ensure that the sink stopper you choose is compatible with your sink. Disassemble the pieces of the new pop-up assembly, then unscrew and remove the mounting nut from the drain tailpiece. Install the plastic washer, then the rubber washer; push them all the way down on top of the mounting nut.
Apply a thin layer of pipe joint compound to the top side of the rubber washer that will fit against the sink. Using joint compound on the rubber will ensure that it seals against the bottom of the sink drain opening. While pipe joint compound is not strictly necessary, without it you might have trouble getting the rubber to seal.
Push the pop-up drain tailpiece assembly up through the drain opening from under the sink as high as you can. While holding the drain piece in place, fit the drain ring into the opening from above the sink, and thread the ring onto the drain tailpiece as far as you can by hand. (Make sure the pieces are threaded correctly and are not cross-threaded). For now, it only needs to be hand-tightened to hold it in place.
From under the sink, hold the drain tailpiece motionless with one hand and tighten the mounting nut upwards toward the bottom of the sink. Make sure the opening in the tailpiece (where the pop-up pivot lever will fit) is pointing straight back toward the wall. Tighten the mounting nut with channel lock pliers while continuing to hold the tailpiece in place. Do not over-tighten this nut, only making sure it’s secure enough to keep the drain assembly from spinning in the drain opening.

Tried-and-True Advice
“The clevis has numerous holes through which you can thread the pivot rod. Figuring out which hole is the right one when you’re hunched under the sink with very little space in which to work can be an exercise in frustration. Eliminate the guesswork by marking the correct hole on the clevis before disassembling the stopper assembly. When you’re reassembling the sink stopper you’ll know which hole to use without any need for trial and error.”
—Tony Carrick, Contributing Writer
Step 5: Reassemble the bathroom sink stopper.
After cleaning the existing parts or sourcing new parts, you can start to reassemble the bathroom sink stopper. Roll out a ring of plumber’s putty and place it around the drain opening, then slide the drain down through the drain hole and secure the locknut with a set of channel lock pliers. Some of the putty will be forced out around the top lip of the drain, so just wipe away any excess putty with a damp rag.
Apply the pipe joint compound to the threads of the stopper drain tail pipe, then reattach the stopper drain pipe to the drain. Realign the P-trap and secure it to the drain line by tightening the nuts, then insert the stopper into the drain until it fits snugly in the drain hole. Slide the lift rod down through the faucet and reattach it to the extension bar. Next, insert the pivot rod into the stopper drain pipe and tighten the pivot nut to hold it in place. Reconnect the pivot rod to the extension bar by threading the spring clip onto the rod. Check to make sure the pop-up stopper opens and closes fully. If it does not, you can adjust the angle of the pivot rod by sliding the spring clip up or down the extension bar.
Step 6: Test for leaks and functionality.

Run the water and check the drain line for leaks coming from the P-trap, stopper drain pipe, drain, or pivot nut. Also, take the opportunity to close the sink stopper and fill the sink with water to test whether the stopper has a strong seal that can prevent the water from flowing into the drain. When you are satisfied that the system is not leaking, you should also test the flow of water with the stopper open. Run water into the sink with the stopper in the open position to see how quickly the water drains out of the sink. If the water seems to be draining slowly, the pivot rod may need to be adjusted to allow the stopper to open further.
Final Thoughts
Maintaining the infrastructure of your plumbing system is integral to having a functional home. Not every problem can be solved with a drain snake. While sink stoppers are not considered as important as a toilet or a shower head, these parts still need to be regularly cleaned, repaired, and replaced to avoid slow sink drainage. The straightforward steps listed above provide a simple walkthrough for the average DIYer to learn how to fix a sink stopper.
Just keep in mind that it is much easier to clean and maintain a universal pop-up sink stopper than it is to work with a more traditional pop-up stopper because new universal pop-up stoppers function with an internal spring mechanism, instead of relying on a complex pivot rod, extension bar, and lift rod assembly. The only drawback to universal pop-up stoppers is that you do need to push down on the actual stopper to either close or open the stopper, while you would be able to keep your hands out of the sink with a more traditional sink stopper assembly.
