We may earn revenue from the products available on this page and participate in affiliate programs. Learn More ›
Like any other tool in your arsenal, a chainsaw must be properly and consistently maintained in order to perform effectively. Of course, you can hire a professional to sharpen your chainsaw, but most DIYers can learn how to sharpen a chainsaw in order to handle the job on their own and save some money in the process.
If you’ve noticed that your chainsaw no longer cuts as easily and cleanly as it once did, it’s a good time to learn how to sharpen the chainsaw blade and check for dull or sharpened teeth. This guide to sharpening a chainsaw chain will help you keep the chainsaw blade in good working order.
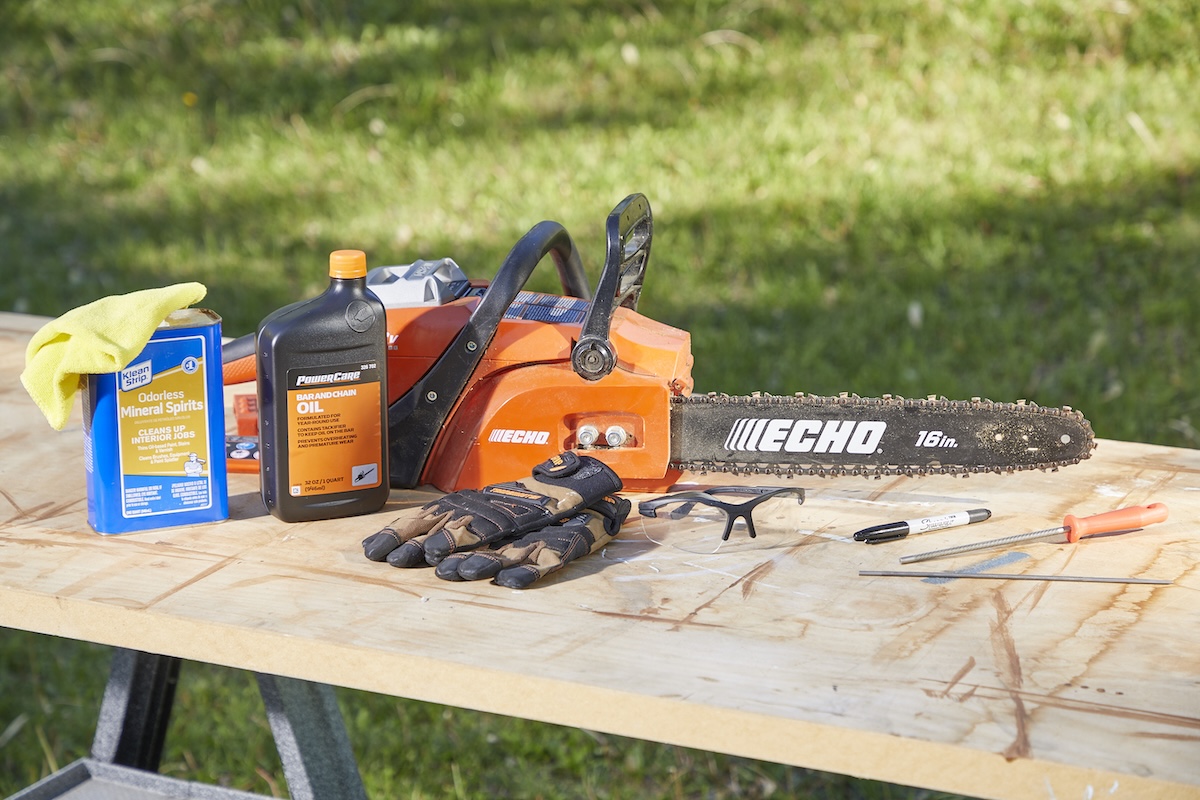
Tools & Materials
Bobvila.com may earn a commission from purchases made through these links.
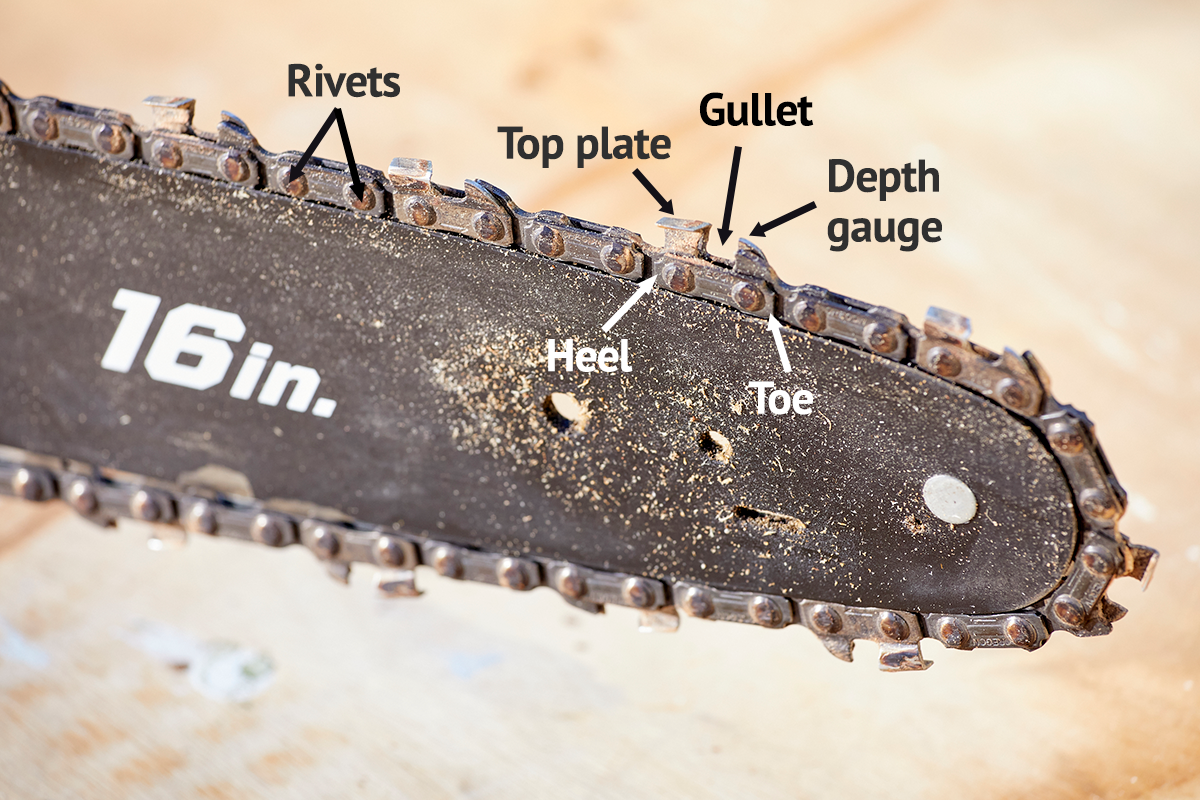
Chainsaw maintenance requires a basic understanding of the tool’s component parts. Most models owned by homeowners typically include the following parts:
- Engine
- Drive mechanism
- Guide bar
- Chain
- Heel
- Toe
- Notch
- Side plate
- Top plate
- Gullet
- Depth gauge
- Rivet hole
Choosing the Right Chainsaw File
Chainsaw files are made in specific sizes that match up to the size and shape of the chainsaw teeth. If the file is too large or too small then it can be difficult to properly sharpen the blade. While there are many sizes, the most popular file sizes are 4 millimeters, 4.8 millimeters, and 5.5 millimeters. Always check your user manual to be certain that you are using the correct file.
- 4 mm: This file size is typically paired with chainsaws that have a chain pitch of 0.25 of an inch. The code number to reference on the depth gauge is 1.
- 4.8 mm: The code number on the depth gauge is 2, which indicates that the chainsaw should be sharpened with a 4.8-millimeter file that’s suitable for the 0.325-inch chain pitch.
- 5.5 mm: Used with chainsaws that have a 0.404-inch chain pitch, this file size is noted by code number 4, located on the chainsaw depth gauge.
Sharpening a Chainsaw Chain
When a chainsaw is sharp it’s easier and safer to use the tool, and minimizing wear and tear on the machine and improving overall efficiency. There are telltale signs to look for if a chainsaw chain needs to be sharpened. Take action and grab a sharpener ff you notice any of the following:
- Pay attention to the chainsaw debris. If the saw is spitting out dust instead of sharp wood chips then it likely needs sharpening.
- Similarly, if you find that you need to put more physical effort into cutting through wood, then this is a sign that the teeth on the chain are dull.
- Another indication that the chain needs sharpening is if the blade tends to pull to one side more than the other. You will need to sharpen the chainsaw chain to even up the cutting teeth.
How to Sharpen a Chainsaw
There are two approaches to sharpening a chainsaw: First, the task can be handled by means of an electric chainsaw sharpener. (If you fell trees frequently, electric chainsaw sharpeners are an indispensable convenience.) Another option is manual sharpening, using a combination of muscle, sweat, and sharpening files.
Since electric sharpeners are used mainly by tradesmen, these tips focus on the manual method of sharpening using a chainsaw sharpening tool, which is more common and accessible to DIYers.
Because the chainsaw chain comprises a series of teeth, you need a chainsaw file that precisely matches up with the size of an individual tooth in the chain. For reference, the most common sizes are 3/16-inch, 5/32-inch, and 7/32-inch.
Note: Consumer-friendly chainsaw sharpener file kits, like this Katzco chainsaw sharpener file kit, conveniently include everything you need to sharpen any common size.

Tried-and-True Advice
“I can’t stand a dull chain while working in the woods. I think it’s important to carry an extra chain while you work. It means you won’t need to stop for sharpening and you can wait to sharpen at home. When you do return home, taking your time while neatly filing every tooth means the saw will slice through wood rather than struggling and burning. Sharpening is something I do often to make my chains last longer and keep my chainsaws performing at optimal levels.”
—Zach Lazzari, Contributing Writer
Step 1: Clean the chainsaw chain.
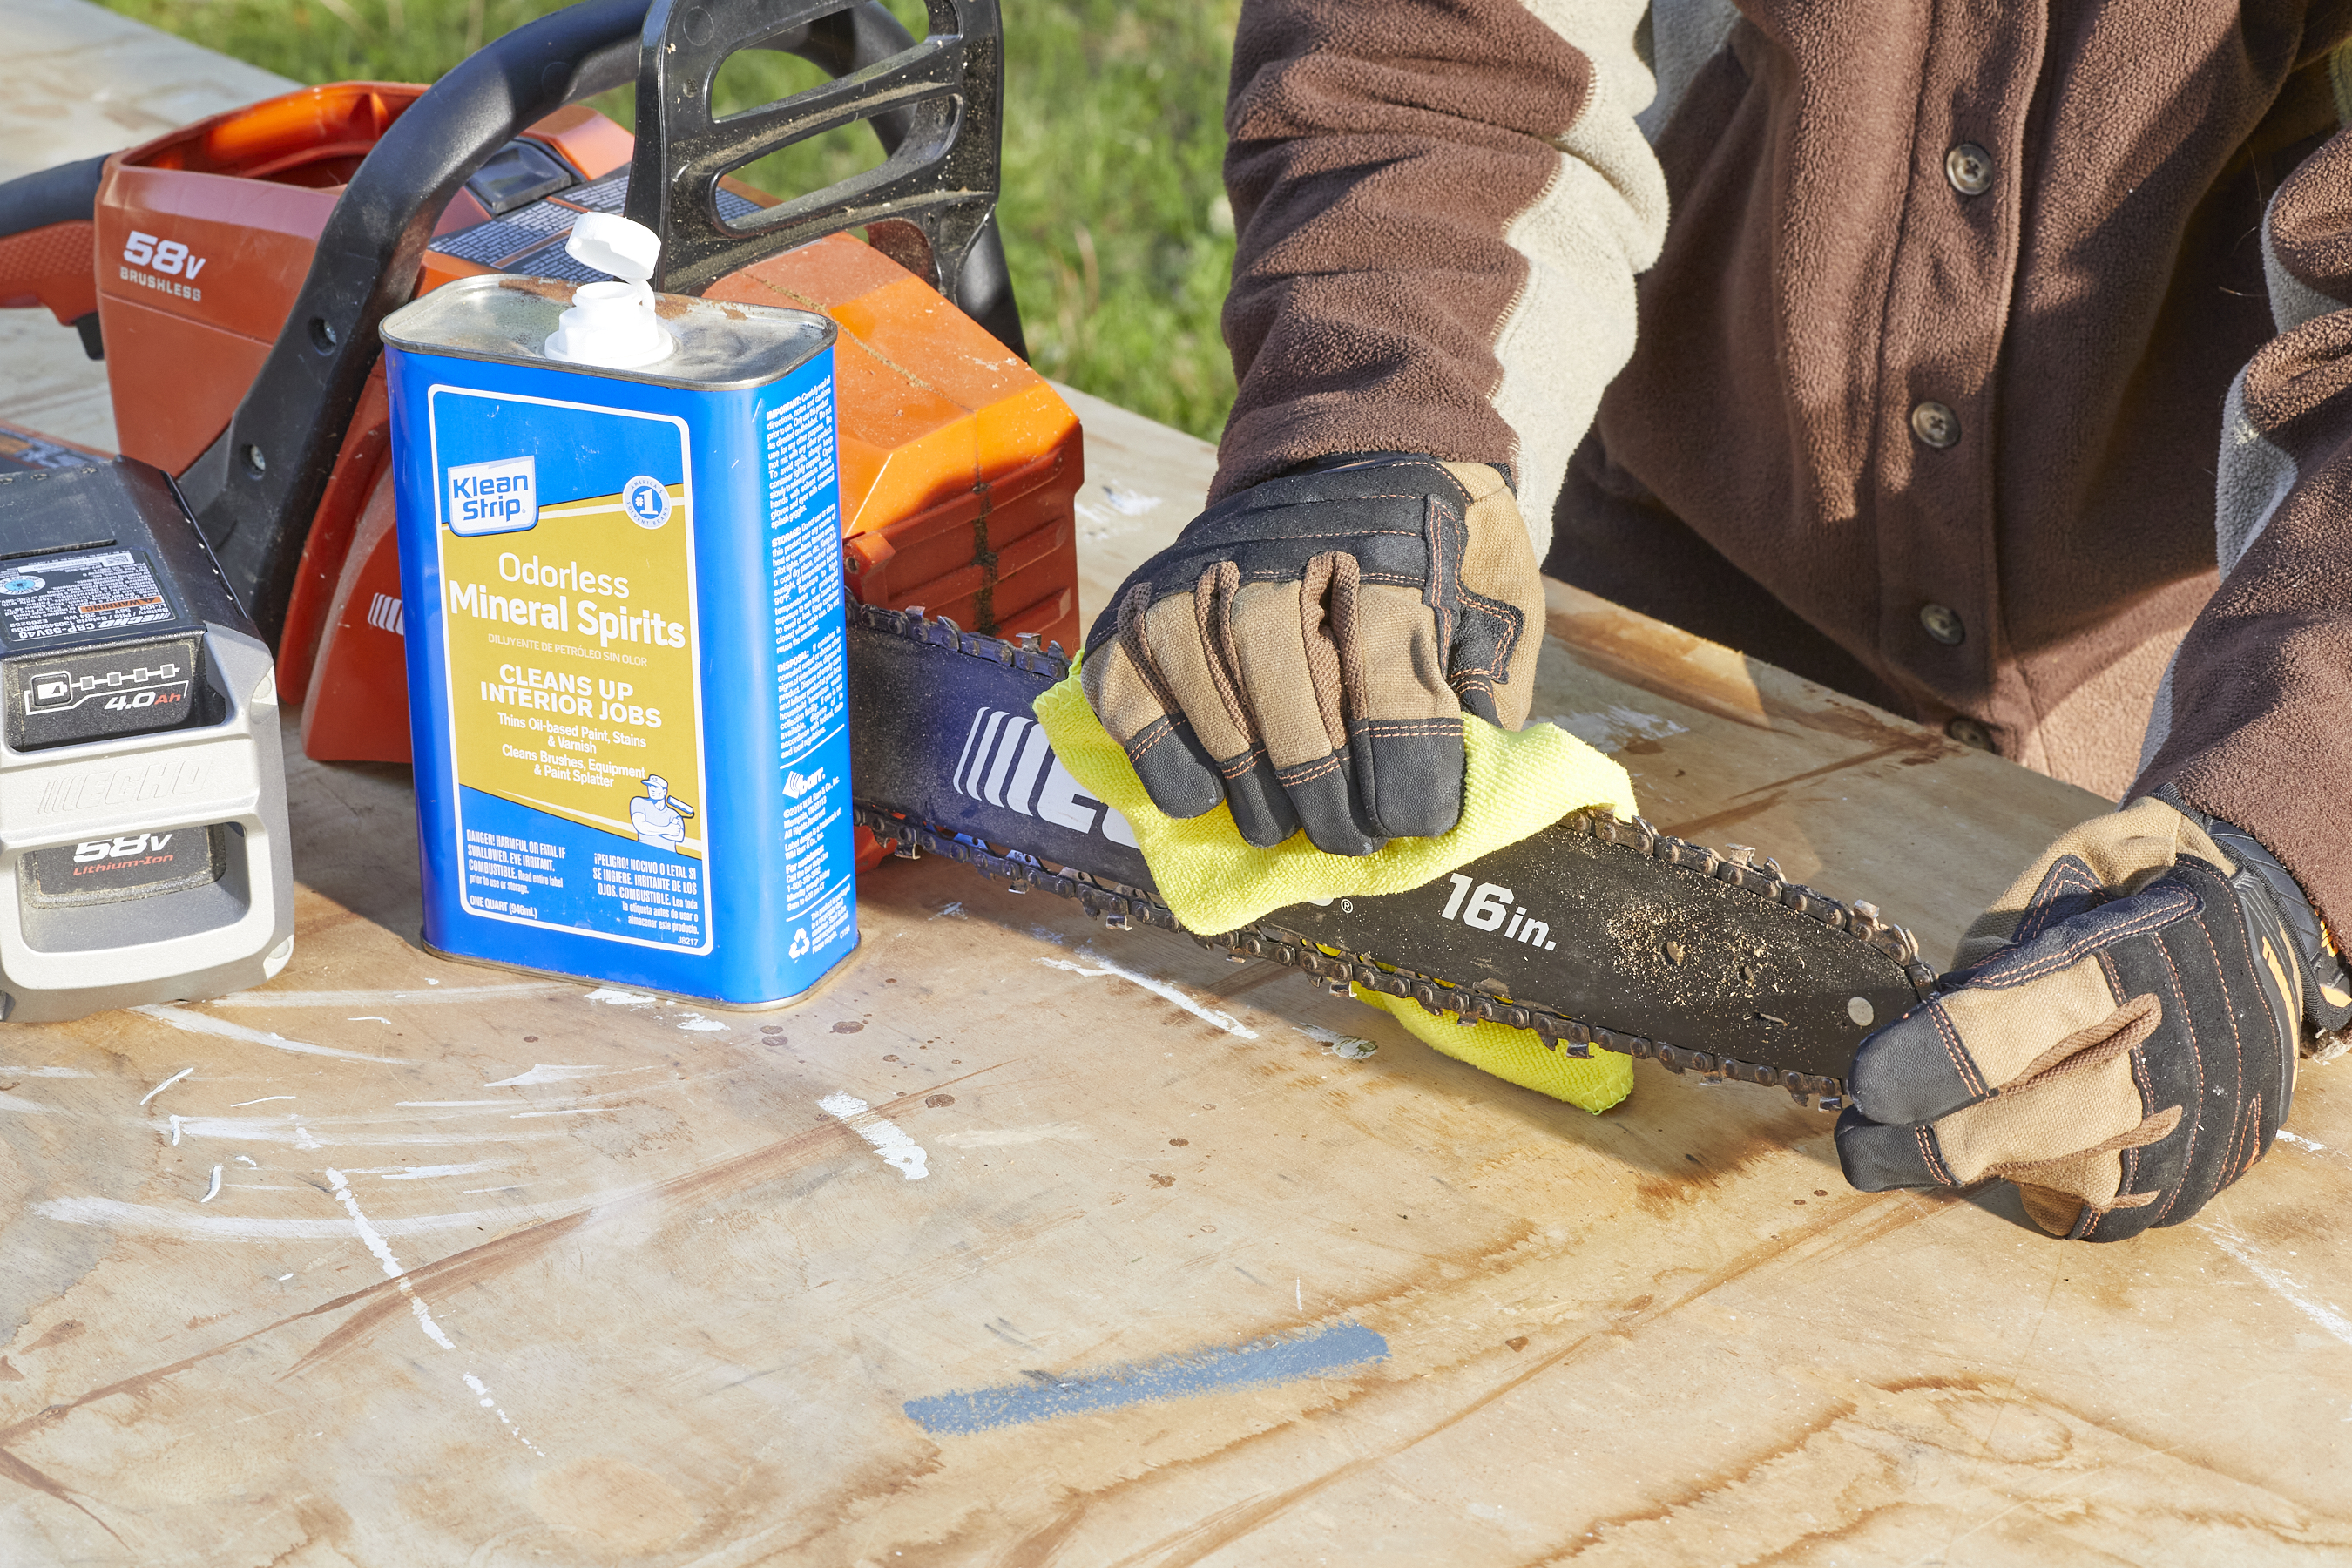
Once you’ve obtained a file of the correct size, put on appropriate safety equipment, like work gloves and safety glasses. Next, begin work by thoroughly cleaning the chain, removing all oil, dirt, and debris. Use an old towel and a screwdriver to do this. Depending on the condition of the chain, you may also need to use mineral spirits.
Inspect the chain as you’re cleaning it. If any of the teeth are damaged, the chain may be unsafe to use. Instead of proceeding to sharpen the chainsaw, you might first need to repair or replace the chain.
Step 2: Set the chain tension.
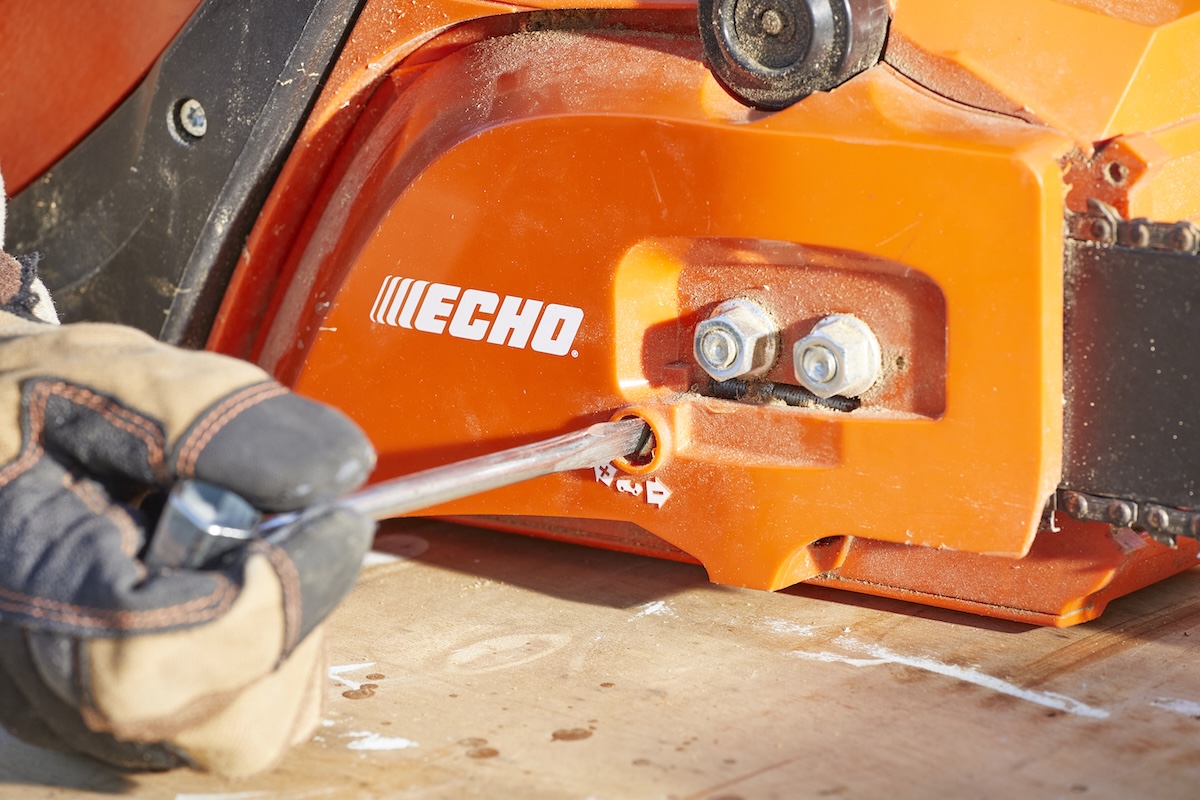
The chain on your chainsaw needs to be set to a specific tension in order to prevent problems while you work. A loose chainsaw chain increases the chance that the saw will kickback or that the chain will be thrown off the guide bar. A chain that is too tight may not move at all, or may increase the amount of friction between the parts and cause excess heat to build up. Overheated parts increase the risk of fire—and significantly reduce the parts’ lifespan.
To avoid this issue, set your chain tension by locating and adjusting the tensioning screw on the side or front of the saw, then turn the screw clockwise to increase the tension or counterclockwise to loosen the chain. Test the chain by pulling it from the underside of the guide bar so that one or two links pull away from the bar. Release the chain and it should snap directly into position, indicating that the chain is tight enough to use. If you cannot pull the chain away from the bar, it is too tight and needs to be loosened. If the chain does not snap back into position, it’s too loose and needs to be tightened.
Step 3: Stabilize the chainsaw.
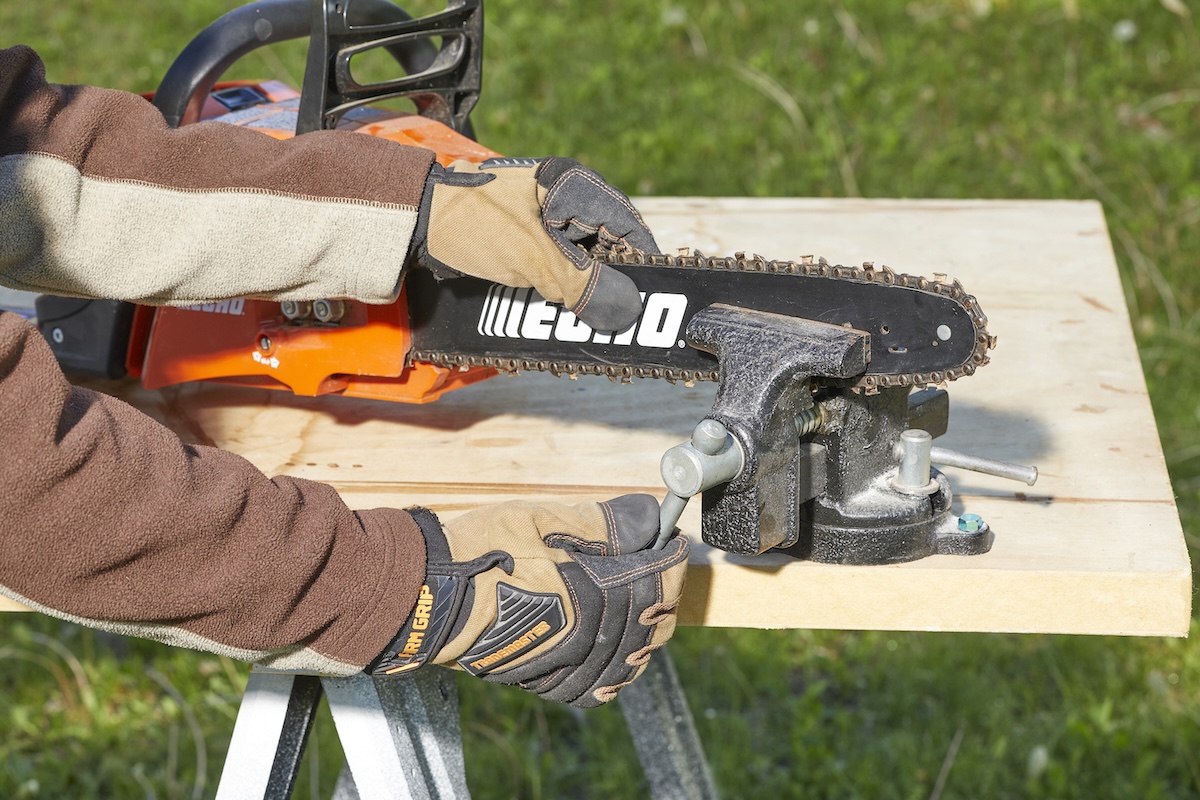
For best results, you need to firmly stabilize the chainsaw before attempting to file the chain. Some choose to place the chainsaw in a vise, with the clamps holding the guide bar in such a way that the chain can rotate freely. Alternatively, you can enlist a helper to keep the tool steady while you work.
Step 4: Begin sharpening at the shortest cutter.
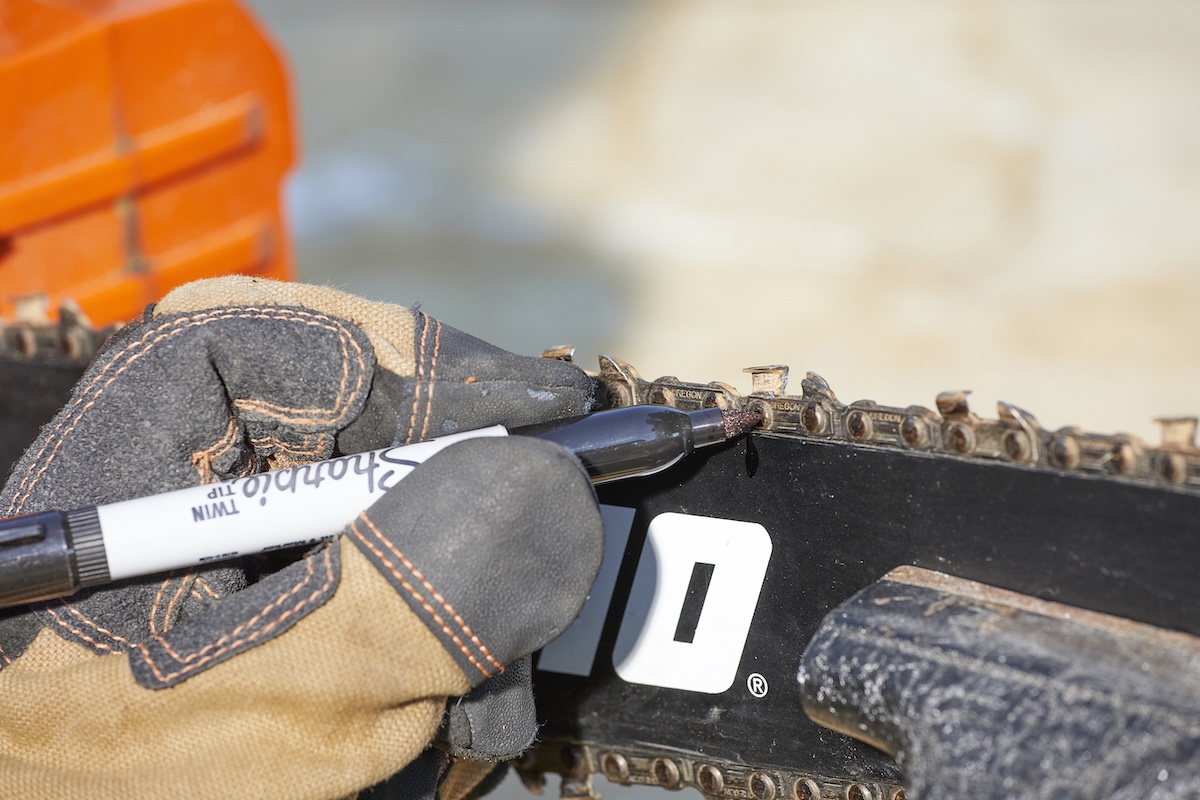
Locate the shortest cutter blade on the chain (the cutters are the ones with flat tops). This is where you should start with the chainsaw sharpener. If all of the cutters are the same height, then you can start with any tooth on the chain. However, remember to mark—with a pencil, marker, or even nail polish—the first one that you sharpen, so that you continue to work in the same chainsaw chain direction.
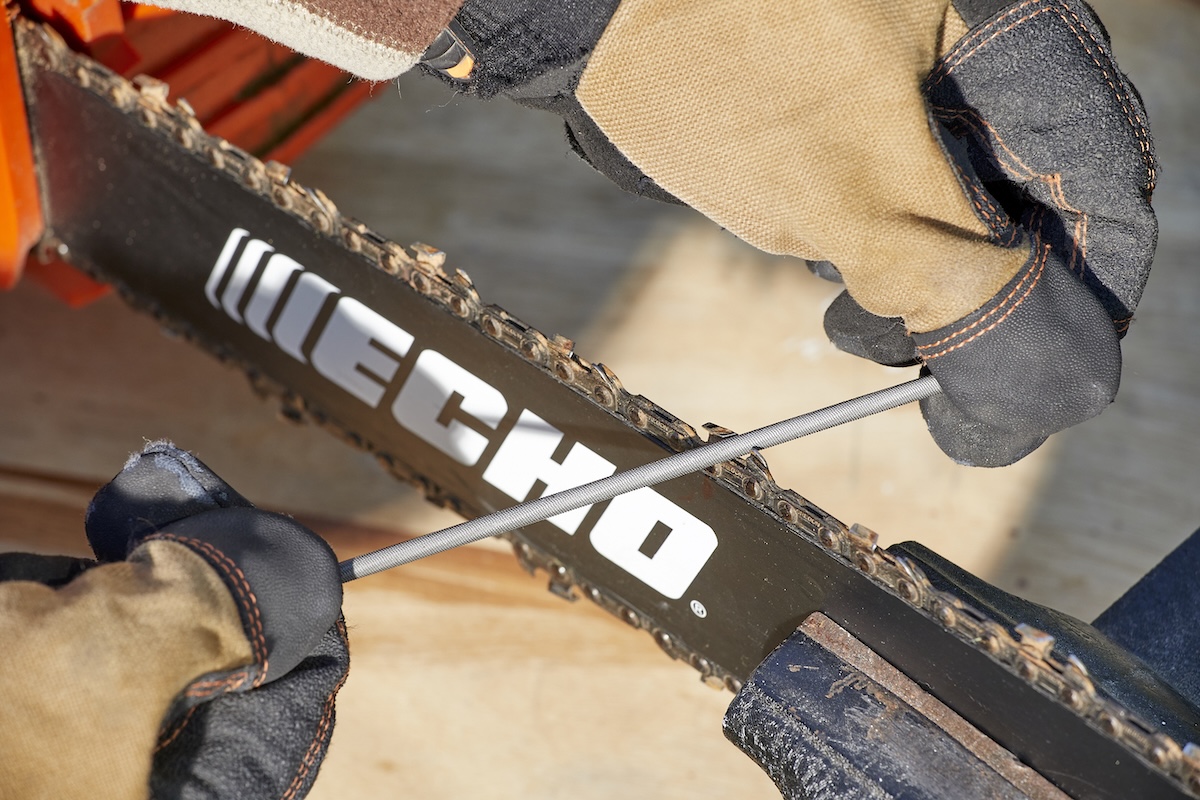
Step 5: Stroke the teeth at an angle.

Set the file into the notched section at the head of the cutter. Holding the file at an angle, the same angle at which the notch was initially ground or most recently filed, slide the file across the teeth, twisting it somewhat so as to create friction as you stroke. Reference a chainsaw sharpening angle chart, for help determining the proper angle. From that initial cutter, proceed to file every second cutter around the chain.
Step 6: Sharpen the other side of the chain.
Now reverse the saw and proceed to file each of the teeth that you left alone in the course of your first pass. When you’ve finished, the flat tops of all the cutters should be more or less precisely the same length.
Step 7: Check your depth gauges.
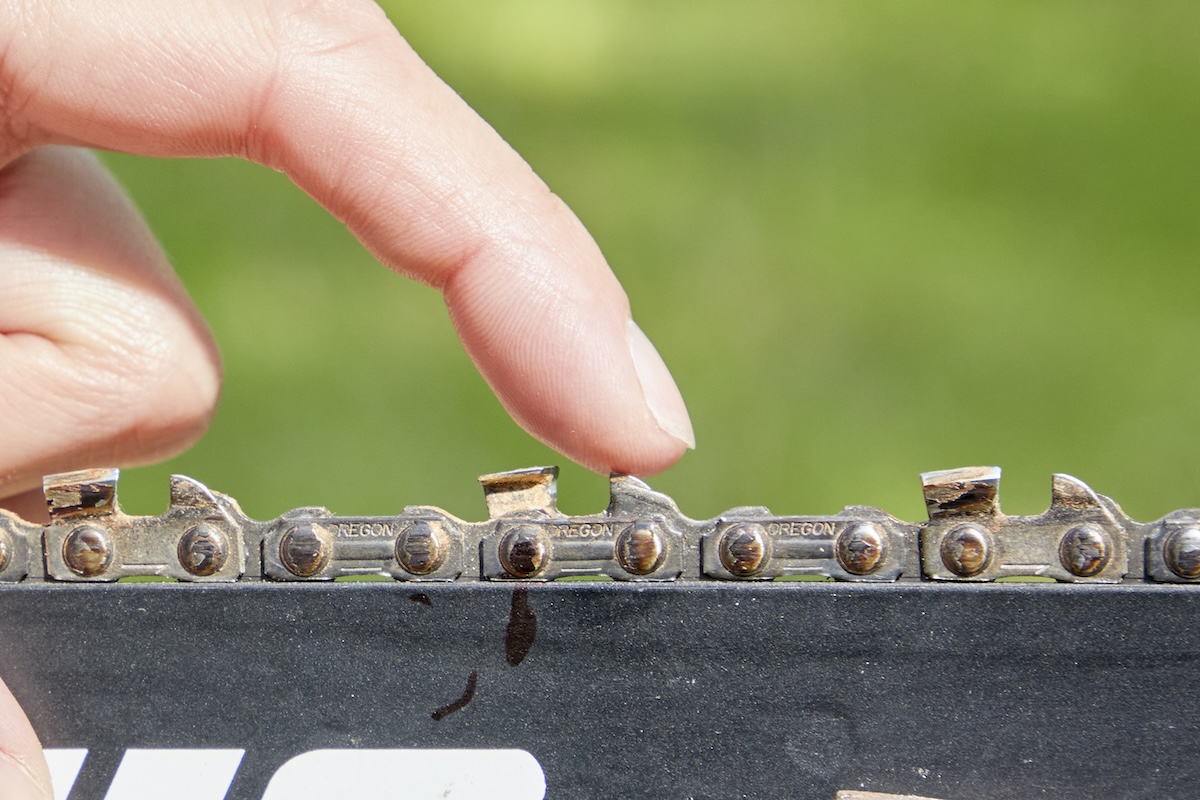
Finally, inspect the depth gauges (these are the curved links between the cutters). Each depth gauge, or raker, should be shorter than the adjacent cutter. If you find a depth gauge with a height that exceeds its closest cutter, file down the raker so that it sits about 1/10 of an inch below the height of its cutter counterpart.
Working with an Electric Chainsaw Sharpener
If you are working with an electric chainsaw sharpener, then you will need to measure the pitch and gauge of the chain in order to determine the appropriate sharpening stone to use with the chainsaw, as well as the correct tooth angle.
Place the chainsaw chain on the sharpener and tighten the vise to hold the chain in place. Once you have all the angles set according to the grinding angles chart (typically included with an electric chainsaw sharpener), you can lower the grinding wheel to the chain in order to sharpen the current cutting tooth. Loosen the vise and slide the chain to line up the next cutting tooth, then tighten the vise and sharpen the tooth with the grinding wheel.
- Always measure the chainsaw chain and refer to the product manual for the correct sharpening setup.
- Make sure to set the wheel depth stop to prevent the grinding wheel from coming into contact with the chain chassis.
- Complete all right-hand cutting teeth in sequence, then all left-hand cutting teeth in sequence to avoid switching back and forth.
Maintaining Your Chainsaw Blade
Whether you use the chainsaw infrequently to cut firewood or you regularly head out to maintain the forested areas on the property, different chainsaws operate slightly differently and have different maintenance requirements. Study the manual that came with your chainsaw to understand the needs of your specific model.
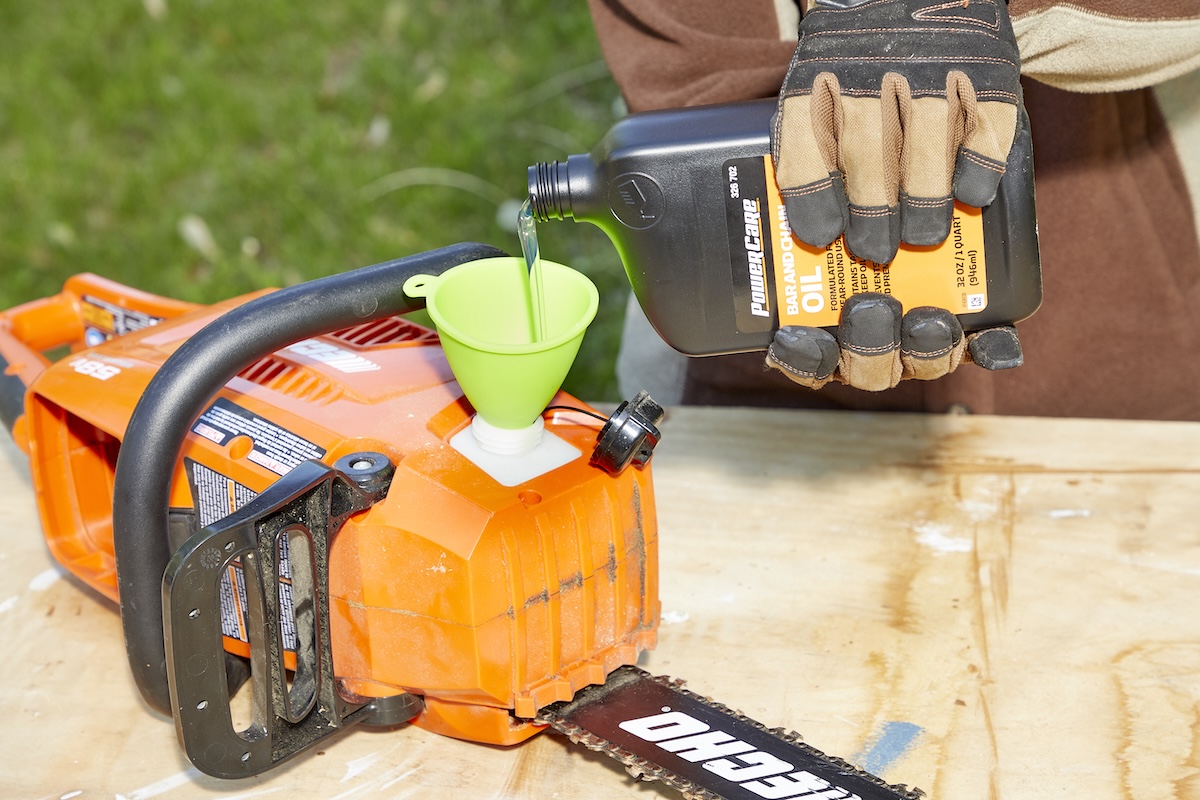
It’s almost invariably true that every part of a chainsaw either must have or would benefit from lubrication with a petroleum-based bar and chain oil. This involves simply pouring the lubricating oil into the saw’s chain oil reservoir, where the oil is gradually dispersed to help keep the saw functioning properly while you work.
- Occasionally inspect the motor and chain, adding lubrication when necessary.
- Confirm on a regular basis that there’s a sufficient quantity of oil in the tool’s reservoir.
- Check the guide bar, which holds the chain in place. It can become twisted or bent during use.
- Avoid problems by ensuring the integrity of the guide bar before you start up your chainsaw, each and every time. Even while you’re working, it’s wise to occasionally spot-check this crucial part of what is, after all, a powerful and potentially dangerous tool.
Final Thoughts
Now that you know how to sharpen a chainsaw, bear in mind that the more frequently you use the tool, the more often it’s going to need maintenance. If you are using the chainsaw for hours on end over the course of a day, you may need to pause at some point in order to restore the chain’s sharpness. Some chainsaws are likely to show wear in specific areas more than others. Pay special attention to the area near the tip of the saw, particularly if you often use it for cutting tree limbs.
Learning how to sharpen a chainsaw isn’t difficult, making it a great task for avid DIYers. Just make sure that you wear appropriate safety equipment while cutting and sharpening. Consider using safety glasses, gloves, hearing protection, and chainsaw chaps to help protect you from cuts and punctures.
FAQs
Q. How tight should a chainsaw chain be?
To check the tension of a chainsaw chain, pull one or two links of the chain down from the underside of the bar. Release the chain and it should snap back into place.
If the chain is too tight, then you won’t be able to pull the chain away from the bar. However, if the chain is too loose, then it will remain slack. Loosen or tighten the chainsaw chain with the tensioning screws located on the front or side of the chainsaw.
Q. When do you know it’s time to replace a chainsaw chain?
If you regularly sharpen and properly maintain your chainsaw, then it should be easy to notice when it’s time to replace the chain. Look for clear signs of overuse or tool failure, such as severe dents in the chain, rusting, uneven cuts, and a chainsaw blade that regularly overheats and smokes while in use.
Q. How long should a chainsaw blade stay sharp?
The duration of time between sharpenings really depends on the amount that the saw is used. A chainsaw may only need to be sharpened once a year if it is rarely used, but a tool that is frequently used will need to be sharpened regularly to ensure that the blade doesn’t get too dull. On average, a chainsaw blade will retain its sharpness for about 3 hours of actively cutting through wood.
Q. Why does my chainsaw blade dull so quickly?
There are several reasons why a chainsaw blade may dull quickly. Some common ways are from overuse, steep angled cutting teeth, cutting through dirty wood, or working with difficult wood like hickory, ironwood, and black oak.
Q. How often should you flip the bar on a chainsaw?
Depending on the amount that the chainsaw is used, you can opt to flip the bar at the end of every use while cleaning up, or you can keep the bar in the same position until it comes time to replace the chainsaw blade. As long as the bar gets flipped semi-regularly to help even out the wear-and-tear on the tool, the frequency with which it is flipped isn’t as important.
