We may earn revenue from the products available on this page and participate in affiliate programs. Learn More ›
This content has been brought to you by Hyde Tools. Its facts and opinions are those of BobVila.com.
Concrete is one of the most durable construction materials around, but the characteristic dull gray of a concrete slab can seem cold and unappealing, especially as flooring. Lucky for many DIY-inclined homeowners, concrete is also a fairly versatile material that offers many options for repairs, alterations, and improvements. You can scrape off dried-on gunk, fill cracks, change the color—and even add patterns!
The bottom line: If you have concrete floors in your basement, garage, or screened-in patio, you don’t have to live with lackluster. You can refresh the entire space by painting your concrete floors.
In combination with the right tools and techniques, today’s masonry paints, designed specifically for concrete, make it easy to turn a drab concrete floor into an attractive surface that can complement a variety of spaces, both indoors and out.
How to Paint a Concrete Floor
MATERIALS AND TOOLS
– 3″ Extra Heavy Duty Chisel Extension Pole Scraper (available at hydestore.com)
– Extension pole
– Protective eyewear
– Protective clothing
– Chemical-resistant gloves
– Concrete degreaser solution
– Masonry rust remover solution (if necessary)
– Stiff bristle push broom
– MAXXGRIP PRO® High Carbon Steel 6-3/4″ Wire Brush (available at hydestore.com)
– MAXXGRIP PRO® High Carbon Steel 9″ Wire Brush (available at hydestore.com)
– Pump sprayer
– Wet/dry vacuum
– Masonry crack filler
– Caulking gun
– 2″ Stiff BLACK & SILVER® Putty Knife (available at hydestore.com)
– 100-grit sandpaper
– Plastic wrap (optional)
– Painter’s tape
– Richard Tools’ 4-Piece Paint Roller Kit (available at arichard.com)
– Extra roller covers
– Paintbrush
– Masonry primer
– Epoxy paint for masonry
– Masonry sealer
– BLACK & SILVER® Paintbrush & Roller Cleaner (available at hydestore.com)
– Soap
STEP 1: Prep the Surface

Even after your concrete floors have been covered with a new color, their condition will remain visible. Lumps, cracks, and other imperfections that you didn’t deal with before you painted will retain just enough texture that their shadows will attract attention. That’s why you want the surface to be as smooth and clean as possible before you begin painting concrete floors.
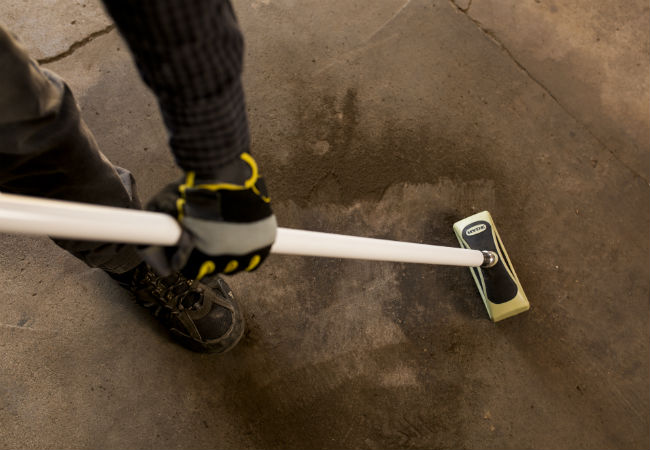
Get rid of the gunk.
Garage and basement floors are notorious for stuck-on paint splatters and adhesive residue. Fortunately, scraping away accumulated gunk doesn’t have to be a back-breaking task if you use a scraper that attaches to an extension pole, such as Hyde Tools’ 3” Bent Chisel Scraper (available at hydestore.com; $11.84). This heavy-duty hand tool features a rock-hard, high-carbon steel blade that makes quick work of scraping away hardened residue. Thread a standard extension pole into its red handle, and you’ll find that the blade is bent at just the right angle for you to scrape standing comfortably.
New paint sticks only to a clean, dry surface.
For best results in the long run, with minimal peeling, start with a concrete degreasing product that’s suitable for your floors (depending on whether they’re interior or exterior surfaces). Because concrete degreasing products are often applied to damp concrete, suit up in protective eyewear, clothing, and gloves, and spray down the floor.
- On patio and garage floors—which can dry out in the open air—it’s easiest to wet the surface with a garden hose. Then, apply the degreaser following the instructions on the label, scrub the solution into the floor with a stiff-bristle push broom, then hose off the solution. Remove any stubborn rust spots left behind by applying a rust removal solution designed specifically for use on masonry and scrubbing the stain with Hyde Tools’ MAXXGRIP PRO® High Carbon Steel 6-3/4″ Wire Brush (available at hydestore.com; $14.24). The brush can be held in the hand—its soft, ergonomic handle makes it easy to grip—or you can attach it to an extension pole so you don’t have to crouch on your hands and knees while you’re scrubbing away large stains. Its tempered carbon-steel bristles will maintain their shape even if you have a floor full of rust to remove.
- Cleaning indoor floors is a little trickier since you can’t spray them down with a hose. Instead, use a pump-type sprayer to saturate the concrete with water, then apply the degreasing solution (following the instructions on the label) and scrub with a push broom. Keep a wet/dry vacuum handy to remove excess liquid. You may need to spray the floor a few times, vacuuming up the water each time, to completely rinse away the degreasing solution.
Finally, fill any cracks that could mar your finished floor.
Concrete filler adheres best to clean cracks, so scrape away any crumbling concrete using a wire brush like the MAXXGRIP PRO® High Carbon Steel 9″ Wire Brush (available at hydestore.com; $13.71). Its narrow-angled tip makes it easy for the tempered carbon-steel bristles to reach into cracks—even in corners. And, like Hyde Tools’ threaded wire brush, this one also features an ergonomic soft-grip handle that’s easy to grasp for reduced hand fatigue. Vacuum away the debris and fill the cleaned-out cracks with masonry crack filler (which is typically dispensed using a standard caulking gun). Smooth away any excess with a BLACK & SILVER® 2” Stiff Putty Knife (available at hydestore.com; $5.41) and, after the filler dries, sand the crack lightly with 100-grit sandpaper.

STEP 2: Prime and Paint
Priming before you paint concrete floors helps ensure that your new look will stick. Select a primer that’s compatible with both concrete and the epoxy paint that you’ll use as a finish coat. (Epoxy paint is the best choice for floors, which take a lot of abuse. You’ll get the most durable results from epoxy, and it will hold up better over time than latex paint.) Be sure that both the primer and paint are suitable for the location of your floor, whether it’s an interior or exterior surface.
Wait until your concrete floors are dry before you prime.
Moisture will prevent the primer and paint from adhering properly. An easy way to tell whether the floor is dry enough is to place a small piece of kitchen plastic wrap (about 12” square) to the surface of the concrete floor. Seal all edges with tape. Wait overnight and then check the plastic. If moisture has condensed on the underside of the plastic, let the concrete dry another 24 hours and test again. When no condensation is present, you’re good to go.
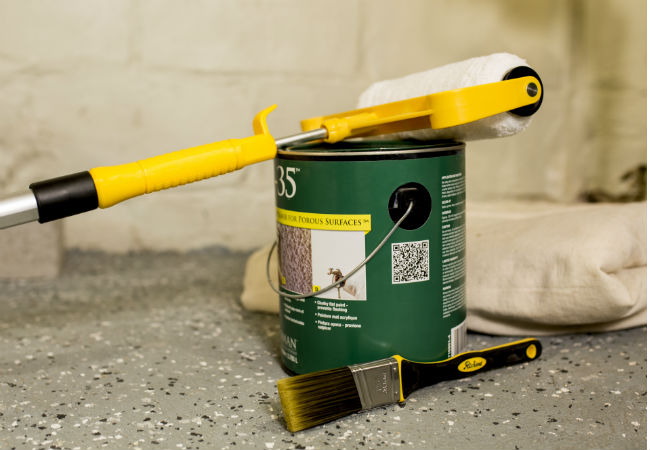
For large projects like this that require a few different applicators, double-check that you have everything you need.
If you have to stop to pick up something mid-job, you risk having the paint dry out and ending up with visible brush or roller marks. Make sure you aren’t forgetting anything essential before you get started—and save a little on your supplies, too—by consolidating some of your purchases into a single kit. The 4-Piece Paint Roller Kit from Richard Tools, for example, comes with all the basics for rolling on the primer and the paint: the paint tray and liner, a cage frame, and a polyester roller cover. Bonus: The threaded cage frame attaches to a standard extension pole so you can roll on the primer and the paint while standing.
Mask the bottoms of columns, railing posts, or baseboards with painter’s tape before applying any primer.
Use a paintbrush first to apply the primer around the floor posts and along the edges of the floor. Then, once you’ve cut in around the edges, you can apply the rest of the primer with a paint roller. Remember to start rolling on the side opposite the door so you don’t paint yourself into a corner, and work in narrow swaths, about 2 feet wide. When applying the primer and the paint, keep a “wet edge,” in other words, don’t let the swath you’ve just applied dry out before you roll the next one. This helps prevent visible roller marks on the finished floor.
After the primer coat has completely dried, apply the epoxy paint.
Epoxy paint comes in two parts, and you’ll need to mix the parts together according to the instructions on the label before you paint the floor, using the same method you used for applying the primer.
STEP 3: Seal the Deal
Once the epoxy coat dries (check the label for drying time), your floor will look amazing, but for the longest-lasting results, it’s a good idea to apply a sealant. Choose a sealant for exterior or interior use (depending on the location of your floor) and one that’s compatible with the epoxy paint you applied.
Heed the manufacturer’s instructions for ventilation, temperature, and humidity.
Otherwise, you risk the product lifting off anywhere from a month to a year down the line. Many good-looking jobs have been ruined by not paying attention to the cure temperature needed.
Use the same application method you used to apply the primer and paint.
Brush the sealant around the edges and then roll the floor. Let it dry completely before walking on it. The sealant will add a lustrous finish, provide a durable protective coating, and prevent the paint from fading so your floor will look just as good five years from now as it does today.
Cleanup Tips
- Most of today’s primers, sealants, and even epoxy paints can be cleaned up with just soap and water. Keep a bucketful handy, and soak paintbrushes and roller covers promptly to prevent the paint from drying on.
- You can often reuse the same roller cover for both priming and painting concrete floors if you clean it thoroughly between uses. Cleaning a roller cover is simple with Hyde Tools’ BLACK & SILVER® Paintbrush & Roller Cleaner (available at hydestore.com; $5.14). It features an easy-grip nylon handle and a curved stainless steel edge that’s designed to push paint down and off the roller. It also has a tined edge that resembles a comb for pulling even the stickiest paint from paintbrush bristles.
- Toss out disposable pan liners, but save the plastic paint roller pan for future use.
- When the sealant dries completely, use a sharp utility blade to cut along the edge of the painter’s tape before pulling it off. Cutting it makes it easier to pull off, leaving a crisp, clean edge. It may help to hold a straightedge along the tape while you cut.