
We may earn revenue from the products available on this page and participate in affiliate programs. Learn More ›
Our 20-year-old cabinets were showing their age. The lacquer finish had gummed up around the handles and pulls, and the cabinet rails and drawer fronts were worn and dinged. In addition, my wife and I were tired of the dark stain and the dated, discolored hardware. The cabinets were well built, though, with solid wood doors, drawer fronts, and frames. It would have been a shame to tear them out, and replacing them with a similar grade cabinet would have cost thousands of dollars.
Having painted cabinets in previous homes, I knew the pitfalls associated with applying enamel paint. Getting the look of a factory finish is not easy for the average homeowner. Nevertheless, a do-it-yourselfer can achieve a near-perfect finish by following these tips.
How to Paint Kitchen Cabinets
STEP 1: Time it right
Choose a week when temperatures are moderate. Avoid hot weather because it will cause the paint to dry before it can completely level itself, leaving ridges caused by brush bristles.
STEP 2: Clear the area
Empty your cabinets and drawers, as well as the countertop and shelves. Take advantage of the opportunity to get rid of duplicates and stuff you never use. Put everything in moving boxes and store them in a nearby room.
STEP 3: Remove doors, drawers, and hardware
Do not kid yourself into believing you can achieve a professional result without doing this. Make certain that you keep track of which cabinet doors and drawers go where, as it will make the re-install considerably easier. Scratching small Roman numerals under hinge leaves on cabinet frames and doors is one way.
STEP 4: Cordon off the kitchen
If the project looks like it will require a lot of sanding, hang overlapping sheets of plastic over the kitchen entrance to keep sanding dust from migrating throughout the house.
STEP 5: Clean cabinets thoroughly
Wash the cabinet frames, doors, and drawers thoroughly with a TSP and water solution. Pay particular attention to cabinets near the range. You’ll be amazed to find how grease has accumulated in the various recesses of cabinet doors.
STEP 6: Sand all surfaces
Lightly sand all surfaces that will be painted with 220-grit paper. This includes both sides of the doors, the drawer fronts, rails and stiles. Flexible sponge sanding pads, like those from 3M (view on Amazon), work great in the recesses of raised panels.
STEP 7: Apply primer
If your cabinets are stained, apply at least two coats of quality primer. For me, there’s nothing better than BIN, Zinsser’s shellac-based pigmented primer. It dries fast and flat, without brush marks (unlike most oil-based primers). You can buy it at home and hardware stores, as well as online (view on Amazon).
STEP 8: Prepare cabinets for paint
Lightly sand the initial primer coat, wipe it with a tack cloth, and prepare for applying the finish coats. You’ll need a lot of dust-free space for this. A two-car garage is ideal. Several pairs of sawhorses (or old chairs) and a large drop cloth are helpful, too.

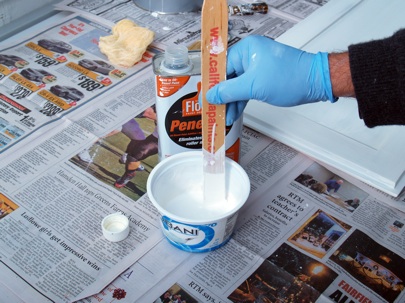
STEP 9: Thin your alkyd-based paint
Mix a thinning agent into an alkyd-based enamel paint according to the manufacturer’s directions. For this job, we used Benjamin Moore’s Impervo semi-gloss paint. Avoid using water-based paint unless you’re okay with visible brush strokes. For the thinner, I’ve have had excellent results with Penetrol (view on Amazon).
STEP 10: Apply the paint finish
Paint the backs of the cabinet doors first. Do the fronts last; they’ll be less likely to be marred by drips. Apply paint with the grain (in the direction of the longest dimension).
Allow the coat to dry thoroughly before flipping over the doors (or drawers) and doing the opposite sides. Be vigilant about drips and paint buildup in recesses.
(Note: For doors with recessed panels, paint the recesses first using a 2-in. brush designed for alkyd enamels— a China-bristle brush, or a brush with a blend of polyester and nylon.)
Paint the flat areas, including the cabinet boxes, with a high-density foam roller or with a high-quality bristle brush.
Tip off rolled and brushed surfaces by lightly dragging a wet (but not loaded) brush tip across the entire length of the surface you’re painting.

STEP 12: Last but not least
Reinstall doors and drawers, hinges and catches. Then install the new drawer and door pulls or knobs.
Money-saving tip: There are many sources online for cabinet hardware at deep discounts compared to home centers. The selection is greater, too.

