We may earn revenue from the products available on this page and participate in affiliate programs. Learn More ›
Whether you’re gutting a 1970s-style bathroom, converting the kitchen and living room into a space with an open floor plan, or embarking on any other remodeling projects, you’re likely going to have to tear a few things apart to get the job done.
Demolition can involve bashing through walls, ripping up old flooring, or even cutting through corroded metal plumbing. Since you won’t be doing any of those things with your bare hands, you’re going to need a good set of demo tools (along with safety glasses, gloves, and a dust mask, of course). Ahead, learn about some of the best teardown tools for remodeling.
1. Sledgehammer

Before you can put in the new, you’ve got to pull out the old. Few tools are better suited for smashing apart the latter than a good sledgehammer. With a forged, heat-treated steel end that includes a wedged side and flat side, this 16-pounder from Fiskars is adept at taking down walls and pounding through concrete. Its IsoCore Shock Control System reduces the amount of impact shock transferred to the operator by half compared to sledgehammers with wooden handles.
Get the Fiskars PRO IsoCore Sledge Hammer at Amazon for $104.99.
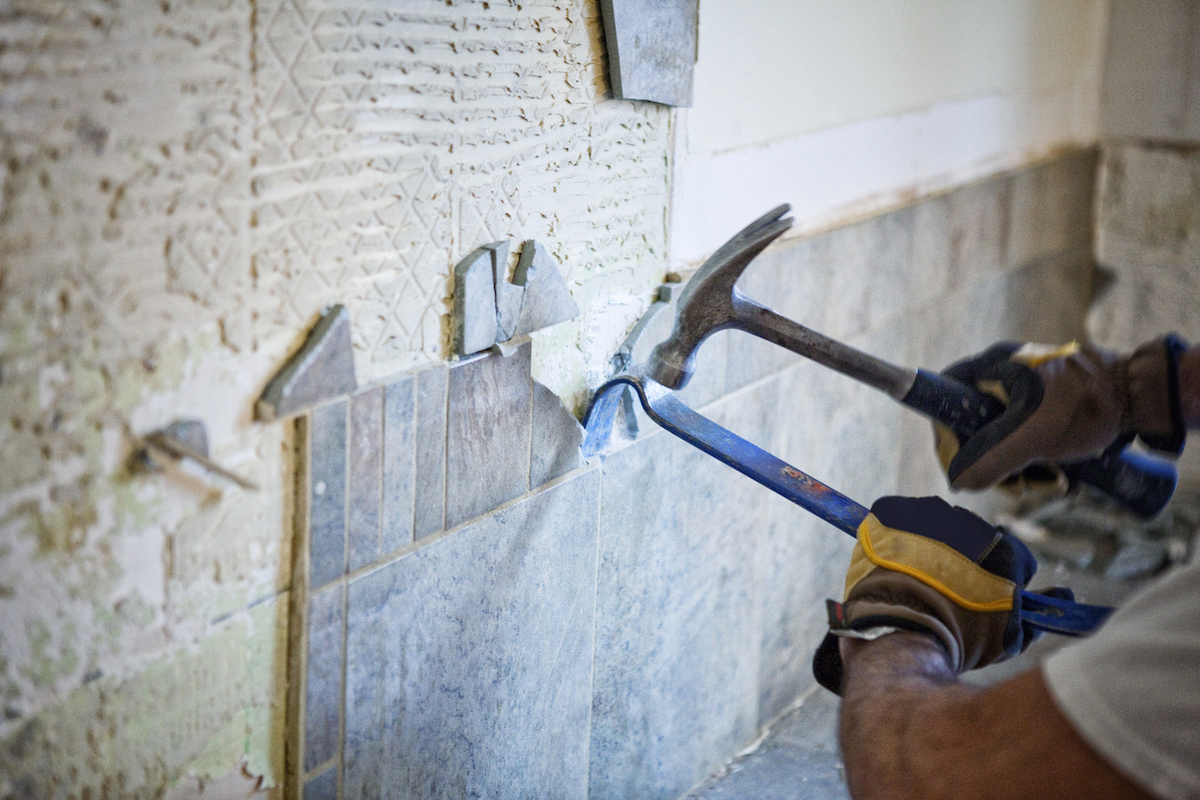
2. Pry Bar

Whether it’s laying tile or hanging drywall, home improvement projects often involve tightly attaching materials to other materials. When it’s time to remodel, the best option for undoing those connections is a double-headed crowbar or pry bar, which is adept at separating everything from drywall and framing to tile and concrete. The key to using a pry bar is finding that angle for maximum leverage between the two pieces that need separating. With a pivoting head that locks into 15 different positions, this 18-inch demolition bar from Crescent allows you to do just that.
Get the Crescent 18” Indexing Flat Pry Bar at Amazon for $29.77.
3. Locking Pliers

Demolition often involves removing old fasteners. Most demo bars have nail removers that will take care of intact nails, but what do you do when you encounter a nail with a sheared-off head or screws that can’t be pried out? A good pair of locking pliers will hold onto nail shafts or screw heads, gripping them tightly so you can pull them out or unscrew them. With its jagged teeth, this set of Irwin locking pliers provides a deep bite into screw heads or nail shafts for maximum grip. The longer handle and curved head provide ample leverage for pulling nails out of wood.
Get the Irwin Vise-Grip Curved Jaw Locking Pliers at Walmart for $19.80.
4. Needle-nose Pliers
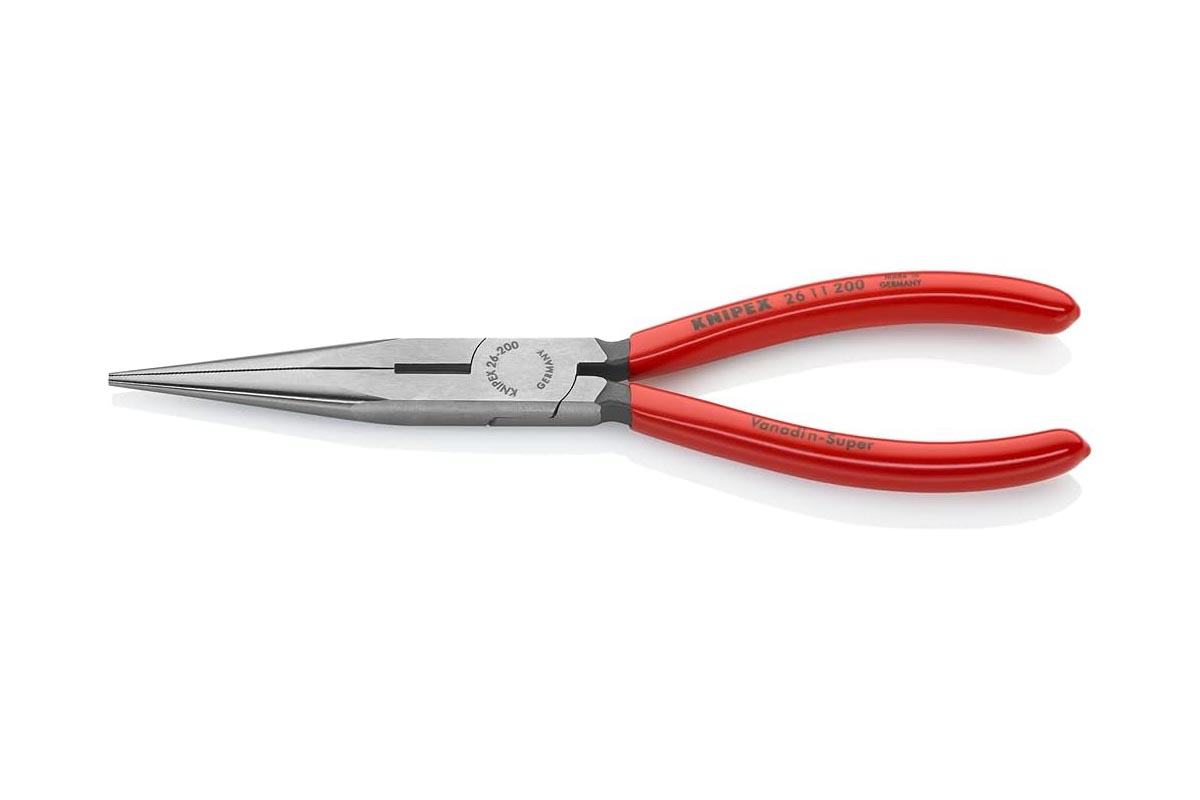
Removing nails, staples, and other hard-to-reach fasteners is much easier when you’ve got the right tools. Needle-nose pliers have a long nose that allows them to slide into tight holes while still maintaining enough space to open and close. These pliers have serrated teeth along the length of the jaws to grip tightly and securely, even under strong twisting pressure. Additionally, this set of Knipex needle-nose pliers has a cutting edge at the back of the jaws that is ideal for cutting wires, staples, or even small screws and nails, making it easier to remove these fasteners during demolition.
What our tester says: “Right out of the package, the Knipex needle-nose pliers showed quality craftsmanship with precise-fitting jaws that weren’t even a hair out of alignment. We found the pliers to be comfortable in hand and well balanced.”—Tom Scalisi, Product Reviews tester and writer
Get the Knipex Needlenose Pliers at Amazon for $30.19.
5. Reciprocating Saw

Fitted with the right blade, a reciprocating saw can cut through virtually any material, including wood, iron, plaster, plastic, or stone. This versatile cutting ability makes it the ideal power tool for almost any home improvement project that calls for demolition. Powered by an 18-volt battery, this reciprocating saw from Makita can deliver up to 2,800 strokes of cutting power per minute yet weighs just over 8 pounds. And, with its toolless blade change system, it won’t slow you down while you work.
What our tester says: “Most reciprocating saws vibrate such that they leave your hand and arm tingling and numb after just a few cuts, but Makita’s 18V LXT is an exception. Of all the saws we tested, it produced the least amount of vibration, cutting smoothly through wood, metal, and PVC.”—Tony Carrick, Product Reviews tester and writer
Get the Makita 18V Cordless Reciprocating Saw at Amazon for $381.52.
6. Nail Puller

While a pair of pliers or a pry bar can remove old fasteners, it’s best to employ the services of a good nail puller if the demo job involves removing a lot of stubborn nails. These specialty tools have pincer-style heads specially designed to grip nails that are flush with the material’s surface and provide ample leverage for maximum pulling power. With its L-shaped design and curved jaws, this Crescent nail puller is one of your best options for pulling out those hard-to-grip nail heads.
Get the Crescent 19” Nail Puller at Amazon for $36.99.
7. Tin Snips

Though not a requirement for all demolition jobs, cutting through sheet metal requires a pair of tin snips. These tools are ideal for cutting away old ductwork when remodeling HVAC systems or chewing through metal wire lath when removing an old plaster wall. This pair of Irwin tin snips is capable of cutting through 24-gauge rolled steel or 26-gauge stainless steel.
What our tester says: “The extra-long blades on the Irwin utility snips made straight cuts easy, even with its inline handles. These long-nosed tin snips are worth having around for fast, short, straight cuts on stiff sheet metal or general work with hardware cloth and pliable sheet metals.”—Mark Wolfe, Product Reviews tester and writer
Get the Irwin Tin Snips at Amazon for $16.99.
RELATED: 10 Pro Tips for an Easier Demo Day
8. Hammer

While a sledgehammer may do more damage with each swing, a standard hammer allows for a more surgical strike. Its lighter weight and compact size allow you to remove smaller sections of drywall without causing the collateral damage that comes with a sledgehammer. Once the drywall is gone, flip the hammer over to remove any remaining nails with its claw side. With a grip designed to reduce impact vibration and a lightweight steel body, this Estwing hammer is ideal for light demolition.
What our tester says: “Whether hanging a picture, nailing fence boards into place, building a doghouse for Rover, or building an addition, the Estwing Rip Claw 16-Ounce Hammer is up to the job. A true joy to use, it’s well-balanced, absorbs shock well, and is incredibly durable. It drove nails without issue and removed them with similar ease.”—Tom Scalisi, Product Reviews tester and writer
Get the Estwing 16 ounce Hammer at Amazon for $24.98.
9. Demo Fork

When remodeling jobs involve ripping up old flooring or removing rotting deck boards, you (and your back) need a demo fork. These specialized tools are made from steel and feature long handles with a forked end that allow you to produce the massive amount of torque needed to pry free boards nailed into framing or subfloor while remaining in a back-friendly standing position. With its four-tine design and 40-inch length, the Honey Badger demo fork produces ample power for floor-wrecking jobs.
Get the Honey Badger Demo Fork at Amazon for $89.99.
10. Demolition Hammer
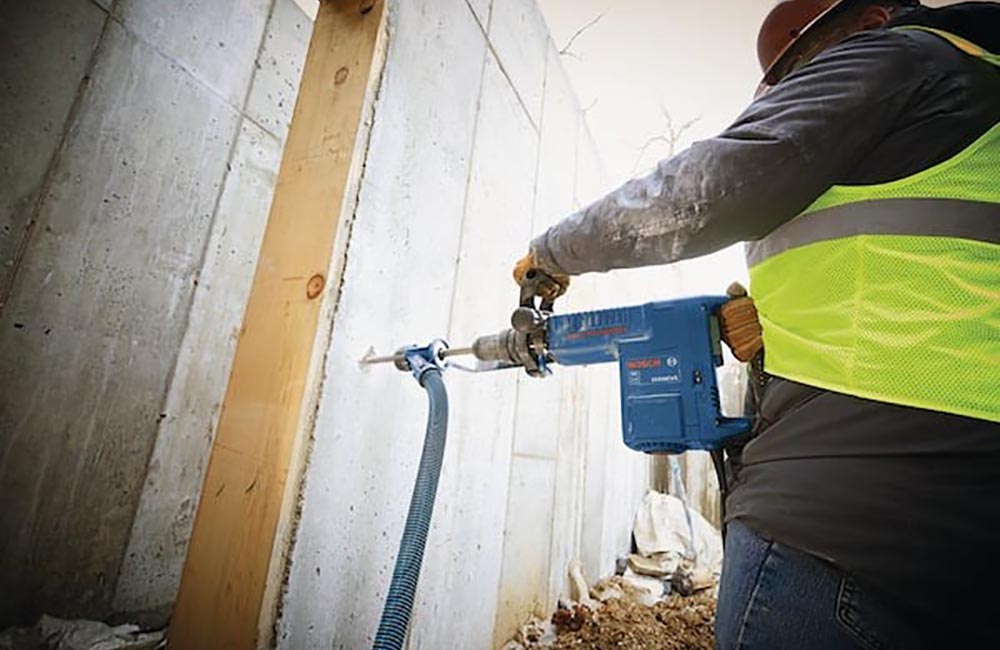
This power demolition tool employs the same principles as a jackhammer, but in a smaller size suitable for DIYers. It uses a motor to create a hammering action that drives its chisel-shaped head into concrete, brick, and other masonry. It’s ideal for breaking through concrete walls or even removing old tile. With a light weight and features that include padded ergonomic handles and variable speed settings, this Bosch demolition hammer is ideal for home improvement projects.
Get the Bosch 14 Amp Demolition Hammer at The Home Depot for $699.00.
11. Oscillating Multi-tool

With its numerous blade options and small size, this Swiss army knife of power tools is ideal for demolition efforts that demand control and detail. Use a hacksaw blade to slice off a protruding nail, switch to a grinding blade to cut through an old galvanized pipe, or equip the tool with a Sheetrock blade to cut out small sections of drywall. An oscillating tool makes it easy to remove a variety of materials without damaging the surrounding areas. With its adjustable speed range between 8,000 and 20,000 oscillations per minute (OPM) and high 4-amp power output, Bosch’s oscillating tool can handle a variety of demolition jobs.
What our tester says: “We liked the toolless blade-change system that allowed us to swap blades and sanding pads without using a wrench or a hex key. All it takes is pulling the lever to release the current blade, then putting another blade in place and pushing the lever back down to secure.”—Tom Scalisi, Product Reviews tester and writer
Get the Bosch Oscillating Tool at Amazon for $149.97.
12. Demolition Gloves

While you may use a sledgehammer, reciprocating saw or pry bar to smash, cut, or pull things apart, sometimes the best tools for your demolition job are your own two hands. Just don’t grab onto splintered wood, jagged metal, or shattered ceramic without a good pair of demolition gloves for protection. This pair of thick padded gloves from Ironclad have a Kevlar strip sewn in the web between the index finger and the thumb, adding extra durability and protection, as well as rubber-reinforced knuckle and finger insets so you can grab onto all manner of objects without fear of injury.
What our tester says: “These Ironclad Ranchworx work gloves were impressive right out of the package. They come with a lot of extras, including multiple rows of overstitching for durability. The black terry cloth strips on the back of the thumbs came in handy for wiping away forehead sweat as we conducted our tests in temperatures over 90 degrees Fahrenheit.”—Mark Wolfe, Product Reviews tester and writer
Get the Ironclad Ranchworx Work Gloves at Amazon for $34.06.
13. Carpet Puller

You can rip out that funky old carpeting by grabbing onto it with your hands and pulling it up, but you’ll struggle to get a good grip. A better option is to use a carpet puller, such as this Roberts carpet puller. One end has a serrated clamp that bites into the edge of the carpeting while the other provides you with a large handle that’s easy to grip for pulling. Since it’s made of diecast aluminum, you can pull it with all your might without worrying about it breaking.
Get the Roberts Carpet Puller at Amazon for $25.99.
RELATED: How to Remove Carpet
14. Pipe Cutter

If your demolition project involves gutting a kitchen or bathroom, then you’ll likely need to cut through old plumbing to add a new toilet, shower or sink. Working on plumbing is typically a challenge because there’s so little room for large tools. This small but mighty Ridgid pipe cutter doesn’t need much space to work its magic. Just attach it to copper, aluminum, brass or plastic pipes up to 15/16 of an inch in diameter and rotate to make a clean cut.
Get the Ridgid Pipe Cutter from The Home Depot for $15.98.
15. Shingle Remover

One of the hardest parts about putting a new roof on a house is removing the old roof. You can pull the old shingles off with a pry bar, or make life easier on your back with a shingle remover. This tool consists of a flat spiked head attached to a long handle. The spikes slide under the shingles while the bar provides plenty of leverage for pulling them up from a comfortable standing position. Galvanized steel teeth and its nearly 4-foot length make this model from Husky one of your best options for taking off an old roof.
Get the Husk Shingle Stripper at The Home Depot for $37.27.
16. Circular Saw Demolition Blade

Most of us associate circular saws with building things, not ripping them apart. But when equipped with the proper blade, the circular saw transforms from a tool of creation to one of destruction. This demolition circular saw blade from Diablo is designed to cut through a variety of materials, including wood, old nails, shingles, and laminated beams. It might just make your circular saw your new go-to demolition tool.
Get the Diablo Demolition Circular Saw Blade at The Home Depot for $14.97.
The prices listed here are accurate as of August 30, 2025.
