We may earn revenue from the products available on this page and participate in affiliate programs. Learn More ›
Today, with the help of cross-linked polyethylene (PEX) pipe, plumbing work has become more efficient for professionals and much more accessible for do-it-yourselfers. These flexible red and blue pipes can bend in nearly any direction to funnel hot and cold water, respectively, where it needs to go.
In fact, if your home is equipped with a water supply manifold—not all homes are—individual PEX pipes can be directly connected to the manifold and then fished through the walls all the way to a sink, tub, or shower to supply hot and cold water. “Threading PEX through a wall will take much less tearing apart of that wall compared to other pipes,” says Daniel O’Brian, technical expert for the online plumbing retailer SupplyHouse.com.
Not only easy to manipulate, PEX pipe is also easy to connect to existing water lines in the house for repairs or new installations. Are you already working with copper or PVC pipe? Thanks to a wide range of PEX components that make connecting the pipes a snap, you, too, can do your own plumbing.
If you want to add new PEX to your existing water lines, keep reading. We’ll let you know which fittings and tools you’ll need and how they’re used to make the connections.
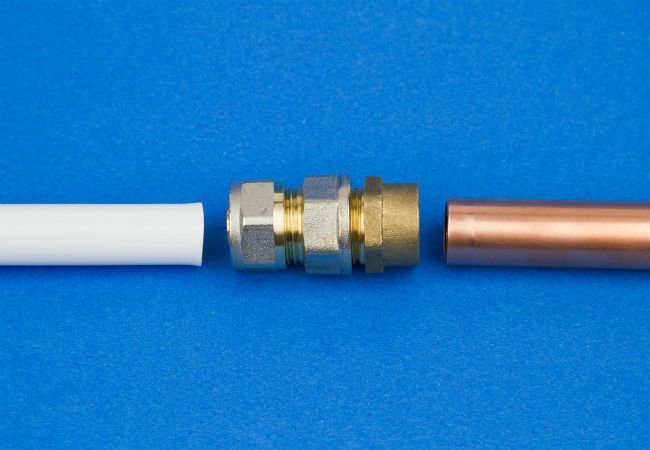
Choose and Attach a Threaded Fitting
A variety of threaded fittings are available in the options listed below for connecting PEX pipe to copper or PVC pipes. Typically, these come in two parts, often sold separately. Half attaches to the PEX pipe, and the other half attaches to the existing pipe, either copper or PVC. Thread the two halves together and, voilà, you have a watertight connection.
When you attach the second half to copper or PVC, some fittings will require wielding a torch or applying glue in a well-ventilated area (more on that in the next sections below). But PEX connections don’t always need to be so complicated. Certain types of fittings involve neither flames nor fumes—not even special tools—and this ease of use makes for “a safer job if you don’t have the experience and equipment a pro has,” O’Brian says.
The required tools and level of complication in a PEX installation depend on the type of fitting you purchase, so you should understand your options first to make sure that you choose hardware you can handle. Start by getting acquainted with your options and learning how they connect to PEX.
- Expansion fittings (like these from BlueFin and these from Uponor) insert snugly into the PEX pipe with a little help. Use a PEX expander tool to stretch the diameter of the pipe to accommodate the fitting. PEX, which has “memory,” then returns to its original size, creating a watertight seal.
- Crimp fittings (like these from Bluefin) are made by slipping metal rings over the end of the PEX pipe and then inserting the correct fitting into the end of the pipe. A PEX crimping tool is then used to tighten the metal ring over the PEX pipe and the fitting.
- Compression fittings (like these from Bluefin) involve sliding a brass nut and a plastic compression ring over the PEX pipe and then inserting a metal sleeve inside the pipe for support (all of these parts can be purchased separately). The fitting is inserted into the PEX pipe and sleeve, and then the nut is tightened to the fitting, squeezing the compression ring to form a tight seal.
- Clamp fittings make use of the same fittings as those used in crimp connections, but instead of using a crimping tool, a ratchet clamping tool is necessary for tightening steel rings in place on the PEX side. The ring slips over the PEX pipe, and the fitting is then inserted into the end of the pipe. The ring is positioned over the fitting, and the clamping tool is used to compress a tab on the side of the ring to tighten it.
- Push-fit fittings, including those manufactured by SharkBite and BlueFin, are the simplest to connect and require neither additional tools nor clamping or crimping to attach the fitting to either the PEX pipe or your copper or PVC pipe. Connection is simple: Insert the PEX pipe into one end of the fitting, and its internal components lock it securely in place. This convenience, however, comes at a price. SharkBite fittings are more expensive than most of the others listed here, but they also spare you from having to buy specialty tools if you’re making only a few connections.
Connect New PEX to Existing Copper Pipe
No matter which fitting you choose, there are only two basic methods for connecting PEX to copper pipe. Traditional copper connections require soldering or “sweating,” while newer, more innovative options like SharkBite fittings connect to copper without any special tools.

THREADED SWEAT CONNECTIONS
For threaded connections, you will always have two separate fittings, one for each pipe you’re connecting and then eventually twisting together. The traditional way of connecting PEX to copper involves using a threaded sweat adapter on the copper side (to connect with the PEX fitting) and soldering to create a watertight seal. Both the copper pipe and its fitting are first cleaned with a fine-bristle steel brush and then coated with flux (like this flux paste from Utility) to help the solder adhere evenly. Then, the seam where the fitting meets the copper pipe is heated with a flame torch. Once the metal is very hot, a small rod of solder—lead-free if these pipes will carry drinking water—is touched to the seam. The heat from the metal melts the solder and draws it into the seam, where it cools and creates a seal.
Then, a threaded PEX fitting is attached to the PEX pipe using the methods outlined in the section above. You can even find a threaded SharkBite fitting with push-fit technology on the PEX side that features a threaded end for twisting onto the threaded end of a threaded copper fitting. Once both fittings are connected to the pipes, twist them together to form a seal. (Though, if you’re already using push-fit fittings, the simplest approach is to just use the SharkBite fitting on both pipes you’re connecting, which we’ll get into next.) Just keep these considerations in mind:
- Every connection must have one male fitting and one female fitting in order for the two fittings to attach. (A male fitting features protruding threads which twist into the threaded opening of a female fitting.)
- The sizes of the threaded ends must match in order for the PEX fitting to twist onto the copper pipe fitting.
- You can connect pipes of different sizes as long as the threaded ends are the same size. Threaded fittings are labeled by the sizes of both ends, meaning a ½” X ½” fitting will connect two ½” pipes while a ½” X 3/8″ fitting (also called a “reducer” fitting) is required to connect a ½” pipe to a 3/8″ pipe.
- Use the sweat method of connecting only if you’re familiar with soldering copper, and before you get started check with your local building authority for additional regulations (such as the need for inspections). If you’re not comfortable with soldering, proceed with the following method.
SHARKBITE PEX-TO-COPPER CONNECTIONS
If you don’t want to bother with soldering, opt for a SharkBite fitting. As described above, this fitting can accommodate a copper pipe on one side and a PEX pipe on the other. Just as the PEX pipe is pushed into the PEX end of the fitting, the copper pipe is pushed into the other end. That’s it! Thanks to the push-fit mechanism of the fitting, you’ve made a watertight connection.
Connect PEX to PVC Pipe
Homes that have PVC water lines can also easily utilize PEX tubing for extensions or replacements. When choosing fittings, double-check the sizes to ensure that you’re buying the right size for the diameter of your pipes.
THREADED FITTINGS
First, always choose a threaded male plastic fitting for the existing PVC pipe to pair with the metal female fitting for the PEX pipe. The reverse—a metal male fitting connected to a plastic female fitting—can strip the threads on or even crack a plastic female fitting, whereas a metal female fitting can handle the superior strength of the metal male fitting.)
The fitting attaches using the standard PVC connection method, which includes brushing PVC primer (like this primer by Hercules) on both the fitting and the pipe to clean and slightly soften the PVC. The glue used for connecting PVC fittings (also by Hercules) is then applied to the end of the pipe and to the inside of the fitting before it’s slipped over the end of the PVC pipe.
Install a matching threaded metal female fitting on the end of the PEX pipe, using any one of the first four PEX connection methods listed above. Be sure to buy the right type of fitting for the connection method you’re using: A crimped fitting is slightly different from an expansion fitting, so choose carefully.
Once the adapter fittings are secured to the ends of both pipes, wrap a little plumber’s tape on the end of the threaded male fitting for a watertight seal when you twist the threaded ends of the fittings together.
SHARKBITE PEX-TO-PVC CONNECTIONS
While you won’t go wrong using the threaded connection method above, there’s an even simpler method available: SharkBite recently introduced a PVC transition coupling that is suitable for connecting PEX to PVC. These push-fit connectors work by inserting the cut ends of each pipe into the appropriate end of the coupling. You’ll not only save time by using these push-fit connectors, you’ll also avoid having to use PVC glue to attach a plastic threaded adapter to the PVC pipe.
This article has been brought to you by SupplyHouse.com. Its facts and opinions are those of BobVila.com.