We may earn revenue from the products available on this page and participate in affiliate programs. Learn More ›
While a wall color change can be a game changer when it comes to a room makeover, achieving a professional paint job makes all the difference in how that new paint color helps realize your vision for a space. And more than other paint details, a crisp paint line along baseboards, ceilings, and door casings is the mark of a job well done, and it’s a technique that any DIYer can master with a little bit of patient practice and the right tools in hand.
So save time by skipping the painter’s tape, and achieve a professional paint job by mastering the art of cutting in.
What does “cutting in” mean?
When you are painting two different colors on adjacent surfaces, like painting a wall blue and a ceiling white, the two colors meet at the inside corner of that junction. To achieve a clear straight line at the corners, handy DIYers and professionals need to know how to cut in while painting with a brush along that dividing line. The term “cutting in” comes from the abrupt change or cut in the color, just like when someone “cuts in” on a dance or a line queue.
While many novice do-it-yourselfers rely on painter’s tape to achieve a straight line of paint, professional painters and practiced DIYers rely on a steady hand and experience painting walls along borders between two different colors.

Tools & Materials
Bobvila.com may earn a commission from purchases made through these links.
Steps For Cutting in Paint
Step 1: Gather supplies and prep the space.

After gathering the paint, a 2½-inch angled paint brush, a multitool to open the paint can, bucket, and a drop cloth, you are ready to set up for painting. Lay out the drop cloth along the edge of the room where you plan to start painting. Place the paint can and other tools on the drop cloth.
Step 2: Open the paint and decant into a bucket.
Open the paint can with the multitool, and if it’s been longer than a few hours since the paint was shaken, make sure to stir the paint thoroughly. While you can work right out of the paint can, it’s usually better for the paint and easier for you to decant a few inches of paint into a bucket. Then you can place the lid back on the paint can to avoid anything from the air settling into the paint.
Step 3: Load the paint brush with paint.

Get ready to paint by loading the brush. Hold your 2½-inch angled paint brush with a pencil grip, with the longer side of the brush bristles in line with your pointer finger. Dip the brush into the paint, but be careful not to load more than ⅔ the length of the bristles with paint. Gently scrape the brush against the side of the bucket to remove any excess.
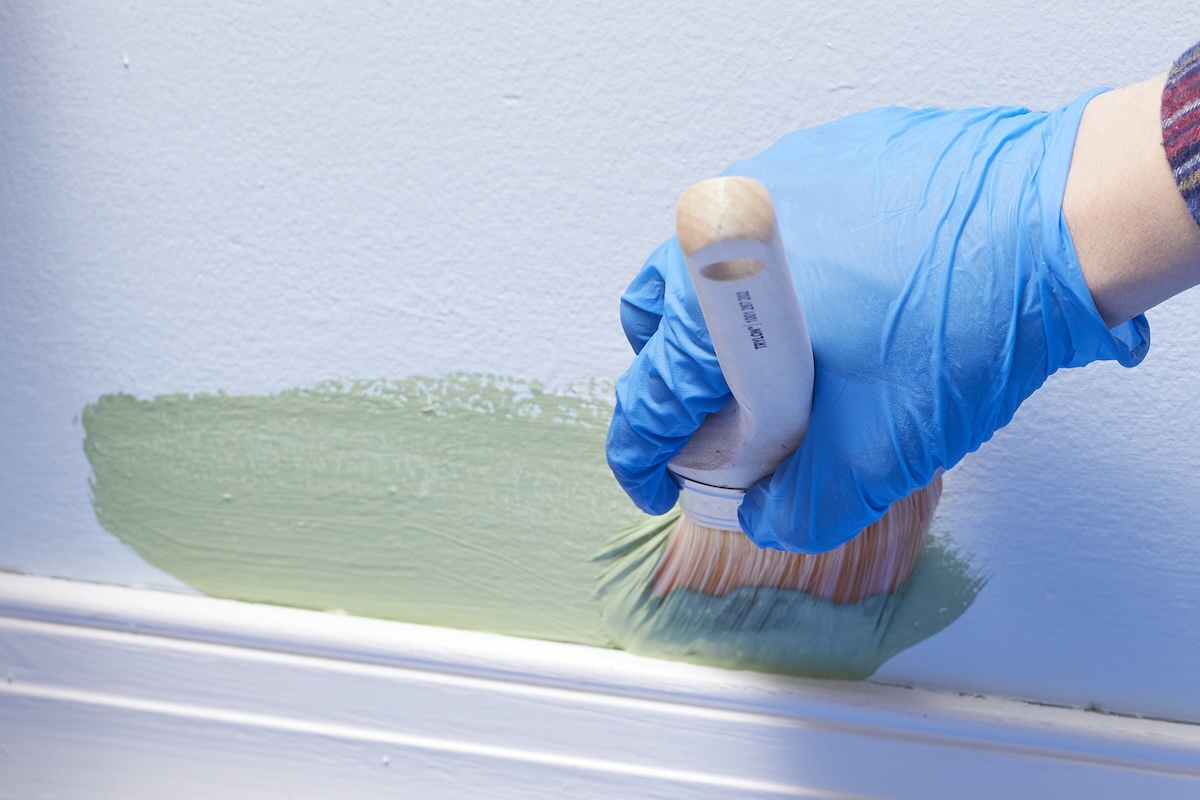
Step 4: Cut in along the baseboard.


While you can start cutting in along the ceiling, you likely need a step ladder to reach the top of the wall. It’s usually easiest to practice cutting in along the lower edge of the wall where it meets baseboard or shoe molding. After loading the paint brush and scraping the excess, turn your paint brush so that it’s parallel with the floor and apply paint about an inch away from the top of the trim on the wall and sweep the paint along the wall parallel with the trim for about 6 to 12 inches.
Go back to the starting point, turn the paint brush so it’s perpendicular to the floor and push the paint along the trim with a gliding motion that’s parallel to the trim.
Step 5: Feather out the edges.

After you’re satisfied that you have a cleanly painted edge, turn your paintbrush horizontally to the floor and ceiling, and gently sweep back over the area to erase any brush marks and feather the outer boundaries of the painted area. Doing so will ensure a smooth, seamless finish after you’ve rolled the walls.
Step 6: Cut in along doors, windows, and the ceiling.
How to cut in paint at ceiling level and along the door and window casing is similar to cutting in along the baseboard. Follow the same method of placing paint along the color border before going back to push the paint along the edge and feathering it out along the door and window casings and ceiling. Gently overlap sections to keep a wet edge while you apply paint to the wall. The wet edge helps blend the paint for a seamless look. Cutting in does take practice, but taking the time to cut in neatly will make a huge difference in the appearance of your newly painted room.
Step 7: Clean up any messes.

If you have an accidental drip or get paint on the trim or baseboard, try to wipe it up immediately with a damp cloth. If it’s dry, then wrap a damp cloth around a putty knife or the long edge of a painter’s multitool, then gently run it along your paint line to remove any excess. And the good news about paint is that you can always go back and try again to get that crisp cut-in line.
Tips for Cutting in Paint
It can take some practice to cut in paint like a professional, but follow the steps above and these tips to get better each time you paint a room.
- Work in a well-lit space. Too many shadows can make it hard to see a paint line.
- Use a high-quality paint brush. It’s well worth investing in a high-quality cutting-in paint brush. The better the brush, the more quickly and smoothly the job will go.
- Don’t load the brush with too much paint. This will result in drips and heavy lines on the walls, and you’ll risk getting the bristles of your brush caked with dried, crusty paint.
- Use a gentle touch. Applying too much pressure on your strokes will cause the paint to ooze out of your brush and drip, wrecking your clean paint line.
- Practice, practice, practice. It takes time to confidently cut in a paint line, so be patient and keep practicing.
FAQ
Q. How do you get a perfect paint line between the wall and the ceiling?
To paint a perfect line between a wall and ceiling, it’s best to paint the lighter surface first. For example, most ceilings are white. Paint the ceiling white, following the edges where the ceiling meets the wall. It’s ok to overpaint a little. Then go back and cut in the wall color following the technique described above in the how-to steps.
Q. What’s the best tool to cut in paint?
The best paint brush for cutting in when painting is the one that works for you. Most pros prefer an angled brush, somewhere between 1 inch and 2½ inches wide. Some others prefer a small round brush. It’s best to try different paint brushes to see which works for you.
Q. What do professional painters use to cut in?
Professional painters use a paint brush to cut in paint. They don’t use painter’s tape.
Q. What’s the best method of cutting in paint for beginners?
Beginners are more likely to succeed at cutting in paint if they don’t overload the brush, don’t try to get a perfect line with the first stroke, and make sure to feather out the paint so there’s no difference between the paint that was cut in and the paint that was rolled on the wall.
