We may earn revenue from the products available on this page and participate in affiliate programs. Learn More ›
For something you can’t even see, a lot is riding on a toilet’s wax ring. These unsung heroes create a watertight gap between the bottom of a toilet and the drain pipe, preventing water and undesirable substances from splashing out of the pipes on their way down, keeping everything sanitary and preventing an absolutely gross cleanup chore.
While wax rings for toilets can last for decades in the right conditions, they aren’t infallible and may need to be replaced under certain conditions. A home settling, folks who often sit down in a hurry, or poor installation can wear out a wax ring for a toilet prematurely. Luckily, it’s a common toilet repair, and learning how to replace the wax ring on a toilet isn’t too challenging.
Tools & Materials
Bobvila.com may earn a commission from purchases made through these links.
Project Overview
Working Time: 2 hours
Total Time: 2 hours
Skill Level: Intermediate
Estimated Cost: Under $20 for just the wax ring replacement; under $50 to also repair the flange
Before You Begin
Assess whether or not the toilet ring seal needs to be replaced. If there is water pooling around the toilet, be sure to check the water supply line going to the back of the toilet as well as the gaskets between the toilet and the tank. If those areas are dry and secure and water is still collecting around the toilet base, it’s probably time for a toilet wax ring replacement.
If the toilet is wobbly, the floor flange is probably broken and needs to be replaced, which requires removing the toilet. Anytime someone pulls (removes) a toilet from the flange or is replacing a toilet, they have to replace the wax ring in order to ensure a tight long-lasting seal.
Before you begin removing a toilet, it’s also important to decide what size wax ring is required. When replacing toilets, if the floor flange and drain pipe are any more than ¼-inch lower than the finished floor, use an extra thick wax ring. Otherwise, a standard wax ring should work.
Step 1: Shut off the water supply and drain the toilet.
The first step to change a wax ring is to shut off the water supply. Typically, there will be a braided steel hose running from the bottom of the toilet tank to a valve on the wall. Turn that valve clockwise until the tank no longer refills after flushing.
Hold the flush lever down until the tank empties as much as possible. Next, use the plunger to push as much of the water remaining in the toilet down and into the drain pipes. This won’t likely get all of the water, but it’s possible to get most of it. Some may also choose to soak up the residual water inside the bowl with a towel.
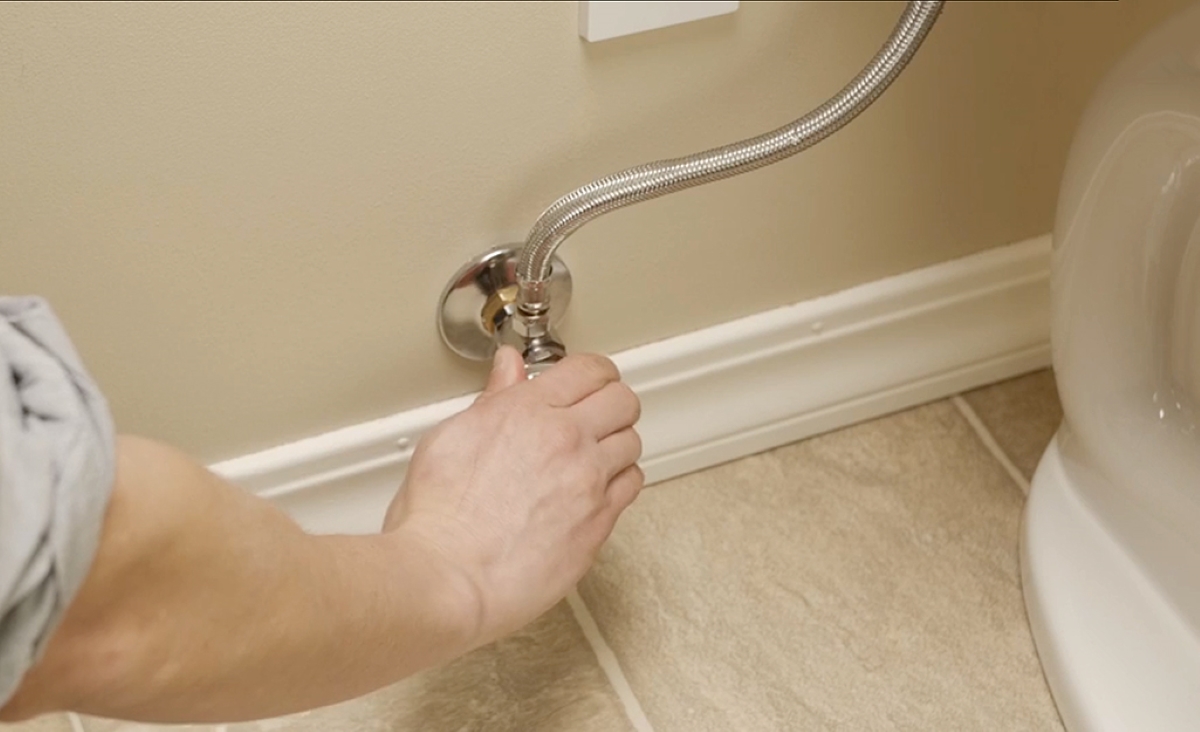
Step 2: Remove the supply line.
Remove the supply line from the underside of the toilet. In many cases, this hose may be only hand-tight, so attempt to remove it with bare hands first. If that doesn’t work, use the pliers.
Turn the plastic nut (or brass nut, in some cases) counterclockwise until the hose becomes loose. Be sure to have the small bucket on hand and tuck the end of the supply line into it after it’s removed to capture any residual water trapped in the line.
Step 3: Remove the anchor bolts.
The anchor bolts are the two pieces of hardware that hold the toilet to the floor. There is one on either side of the toilet, and they’re usually covered with plastic caps. Use the flat head screwdriver to pop the caps off of the bolts, exposing the nut and washer on each.
Use the adjustable wrench to loosen and remove the nut. In cases where the bolt keeps spinning, grab the threads with a pair of pliers to hold it in place. There are replacement bolts in the wax ring kit, so don’t worry about crushing the threads.
Once the nuts are off, slide the plastic washer up off of the bolts.
Step 4: Remove the toilet.
Fold a large towel into quarters and lay it on the floor a few feet from the toilet and next to a wall or other sturdy vertical surface. This is where the toilet will sit after it’s removed; the towel will cushion it and soak up any leaks.
Standing over the toilet with one leg on each side, bend down and grab the underside of the toilet, close to the tank. With a straight back and bent legs, stand up to remove the toilet from the flange. It may feel slightly stuck at first (thanks to our friend the wax ring), but it should come loose.
Without putting the toilet down, shuffle over to the towel. Place the toilet on top. It’s easier to balance the toilet on the towel by leaning it slightly against a wall or bathtub.
Step 5: Remove the old toilet gasket seal residue.
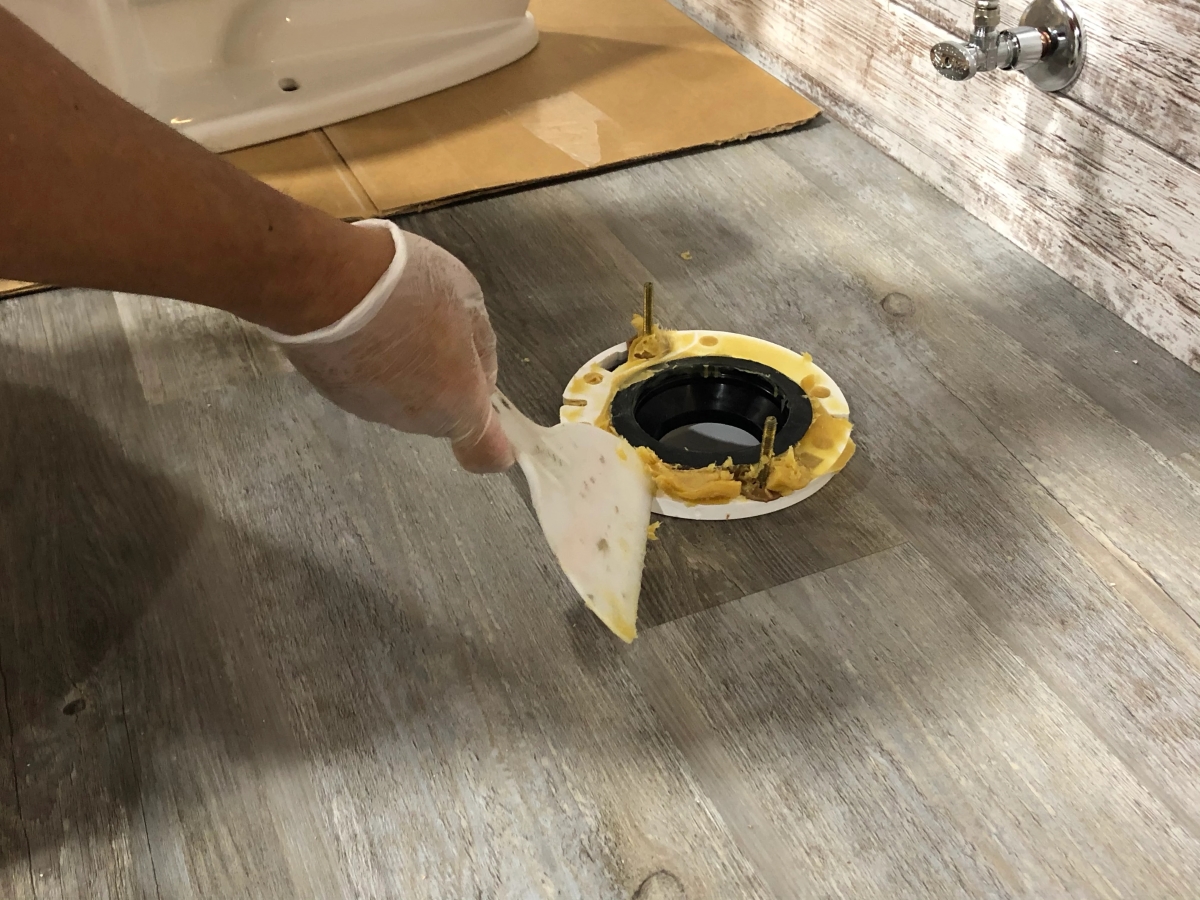
The wax ring might be attached to the underside of the toilet, attached to the floor flange, or a little bit of both. Use the putty knife to scrape any chunks of wax from the underside of the toilet and the pipe. It has to be completely removed for the new wax ring to work properly.
Once the major chunks are clean, use the degreaser to clean the pipe and the underside of the toilet. These surfaces must be as clean as possible so the new ring can adhere.
Step 6: Inspect the flange and repair it (optional).
Look closely at the floor flange. If there are cracks, bends, or any signs of excessive wear, it’s best to simply repair the flange before installing the new wax ring.
There are several types of repair flanges. Some slide into the existing pipe and then screw to the other floor. Others are simple thin metal plates that sit over the existing flange and then screw to the floor. Others may be hinged or come with metal floor brackets. Whichever type is chosen, follow the manufacturer’s instructions for installation.

Tried-and-True Advice
“Beyond the steps included in this guide, it’s worth thinking about what sort of wax ring you want to use for your toilet. There are numerous options out there today, including not only wax rings but also ‘wax-free’ gaskets and elastomer seals that purport to be more effective and easier to install than conventional wax models.
In my experience, the efficacy of these alternatives varies—I once tried a popular rubber gasket that failed to seal on my rear-mounted toilet. In most cases, a good old wax seal is still your best bet. But even those can vary in design and composition, so it’s worth doing some research beforehand to figure out which one will work best with your setup.”
—Chase Brush, Contributing Writer
Step 7: Install the new flange bolts.
The new wax ring replacement kit should come with new flange bolts. Remove them from the packaging and slide their heads into the slots on either side of the floor flange. The friction-fit plastic washers slide down over the top of the threads and hold the anchor bolts in place and upright.
These bolts should be on either side of the flange, left and right, at 3 o’clock and 9 o’clock. Be sure to use the plastic washer to hold them in place.
Step 8: Install the wax ring.
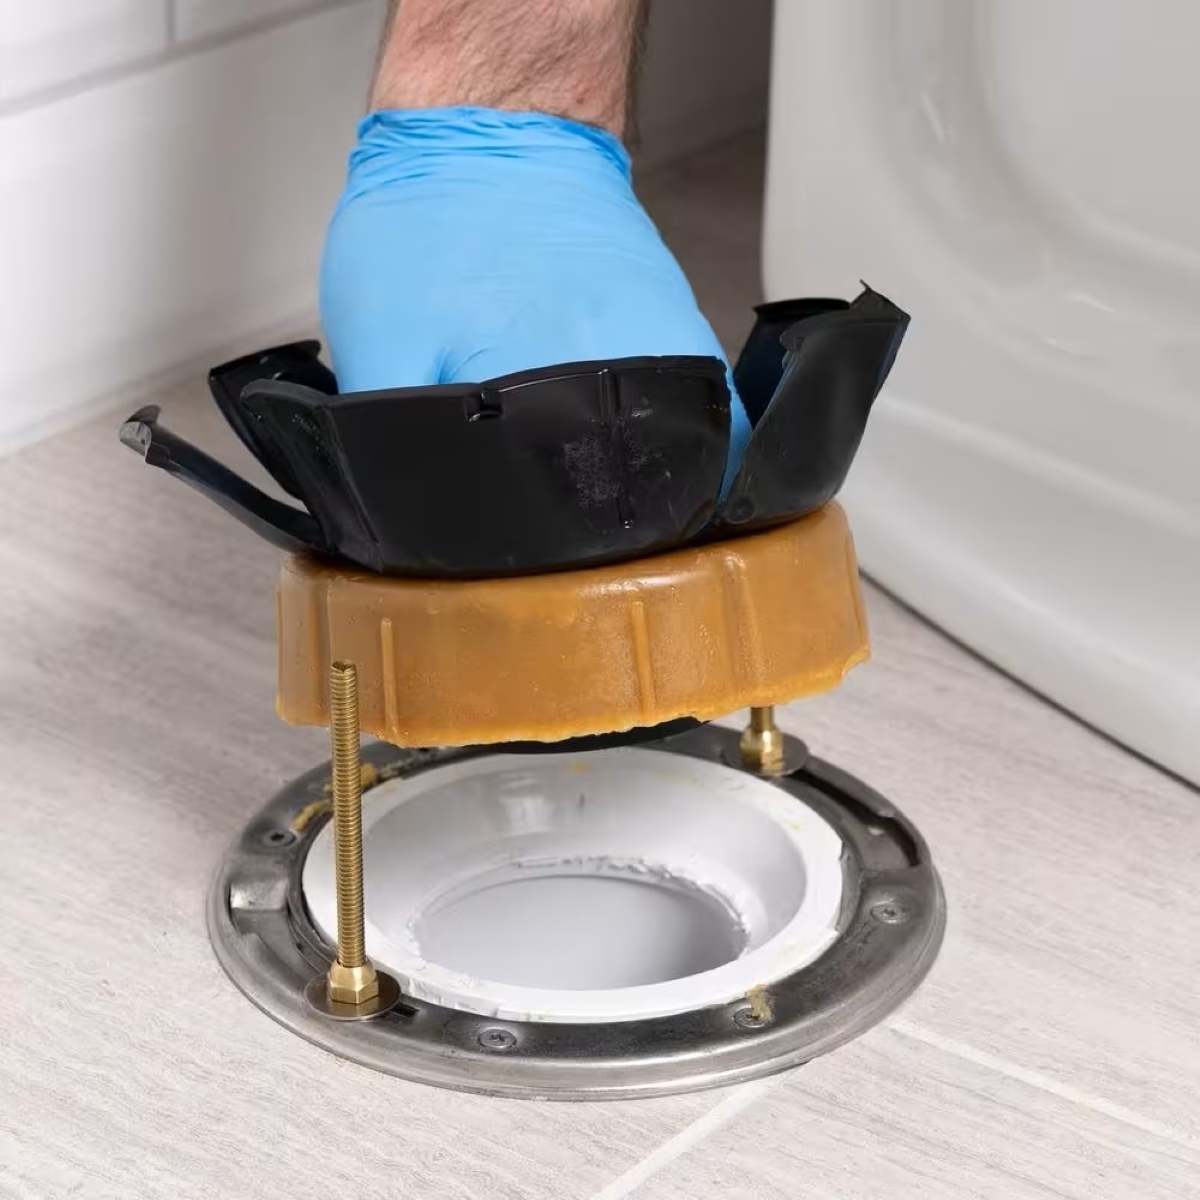
There are two ways to install the wax ring. Either method works.
- The first option is to attach the new wax ring to the bottom of the toilet. Sticking the wax ring to the toilet is the traditional method, but it can be hard for one person to adhere the ring and hold the toilet up.
- The second option is to stick the floor flange over the pipe and place the toilet on top.
In either method, it’s important that the toilet and flange are clean and centered. Being off to one side or the other could squeeze too much wax out one side and ruin the seal. It can also cause a partial blockage and restrict flow.
Step 9: Reinstall the toilet.
Standing over the top of the toilet, grab the underside of the toilet. Maintaining a straight back and using leg power, lift the toilet and shuffle it over to the drain. Hover it over the drain and lower it so the anchor bolts slide up into the mounting holes. This may take more than one attempt; be careful not to ruin the wax ring in the process.
Once the toilet is back in place, sit down on the lid to compress the wax ring and form the seal.
Step 10: Secure the toilet.
Place the wide plastic, nylon, or paper washers that came in the wax ring kit over each of the bolts. Thread a nut onto each bolt and tighten until the toilet doesn’t wobble. Do not over-tighten or the porcelain base could crack.
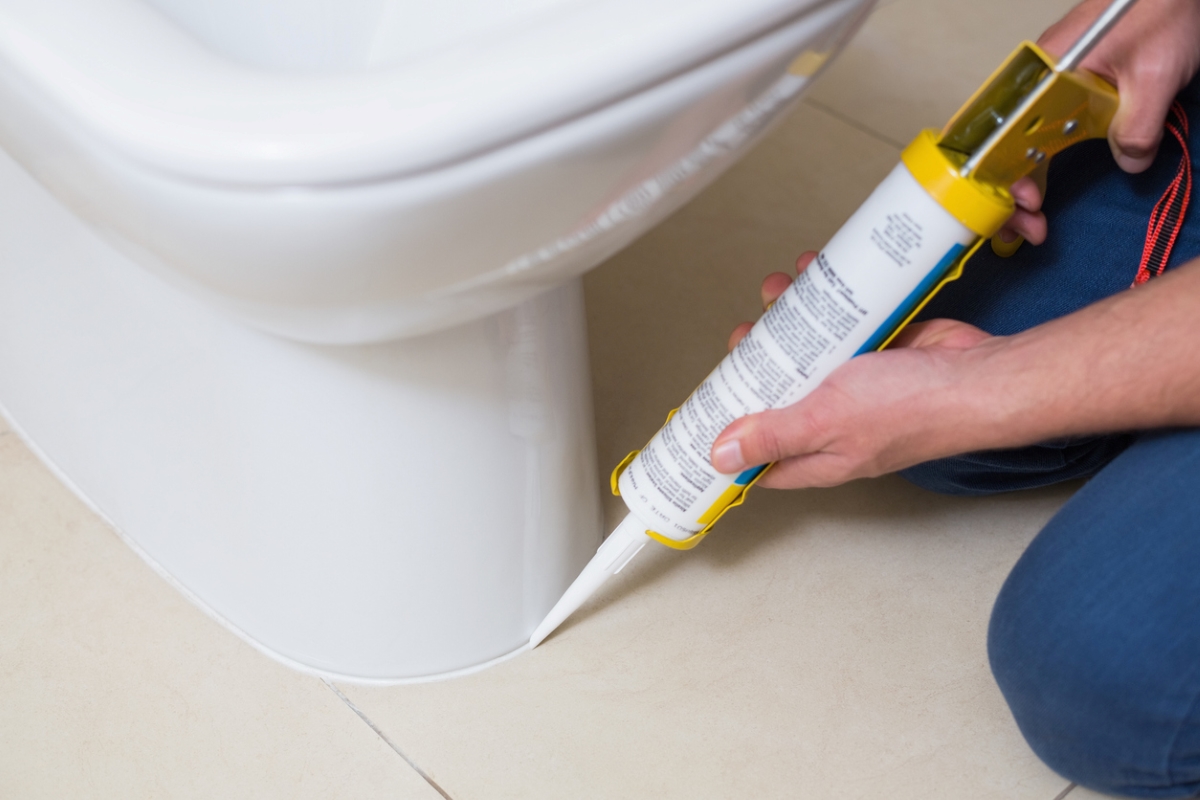
After the toilet is secure, place the plastic caps on the bolts. Then, reattach the supply hose. Tighten the hose, turn on the supply water, and check for leaks. Also, consider caulking around the base of the toilet to finish the job.
Final Thoughts
Replacing a wax ring on a toilet is not a difficult job, but it must be done correctly to ensure there is a watertight seal. With these tips, that new wax ring will take the day-to-day use dealt to it for years to come. Just be sure to clean the area where the old ring was attached, repair the flange if necessary, and carefully align the toilet while replacing it for the best results.