
We may earn revenue from the products available on this page and participate in affiliate programs. Learn More ›
While closed doors do a decent job of muffling the noise outside a room, cracks between a door and its casing or threshold offer just enough space for some sound to filter in. Homeowners looking for complete quiet will need to mix and match a few of these methods in order to seal these gaps to their satisfaction. If you install weatherstripping but do not have a snug-fitting threshold, for example, you’ll still hear some noise. Do a thorough job of securing all surfaces mentioned in this guide for how to soundproof a door, though, and you’re sure to get a more than adequate level of soundproofing.
Once you determine just how quiet you need the space to be (just quiet enough quiet to fall asleep, or complete silence for your basement recording studio?), get to work implementing one or more of these noise-reducing methods.
RELATED: The Best Soundproofing Materials for Any Room in Your Home
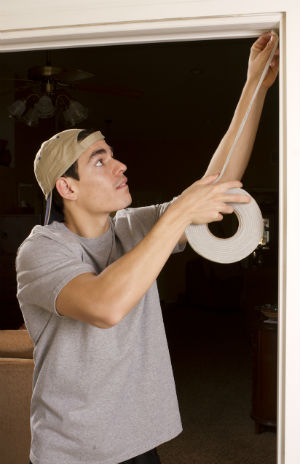
1. Seal the door with spring bronze weatherstripping.
Create a better door seal and prevent noise from penetrating through the cracks by installing new spring bronze weatherstripping. This type of weatherstripping performs the same task as your average vinyl or foam stick-on weatherstripping, but can do so better, and for longer—up to 30 years. It’s especially ideal when used on doors that face the outside, because it’s sturdy enough to seal out both water and bugs.
SUPPLIES
Tape measure
Marker
Bronze spring weatherstripping
Tin snips
Awl
Hammer
17d Nails
- After removing any existing weatherstripping, measure the width of the door frame and the length of the door jamb (the vertical parts of the frame, one of which the door hangs on).
- Unroll your metal weatherstripping and use a marker to identify your cuts based on the dimensions taken.
- Cut the spring metal weatherstripping using tin snips to the appropriate length. If your spring metal weatherstripping does not feature pre-punched holes, dot along the lip of the metal every 1-1/4 inches so that you know where to place your nails later. For the piece of metal that will trim the top of your door frame, you may want to pre-punch it manually by placing the tip of the awl at each mark and tapping it with the end of a hammer. (Using the awl and hammer overhead will be difficult.)
- Hang your first cut of weatherstripping along the door hinge side; you want the bronze to nearly touch the threshold. Use tin snips to trim away metal stripping that may impede the operation of hinges.
- If your metal weatherstripping has pre-punched holes, tap a nail in the first hole (at the top) and the last (at the bottom) of the strip, but do not drive either nail all the way in. Visually confirm that the strip appears to be straight (or use a level), and make any necessary adjustments. (Working with weatherstripping without any holes? Simply hammer the nails through the first and last dots.)
- Tap a nail partway in the center of the weatherstripping. Then, continue adding nails along the strip at consistent intervals.
- Repeat Steps 4 through 6 for the strip on the second side of the door frame.
- Once all the nails are in place and you’re comfortable with how the bronze strips are positioned, finish driving the nails into the strips. Keep the fastener head flush with the strip. In other words, do not pound or drive it into the metal as this can damage the metal.
- Nail in the strip across the top of the door frame, following Steps 4 through 6.

Tried-and-True Advice
“The very first step in soundproofing a door should be determining how much freedom you actually have when it comes to making modifications to said door. That is, is this a door in your own home? Or do you live in an apartment?
If the former, there are a ton of soundproofing methods you can use, including the ones listed here but also more extreme measures, such as replacing the door itself with one made of more soundproof materials. If it’s the latter, however, you probably need to be more careful—not all landlords are happy to let their tenants make serious home improvements, however minimally invasive they may be.”
—Chase Brush, Contributing Writer
2. Seal the door with rubber weatherstripping.
Like metal weatherstripping, rubber is designed to seal and block not just drafts, but also noise. While you’ll find a few different versions of rubber weatherstripping at home improvement stores, the easiest one to use (and the one we’re giving installation instructions for here) is the kind with an adhesive backing.
SUPPLIES
Rubber weatherstripping with self-adhesive backing
Tape measure
Putty knife
Rags
Utility knife
- Before buying rubber adhesive weatherstripping, measure the thickness of the door and the gap between the door frame and the top of the door. Weatherstripping comes in various width sizes and you will want to buy a size that will fit snugly, but not so bulky that it will hinder the door closing properly.
- Optional step: If you are replacing old material, pop the old weatherstripping out first using a flat tool (either a putty knife or flat head screwdriver).
- Scrape away any remnants of old caulk. Then, wipe the bottom of the base and the door jamb surface thoroughly with a damp cloth to remove dust and remaining residue, either of which will prevent the new adhesive from sticking properly. Follow with a clean cloth to dry.
- Measure the width of the door frame and the length of each door jamb and cut these dimensions from the rubber weatherstripping. You should have three strips total. (Alternatively, you can line up the end of weatherstripping with the corner of the door base and run the strip along the base until you reach the other corner, then cut it.)
- Peel away the backing to expose the adhesive and, with the door open, start to apply it to the frame. Stand on the side of the frame on which the door opens, and start by addressing the door jamb without hinges. Stick one end of weatherstripping in the top of this door jamb, and run the weatherstripping down along slim edge facing out; this is where the door comes into contact with the frame. If the rubber adhesive impedes the door lock from catching, carefully notch it, or cut out the excess, using the blade of a utility knife.
- On the opposite door jamb, run the weatherstripping along the edge that the hinges screw into.
- Run the final strip of rubber along the top edge of the door frame, again facing out so that the door closes on it. Press each for a firm seal.
RELATED: 5 Smart Tips for Soundproofing Windows
Need help?
Discuss your needs with a soundproofing expert and get free, no-commitment estimates from professionals near you.
3. Replace the threshold.
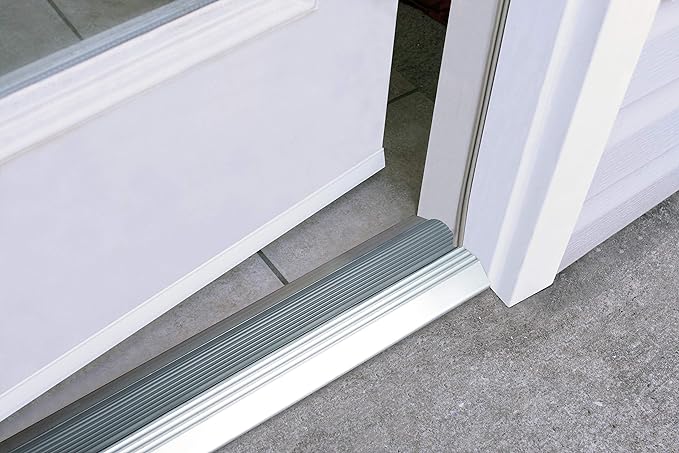
Over time, daily traffic may wear down or loosen your existing threshold, the raised part of a doorway that serves not only to cover the line where flooring meets between rooms but also seal out sounds. Installing a better threshold—preferably, an acoustic threshold that muffles sound—should keep unwanted noise from transferring through the gap under the door.
SUPPLIES
Power screwdriver
Hacksaw
Pry bar
Hammer
Broom
Tape measure
Threshold
Screws
- Use a power screwdriver to undo any screws holding the existing threshold in place. How you actually remove the threshold depends on its position in relation to the door jambs: If the threshold extends from door jamb to door jamb, wedge a pry bar beneath one side and tap its end with a hammer in order to lift it enough to remove. If door jambs don’t meet the ground but stop short above the threshold, you’ll need to cut through its middle using a hacksaw and slide each piece out one by one.
- Use a broom to sweep out accumulated dirt and debris before you put a new threshold in place.
- Measure the opening left for the threshold. (You may also put together and take the dimensions the old threshold, which can serve as a template for the new installation.)
- In pencil, mark the exact measurements onto the new interior door threshold.
- Use the hacksaw to trim excess off from one end.
- Slide the new threshold into place between the door jambs, and use a power screwdriver and screws (perhaps those saved from the previous threshold installation) to fasten it to the floor beneath.
- Test the installation by closing the door to detect any problems.
RELATED: Soundproofing a Room: The Two Best Ways to Dampen Noise Without Tearing Down Your Walls
4. Install a mass loaded vinyl sound barrier.
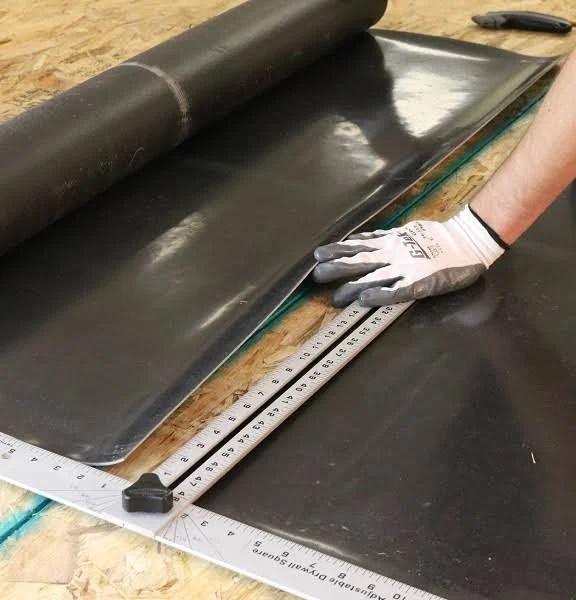
Those who need serious soundproofing can find peace and quiet with a mass loaded vinyl (MLV) mat. Though often used underneath carpet as a vibration cushion, MLV hung on the back of the door significantly reduces the noise that would otherwise pass through. This silence comes at a premium cost: It retails for upwards of $60 for a roll from online shops specializing in acoustics (about $2 per square foot, depending on weight, length, width, and thickness), and a roll often contains more material than you need for a single door. MLV thickness ranges from 1/16 inch to ¼ inch, and when it comes to sound blocking, thicker is better. If you don’t see thickness listed within the product description, you can rely on weight per square foot of coverage:
- Half-pound MLV is 1/16-inch thick
- One-pound MLV is 1/8-inch thick
- Two-pound MLV is ¼-inch thick
Before you start on this soundproofing project, find another do-it-yourselfer to help hold the material in place—the flexible foam mat is about as heavy as lead.
SUPPLIES
Flat-head screwdriver
Drop cloth
Roll of mass loaded vinyl
Tape measure
Carpenter’s pencil
Utility knife
Rags
Construction adhesive
- With the door shut, remove it from the hinges. Push a flat-head screwdriver into the bottom of the hinge (aimed at the end of the pin), and tap the tool with a hammer. This should cause the pin to pop up so that you can pull it out. After you repeat this process on all of the hinges, use the door knob to help wiggle it free and lay it on a drop cloth–covered work surface.
- Measure the length and width of the door. Then, make note of the location (how high and how far in from the side) of the doorknob and any additional locks. Your measurements should allow for which way the door open: If the door opens inward (toward you) and you plan to cover the surface facing you, measurements of the door itself should be adequate. If the door opens outward (away from you) and you are covering the surface facing you, you will need to subtract a sliver of space at the top, sides, and bottom of the door. These areas where the door “meets” the door frame should not be covered with MLV, or else it will not close properly. In this scenario, it’s best to close the door and measure the amount that is exposed.
- Place the roll of MLV on a flat surface and transfer your door measurements to the material, including the precise space and location of door knob and lock(s). Considering how pricey as this material can be, heed the old adage, “Measure twice and cut once.”
- Using the door measurements as a guide, cut the material with a sturdy utility knife. (Doing so on top of scrap wood would be wise to protect your floor or work surface.) Cut away the material that will cover the doorknob and locks.
- Clean the door surface of any dirt using a dampened cloth, and allow to dry.
- Apply the construction adhesive to the side of the door panel where you’ll mount MLV.
- With your DIY helper, place and position the MLV onto the door surface. While the helper holds the material in place, visually check that the material is lined up properly to cover the entire door’s surface and adjust it as needed. Then, after waiting out the dry time recommended for your construction adhesive, reattach the door to its hinges by lining up the hinge plates and sliding each pin back into place.
RELATED: 7 Simple Soundproofing Solutions for Your Bedroom
Caulk cracks and gaps.
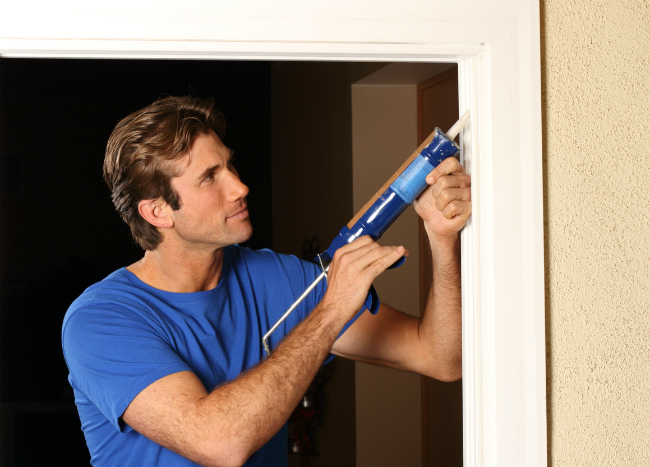
As noise can seep in through the tiniest places, you’ll want to seal any cracks around the door jamb, casing, and trim. If you pinpoint any cracks, holes, or deteriorated caulking material in a visual inspection of the entire doorframe, grab that caulk gun and load it up with a fresh tube. (Don’t forget to snip off its tip before you start!)
- For cracks and holes, place the tip of the caulk gun above and slowly press the caulk gun’s trigger to dispense an appropriate amount of caulk. Fill in the crevice with a bead of caulk and smooth with your finger.
- For instances of crumbling old caulk, you’ll do the same—just be sure to remove the old stuff using a putty knife before you apply the fresh seal.
