
We may earn revenue from the products available on this page and participate in affiliate programs. Learn More ›
A convenient method of joining boards is a dowel joint. Especially useful when two or more boards are being joined (butted) on the same plane (as for a tabletop, for example), dowel joints are strong and relatively easy to align, drill, and glue.
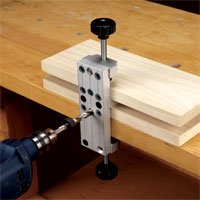
A purpose-made tool called a doweling jig will guide a drill in making perpendicular holes in the edge, end, or face of a board. With a good jig, the challenge of layout and proper alignment is met with ease.
A variety of doweling jigs are produced by tool manufacturers; you also can accomplish the same result by using a piece of wood with nails or sharp metal pins positioned in its end. Since the hole (enters must be located exactly, and the holes should be cut precisely at a ninety-degree angle to the edge of the stock, homemade doweling jigs may not produce the accurate result you desire.
A commercially available doweling jig and drill guide may be a good investment. The adjustable fences allow for presetting them to the width of the stock being used in order that each hole will be located precisely from one piece to the next.
Doweling jigs that act as drill guides have metal bushings or sleeves into which the drill bits are inserted. The bushing holds the bit in the correct position, both at the center of the workpiece and square to the edge being drilled. Most doweling jigs come with several different sleeves for different-sized drill bits. The diameter of the dowel to be used should be roughly half the thickness of the stock being joined.
Another handy tool in the drilling process is a bit depth gauge, essentially a collar with a set screw that is attached to the bit itself to ensure that the holes drilled are of uniform depth.
Set the depth carefully. It should be roughly one-sixteenth of an inch deeper than half the length of the dowel you are to use, which leaves adequate space for glue but will also keep the dowel centered on the joint for maximum strength. Drill the holes at four- to six-inch intervals along edge joints; don’t set one closer than one inch from the end grain. For end-grain joints, you mav drill holes at one-inch intervals, but no closer than half an inch from the edge of the stock.
Inserting the Dowel. Once the holes are drilled, test them for size: the dowel should be snug, but not so tight that you can’t insert it with your fingers. If it fits, then pour a little glue into each hole, and apply a thin film along the length of the wood edges to be joined. Insert the dowels in one of the pieces to be joined, but only partway, perhaps a quarter of their length (this will make fitting the mated piece easier). Fit the second piece, and tap the assembly together. Clamp the joint securely and wipe off any excess glue.