We may earn revenue from the products available on this page and participate in affiliate programs. Learn More ›
Tile is one of those unique powerhouse home finishes that gives a space style and sturdiness. Widely used in bathrooms, kitchens, and entryways, tile is often chosen for other spaces where durable, water-resistant surfaces are required. While it takes more know-how and tools than installing vinyl flooring, tile installation can successfully be done by DIYers. The keys to a pro tile installation are patience, planning, a detailed work ethic, and the right set of tiling tools for the job.
In addition to familiar tools, like a tape measure, chalk box, framing square, and a basic carpenter’s level, the following are the essential tiling tools that you’ll need to get great results from your next tiling project.
1. Tile Cutter

The tile cutter is essentially a sophisticated version of a glass cutter that scores and snaps tiles along straight lines. Also known as a snap cutter, this tool for tiling with glazed tiles has a platform topped by a frame along which a cutter wheel slides. The cutting wheel, quite like the wheel on a glass cutter, is mounted on a lever mechanism that allows considerable leverage to be applied.
- Position the tile on the padded platform with one side flush to a fence at the head to hold the workpiece square.
- Press the wheel against the tile to score its glazed surface. The cutter lever pressures the tile until it snaps the tile apart.
Tile cutters vary significantly in price. Some have hardened steel cutting wheels; others have carbide cutters (these cost several times as much but last much longer). Some have larger tables; others can be set up to make accurate miter cuts.
Best for: Cutting straight cuts on glazed tile indoors
Our recommendation: Goplus Professional Tile Cutter – Get it at Amazon for $175
The Goplus tile cutter scores tiles up to 48 inches, comes with a durable frame and nonslip feet, and makes precision scores.
2. Wet Saw
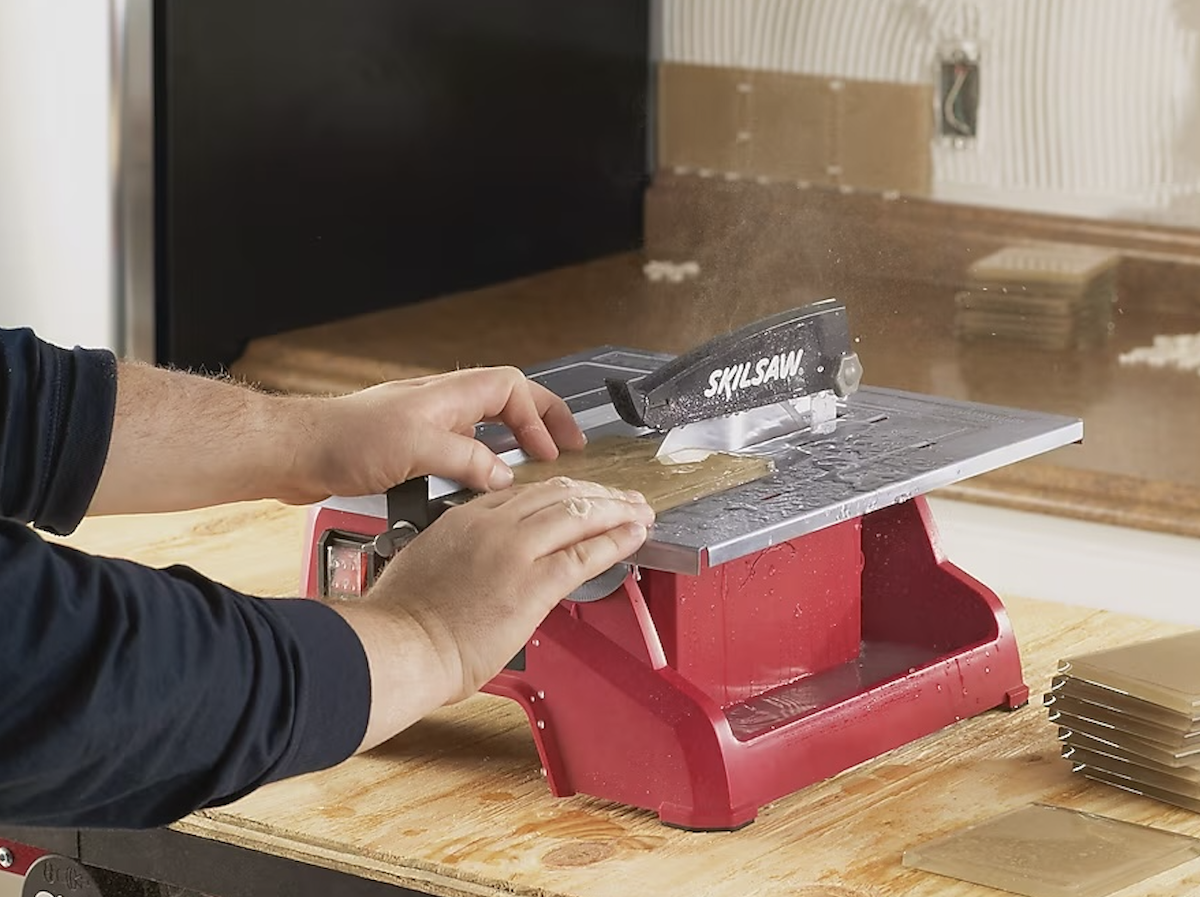
The wet saw makes quick work of cutting large, hard tiles. A more expensive option than the tile cutter above, a wet saw is a portable circular saw mounted onto a unique frame that features a water-filled trough. A movable cutting table with an adjustable fence presents the tile to the cutting blade, which is kept cool by jets of water. If you have used a circular saw, similar safety rules apply.
The wet tile saw is invaluable for working with thick and shaped tile. Use it to shape curves from tile and make smooth, regular cuts. While not outrageously expensive, wet saws can also be rented for reasonable fees daily or hourly. Some tile suppliers also will rent or loan cutters to their customers who buy tile. Before renting a wet saw or tile cutter, keep in mind that a cutter can be sufficient for most simple glazed tiling jobs.
Best for: Large tile projects and thick, rigid material, such as unglazed stone tiles
Our recommendation: SKILSAW 7-inch Wet Tabletop Tile Saw – Get it at Lowe’s for $109
This corded tabletop wet saw is portable. It can cut tiles up to 1⅜-inch thick and 12 inches wide, and can be adjusted to make both right- and left-side cuts.
3. Nippers
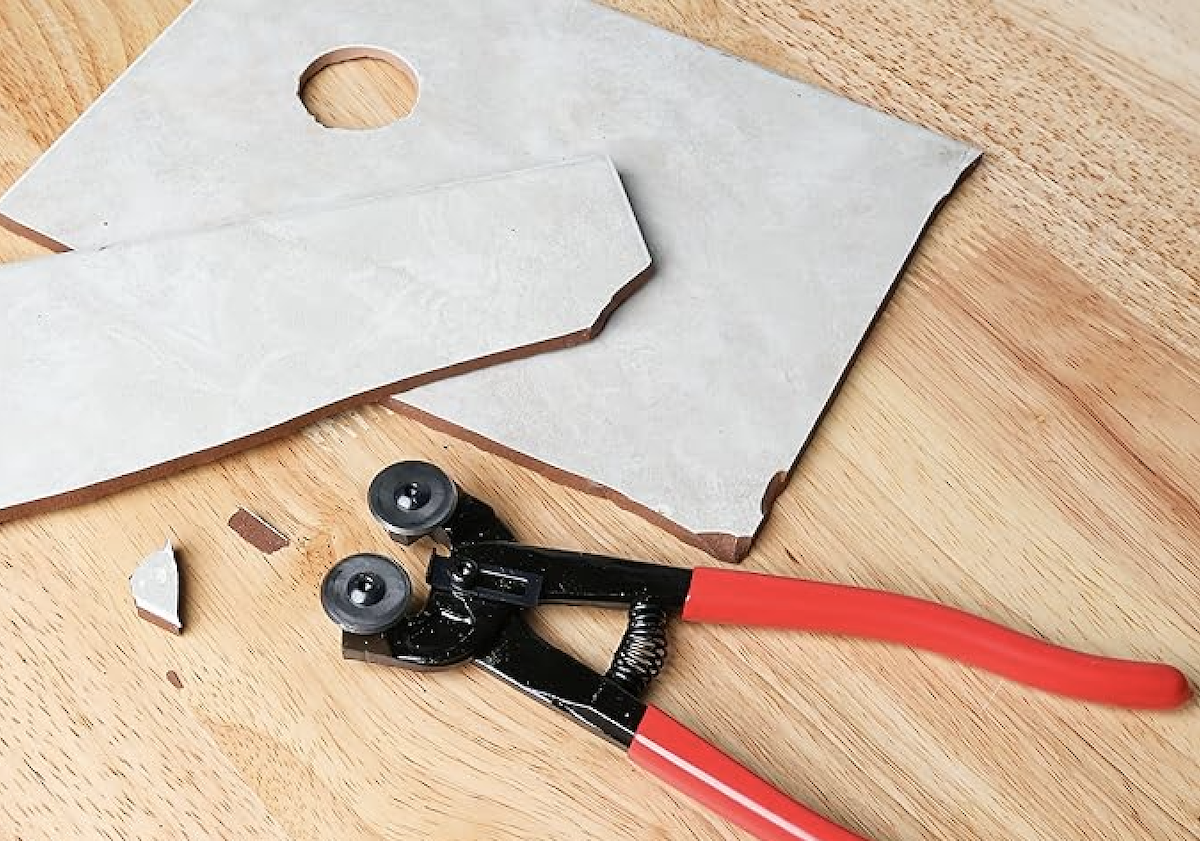
Nippers are another essential tile-cutting tool. While they look like pliers with their jaws and handles, nippers cut curved or irregular tiles or to nip away very thin strips from the edges of a tile. Available in many sizes and configurations, a basic model will suffice for most jobs.
Nippers can be used to trim away excess tile to achieve complex patterns that have been scribed on the tile’s surface. After scoring a tile with a tile cutter or glass cutter, the nippers are then used to clip off small sections at a time.
Some nippers have one flat jaw that is held flush to the glazed surface of the tile; the other has a curved cutting edge that is designed to bite into the unglazed vitreous base (called the bisque). Other models have two cutting edges. Both designs work well.
Best for: Making irregular, small cuts to fit tile around pipes or to create mosaic tile installations
Our recommendation: ABN Tile & Mosaic Nippers – Get it at Amazon for $12.99
We like that these tile nippers feature durable carbide nipping edges, and come with nonslip grips for stability.
4. Notched Trowel
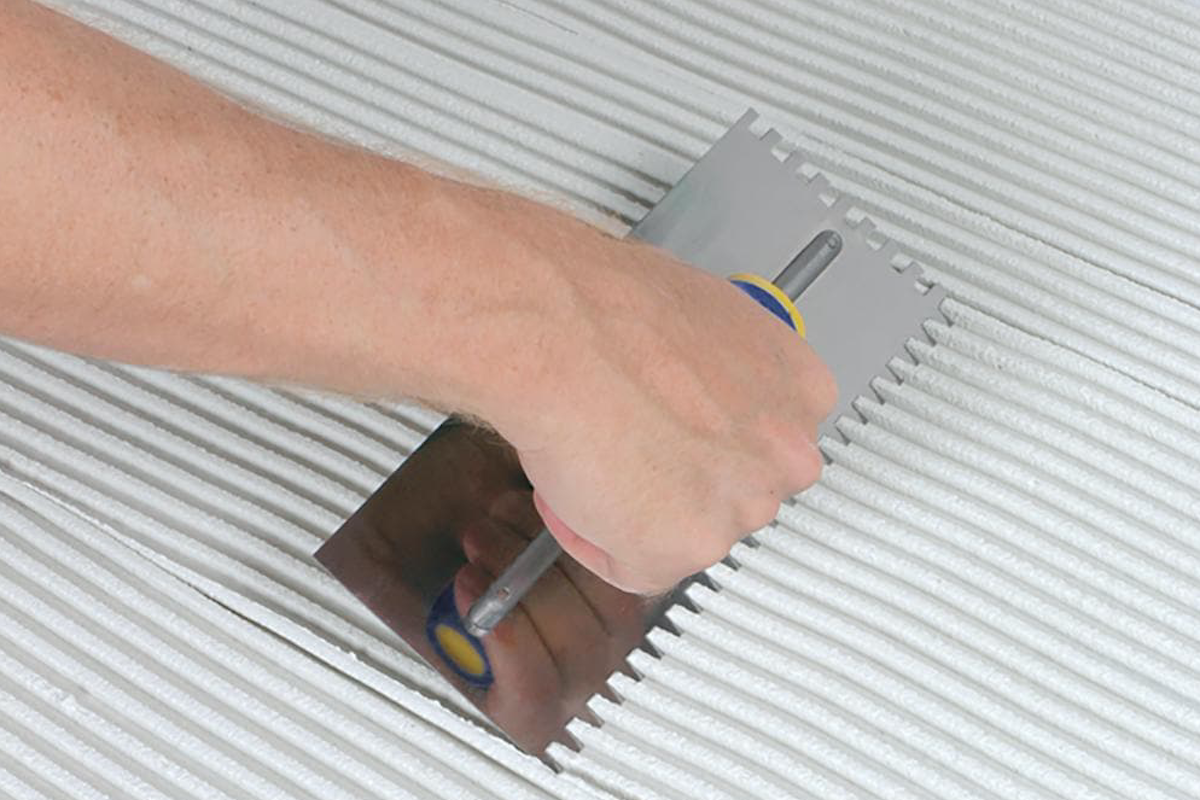
When tiling floors or walls, you use a notched trowel to spread adhesive before setting the tiles in place. It has a flat rectangular blade and a wooden handle mounted along the center of its back. Also called a serrated-edge, adhesive, or mastic trowel, the edges of the blade are notched, sometimes in different profiles.
Trowels come with various sized notches, and some notches are square while others are triangular. Don’t pick just any notched trowel—the different size notches create thinner or thicker beds of thinset or adhesive. You’ll want to check the tile manufacturer’s specifications to make sure you get proper notched trowel for the type of tiles you’re installing.
Here’s how to use a notched trowel:
- After laying out the tile, apply the adhesive to a small area (for example, 3-foot-square area) using the notched trowel.
- Smooth the adhesive or thinset evenly onto the surface.
- Draw the notched edge through it on a final pass, holding the trowel at a low angle. This will create a uniform series of ridgelines in which to bed the tiles.
- The tiles can then be set in place, one at a time. They are pushed firmly into the adhesive, perhaps slightly twisting to bed them securely and evenly.
- As you finish each section, check the areas for plumb and level.
Best for: Installing many types of ceramic, and porcelain tiles up to 8 inches by 8 inches
Our recommendation: QEP 1/4-in. x 1/4-in. Comfort Grip Square-Notch Trowel – Get it at The Home Depot for $14.97
This square-notch trowel is suitable for a variety of tiles, and it comes with a padded, nonslip grip for comfort.
5. Grout Float
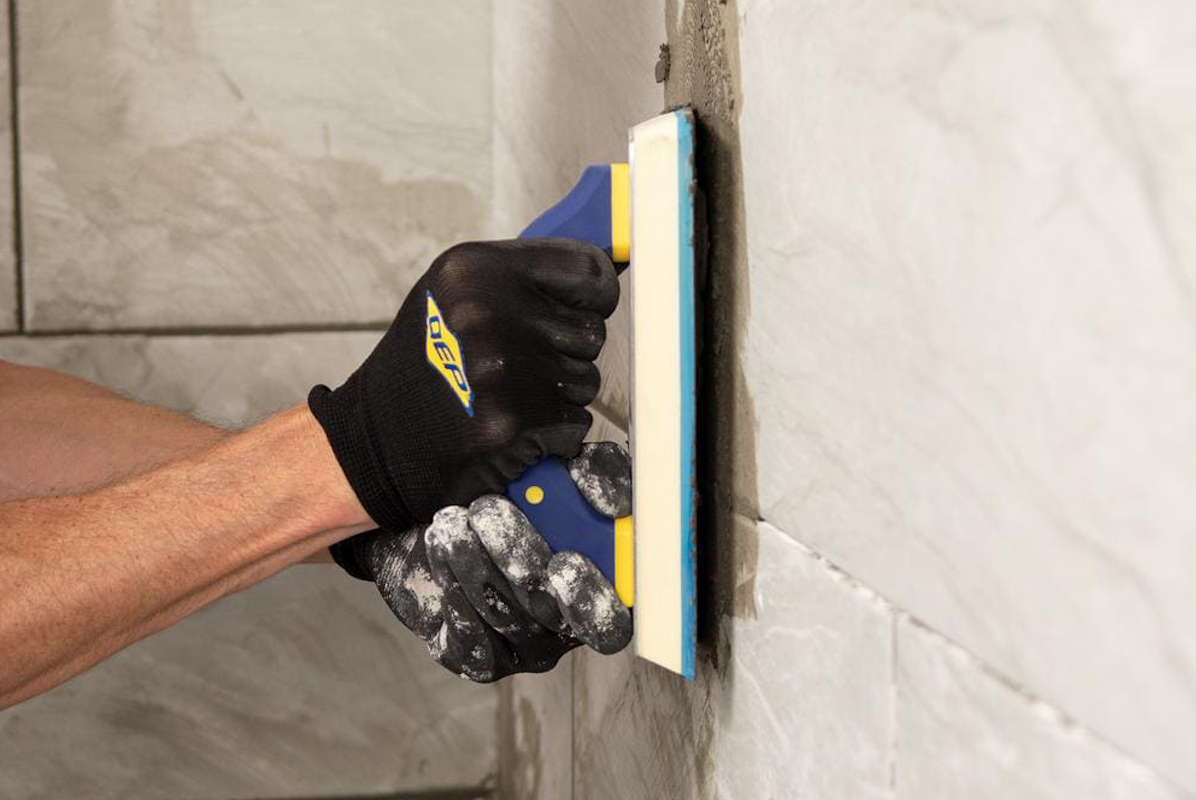
After the tile is in place and the adhesive or thinset has set for 24 hours or longer (follow the instructions on the adhesive’s or mortar’s packaging), it’s time to grout. You may choose to use sponge, but the task is a good deal easier if you use a grout float.
The tile grout float looks somewhat like a trowel, with a handle at the center of its back. The float’s body may be made from wood or another rigid material. Its working surface is made of rubber and it’s also known as a rubber float.
Hold the long edge at a low angle to the tile surface while sweeping it across the area, like how you use a trowel. Exerting a bit of pressure will help work the grout between the tiles. Follow with a sponge to remove the grout residue from the tile surfaces. Most grout floats can be used with either sanded or unsanded grout, but look for a float specified for use with epoxy grout if you’ll be using that product.
Best for: Smoothing wet grout into grout joints in recently laid tiles
Our recommendation: QEP 4 in. x 9.5 in. Universal Gum Rubber Grout Float – Get it at The Home Depot for $19.97
This grout float is just the ticket for filling grout joints in all types of tile projects, and it comes with a nonslip handle for stability.
6. Diamond Blades
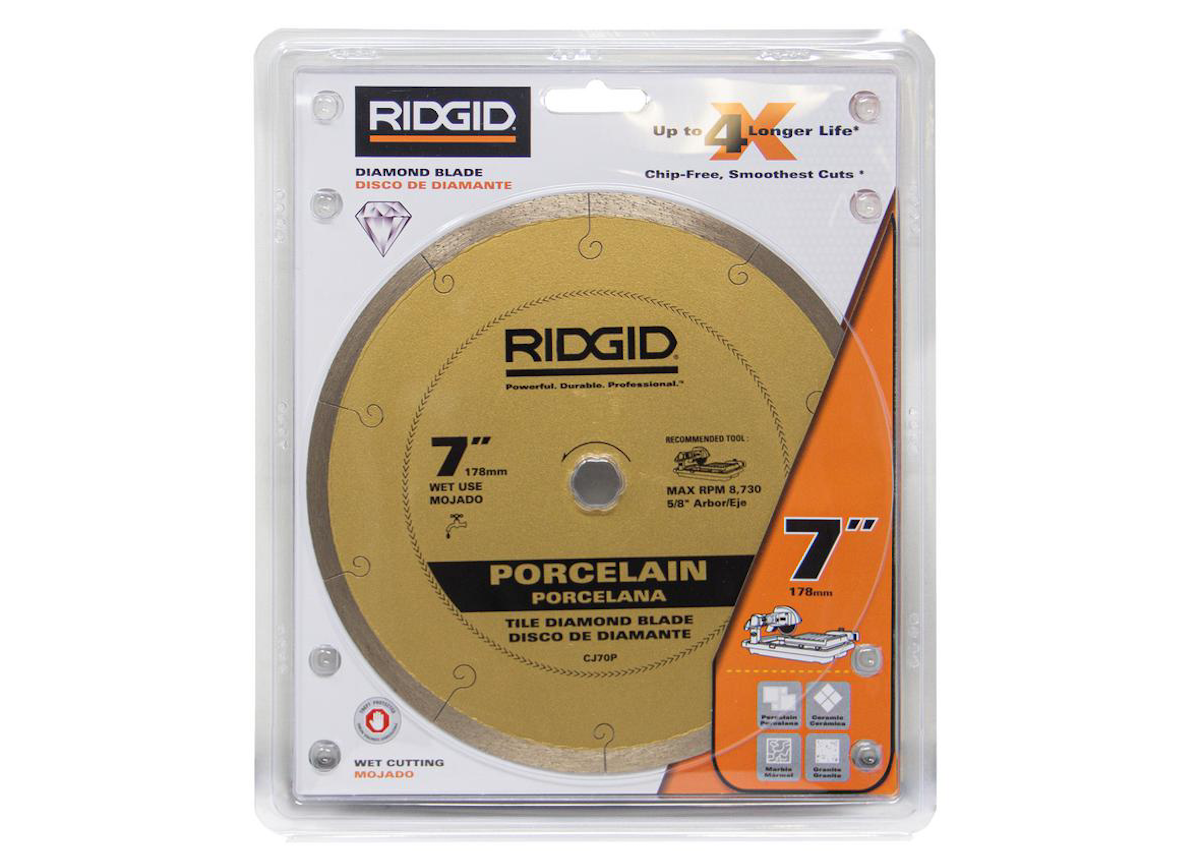
Despite their name, diamond blades don’t contain real diamonds mined from the earth. Instead, they have rigid synthetic diamond particles embedded in the blade’s sharp cutting edge. Diamond blades are used in wet saws for making clean cuts on various types of tile.
The correct diamond blade for any tiling project must match the installed type of tile. Fortunately, getting the right one is relatively simple because the blades are labeled by the type of tile they’re designed to cut. For example, a diamond blade suitable exclusively for cutting ceramic tile may not be durable enough for porcelain tile, which is a more rigid material. Likewise, cutting stone tiles requires a specific blade. Be sure to check the label when choosing the blade.
Best for: Cutting hard tiles, including porcelain, marble, ceramic, and granite
Our recommendation: RIDGID 7 in. Premium Tile Diamond Blade – Get it at The Home Depot for $49.97
This all-purpose diamond blade is designed to cut through hard tile types, including granite and porcelain.
7. Paddle Mixer
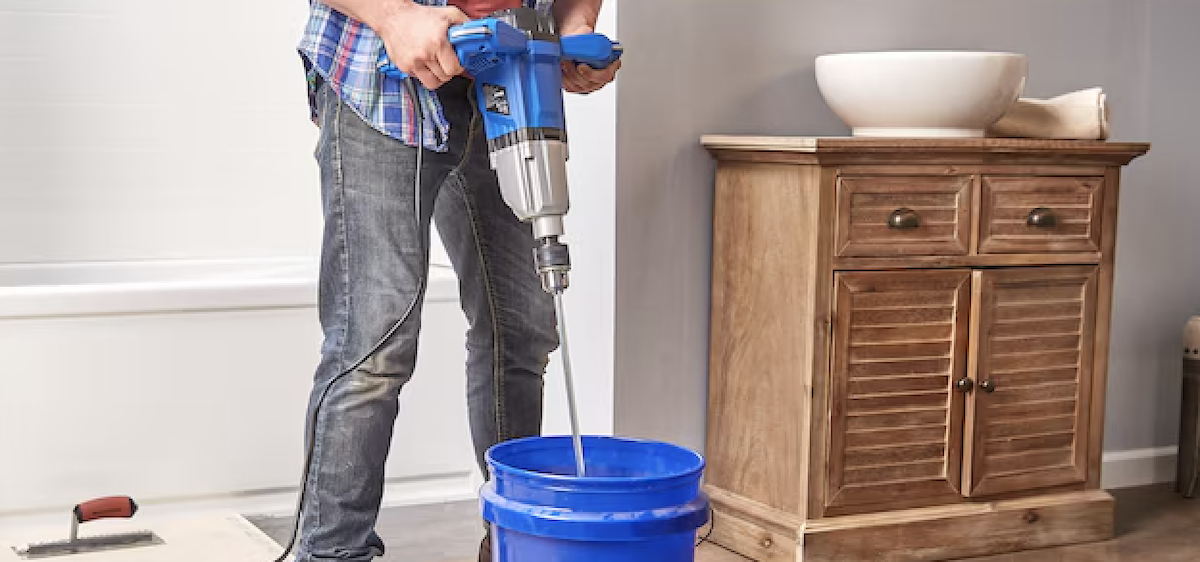
While premixed types of thinset and grout are available, both can be found in a powdered form that must be mixed thoroughly with water. Mixing by hand—although doable—is labor-intensive and tedious. Hand-mixing increases the risk of powder lumps remaining in the mixture that can reduce the product’s adhesion factor.
Paddle mixers—or paddle bits, like QEP’s Paddle Bit, that fit heavy-duty drills—make quick work of mixing powered grout or thinset. A dedicated paddle mixer that features a two-hand grip makes it easy to securely grasp the power tool while mixing large batches. Paddle mixers save a lot of time for large tiling projects and help ensure uniformly mixed adhesive and grout.
Best for: Mixing large batches of thinset or grout
Our recommendation: Kobalt Mud Mixer 1.9-HP – Get it at Lowe’s for $188.98
This heavy-duty paddle mixer comes with a two-hand, nonslip comfort grip, and it features a powerful 1.9-HP motor for mixing large batches.
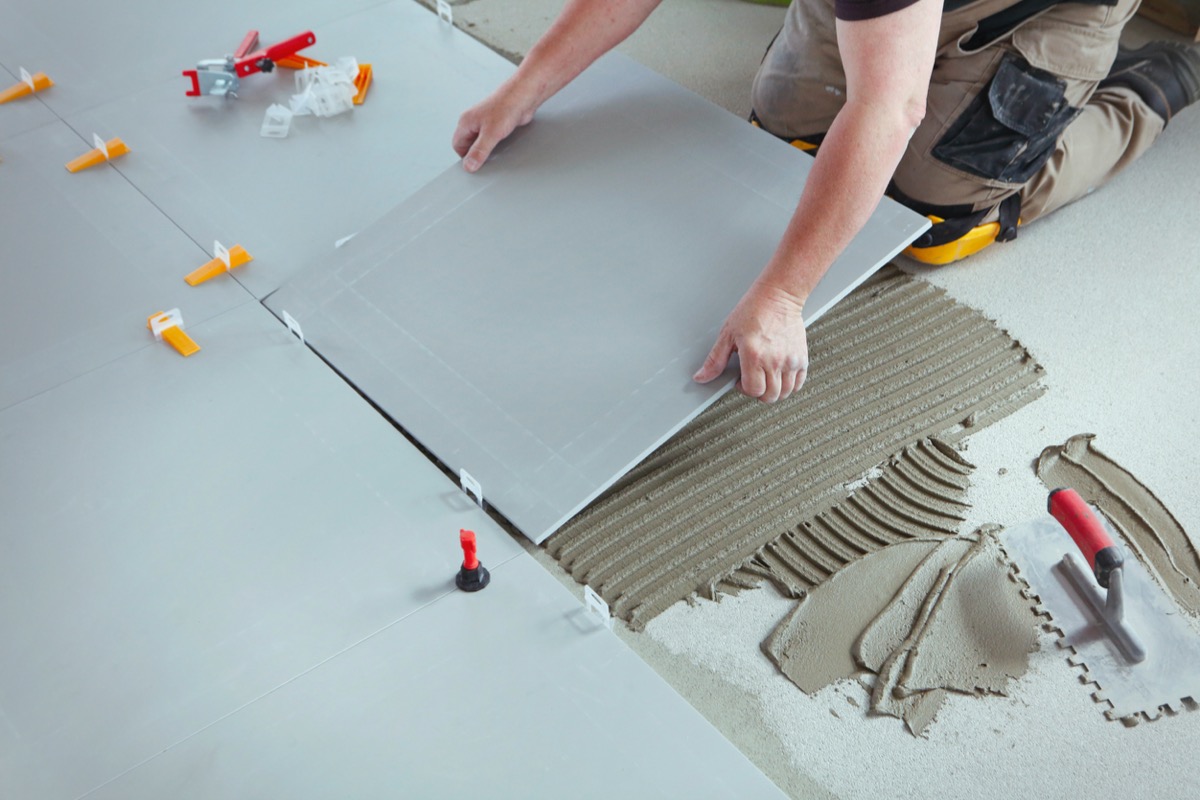
8. Tile Leveling System
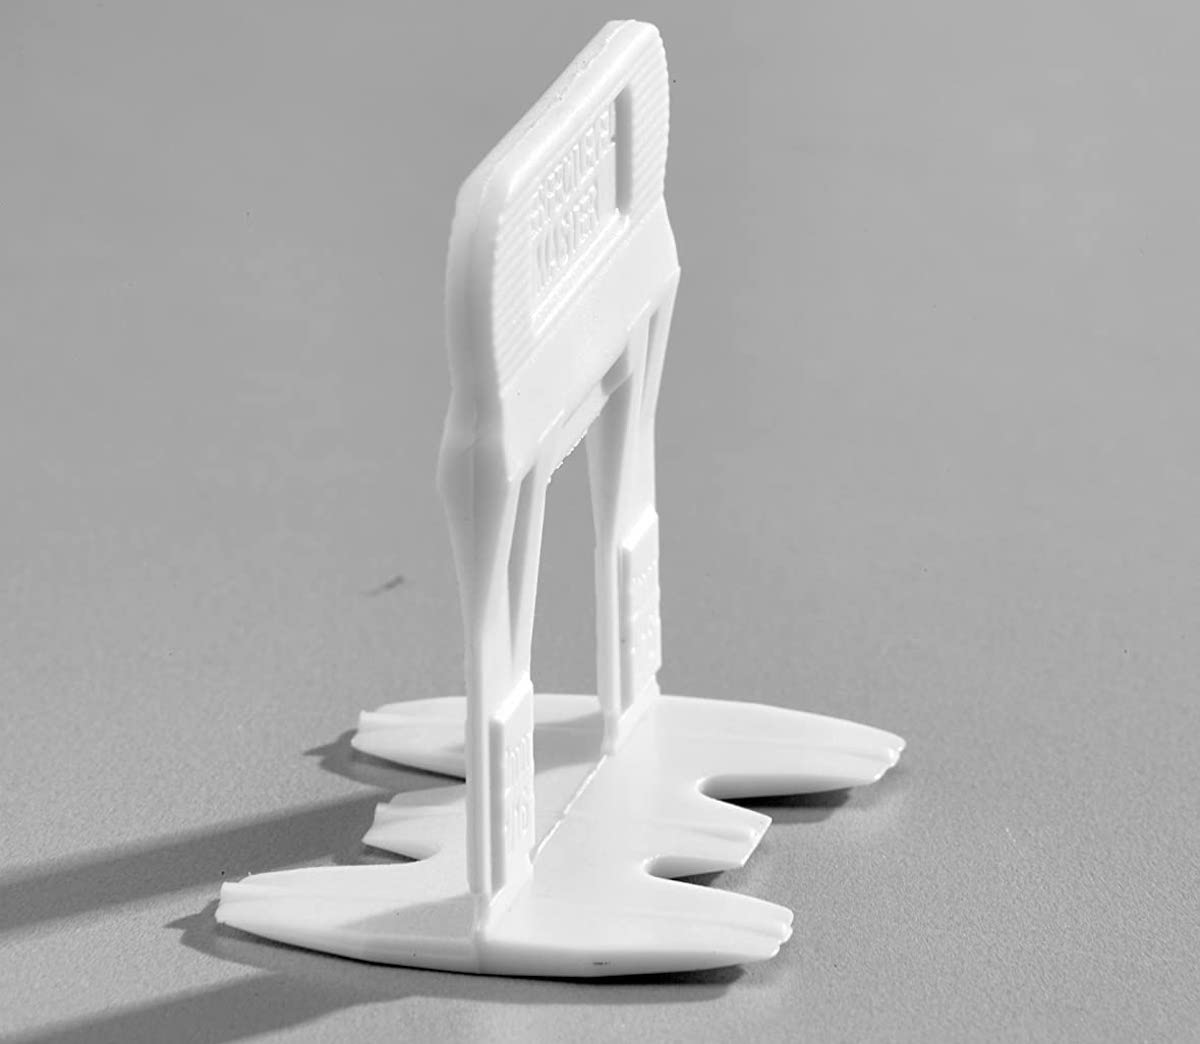
Tiles add to a room’s style, but if they’re uneven they can look amateurish—or worse, be a tripping hazard. An uneven subfloor can easily result in tiles that aren’t level, which is why the first step to a pro tiling job is ensuring that the subfloor is level. Sometimes this requires using a floor leveling compound.
When the edge of one tile is higher than the edge of an adjacent tile, the issue is known as “lippage,” which means the higher tile has a raised lip. While lippage isn’t as noticeable on wall tiles, it can create significant problems on the floor. Lippage on floor tiles can catch dirt during sweeping or mopping, and it can feel uneven underfoot. Tiling leveling tools can help you achieve a flat floor that’s free from lippage.
Professional tile setters may use straight edges to ensure all tiles are of a uniform height during installation, but DIYers may want additional assurance. A tile leveling system offers installers a way of carefully aligning tiles at a consistent height. This can be accomplished by using special spacers between the tiles and then slipping braces within openings in the spacers. The braces put equal pressure on the tiles on both sides to keep them at the same level. When the thinset cures, the spacers and braces are removed before grouting.
Best for: Ensuring a level floor with minimal lippage
Our recommendation: T-Lock PERFECT LEVEL MASTER Professional Tile Leveling System – Get it at Amazon for $62.39
The set’s durable, 1/16-inch clips help create thin grout lines and level tile installations.
Final Thoughts
Installing tile was once a project left almost entirely to professional tile setters, but with today’s tiling tools and accessories, it’s become a DIY project for handy homeowners. With the right materials needed for tiling and special tools for scoring, snapping, or cutting, DIYers can make accurate cuts. Power mixers or paddle bits help blend grout and adhesives with ease, so laying tiles is quicker and simpler.
FAQ
Q. What is a grouting tool?
A grouting tool or float is a rubber-padded trowel used to smooth wet grout into the joints between tiles.
Q. What do I need to tile a hearth?
In addition to measuring tape and a pencil, you’ll need the tiles, a tile cutter or wet saw, adhesive (thinset), a notched trowel, and a paddle bit or mixer (if you’re not using premixed grout). You may also want to use tile spacers, which double as a tile measuring tool to keep tiles evenly spaced. You’ll need grout, a grout float, and a sponge to clean away excess grout from the tile surfaces for the grouting process.
Q. What are the four most essential tools used in tile installation?
The four most essential tile tools are: a tile cutter or wet saw, a notched trowel, tile spacers, and a grout float. And while they’re not essential for installing tile, if you’re working on floor tile, don’t forget to invest in a good pair of knee pads.
The prices above are accurate as of September 23, 2025.
