We may earn revenue from the products available on this page and participate in affiliate programs. Learn More ›
When you’ve already filled your bathroom’s medicine cabinet and limited under-sink space with extra toiletries, a surplus of shampoo bottles, medicines, and makeup, you probably don’t want to squeeze a cleaner or toilet brush in the crowded space, too. Rather than leaving them out and uncovered next to the toilet, create a designated storage station that hides the ugly essentials and brings your bathroom one step closer to serene. We’ve got you—and your bathroom cleaning supplies—covered, both figuratively and literally, with this easy-to-build, cabinet-like DIY bathroom storage unit.
MATERIALS AND TOOLS
– 1×8 lumber (10 feet)
– Ruler
– Pencil
– Jigsaw
– Palm sander
– Sandpaper
– Wood glue
– 1-½-inch nails (24)
– Hammer
– 12mm plywood
– 1-¼-inch wooden dowel
– 1-½-inch screws (4)
– Drill
– 1-½-inch × ¼-inch wood lath (8 feet)
– Wood stain
– Paint
– Varnish
– Brush
– Rope
– Wooden curtain ring
– Small hinges with screws (2)
STEP 1
Let’s first make the necessary cuts for building the structure of the cabinet. Cut the lumber into five pieces: two 16-inch pieces to make the top and the bottom, and four 19-inch pieces to make the sides and the inner division. Then, slice the four 4-inch pieces from the wooden dowel to make the cabinet’s legs.
Using these dimensions, your finished DIY bathroom storage cabinet will stand 25 inches tall, 16 inches wide, and 8 inches deep. Measure out where you want to place the cabinet now so that you can adapt those dimensions as necessary to fit your own space.
STEP 2
Lay the 16-inch bottom piece in front of you, squeeze a line of wood glue at each short end, then stand and press two 19-inch side boards in the glue. Be careful to align the sides with the outermost edges of the bottom and the top boards in order to build a perfect box.
Hammer four 1-½-inch nails through each end of the bottom piece to secure the sides. Then, glue and nail the top board in place.
STEP 3
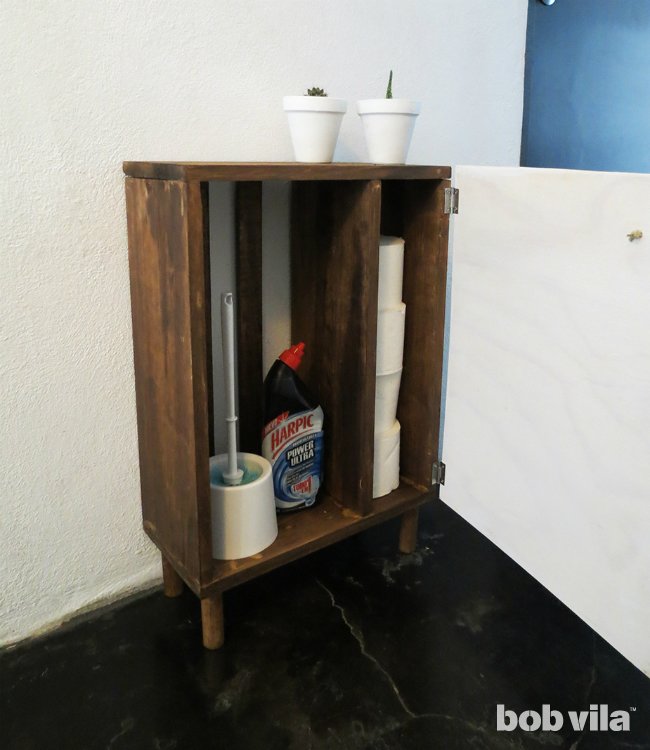
Measure 5 inches inside the left side of the box, and mark this both on the bottom and top boards. Apply a little wood glue to the short edges of the third 19-inch piece you’ve cut—a soon-to-be cabinet divider—and slide this board into place where you’ve marked it to go. Hammer in four more 1-½-inch nails both through the top and the bottom to hold the divider in place. The 5-inch space to the left of the divider will provide the perfect storage space for stacking toilet paper rolls.
STEP 4
Since this DIY bathroom storage will stand next to the toilet, adding legs (those 4-inch dowel cuts) will make it easy to clean underneath it in the future. Flip the cabinet so that the bottom faces you, and measure 1-½ inches in from each corner; mark where you’ll place the leg.
Drill four small pilot holes, one at each mark, as well as holes into the center of each dowel piece.
STEP 5
Drill a 1-½-inch screw through the floor of the cabinet and into a dowel at each corner to affix the legs.
STEP 6
Add a little glue to the drilled end of a dowel piece, then twist it onto the bathroom storage unit. Repeat for each leg.
STEP 7
Make the back of the cabinet using strips of wood lath to create good ventilation on a cabinet that will likely store store lightly damp toilet brushes and cleaning products. Cut three pieces of 1-½-inch × ¼-inch wood lath to be 19 inches each. Line the top and bottom ends of each with wood glue, and place them through the open cabinet at the back; the top and bottom should fit snugly with the wood structure you’ve made so far. Wait for the glue to dry before moving the unit.
STEP 8
Now, it’s time to build the door from 12mm plywood: Draw and cut out with a jigsaw a rectangle of 19 by 21 inches.
STEP 9
Sand the storage unit and the door with a 100-grit paper, with extra attention given to the cut edges.
STEP 10
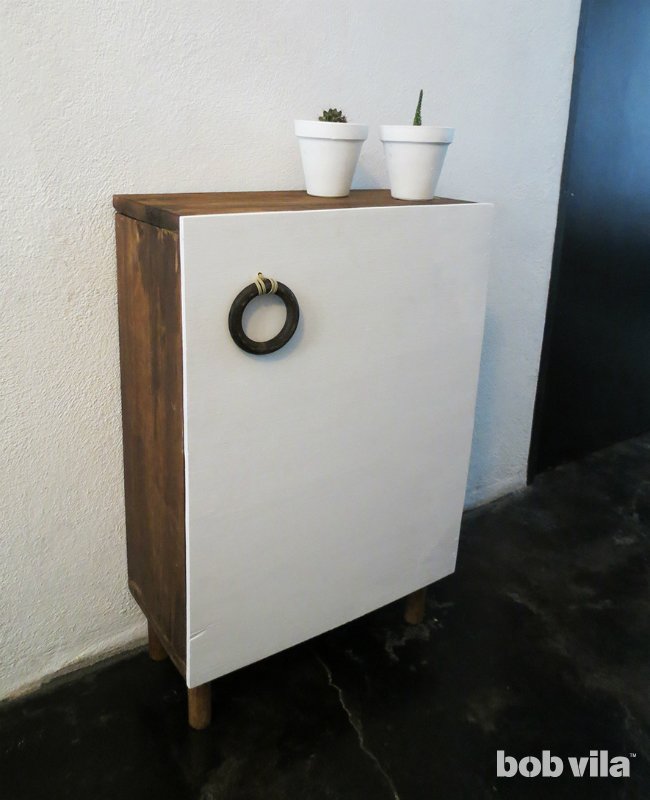
Stain or paint the cabinet’s frame and door with colors that complement your bathroom’s design. We used a combination of the two on the new DIY bathroom storage: an Early American stain on the structure itself and a contrasting white paint (a satin or semi-gloss paint is best for use on walls and fixtures in the bathroom, since it is often easier to clean) for the door. Since this finished piece will move to a high-moisture zone, it’s important to wait for the piece to dry completely and then finish with a coat of varnish over any wood stain as an extra layer of protection.
STEP 11
Think about where you are going to place your cabinet and, as a result, which way the door will need to swing. For easy opening, add a handle to the door. You can choose a more traditional drawer knob, but we repurposed a wooden curtain ring for the job.
Drill a hole into the corner of the door opposite of where you’ll attach hinges. Take about 10 inches of rope, fold it in half, pass the folded end through the center of the ring, and pull the loose ends through the small loop that you’ve created until tightened; the ring should now have two ends of rope hanging loosely from it. Pass these through your door’s drilled hole and knot on the other side to securely attach it. You can cut any extra length just after the knot.
Door pull in place, you’re ready to attach it to the storage unit. Lay two hinges on the side of the open-face storage cabinet that is opposite where you’ll have the door pull (we mounted the the door pull in the upper left of the cabinet, so our hinges are located on the right side). Each hinge should be placed 1 to 2 inches from the top or bottom, with one plate screwed into the edge of the 19-inch side and the other screwed into the back of the door.
Thanks to your brand new bathroom cabinet, organizing your cleaning supplies and toilet paper rolls will soon be an open and shut case!
Ama is a DIY addict and the creative mind behind Ohoh Blog. She likes home decor, lighting, and furniture projects that may involve painting, sewing, drilling…no matter the technique! Whatever she has on hand is inspiration to create, and fodder for her serious addiction to upcycling.