We may earn revenue from the products available on this page and participate in affiliate programs. Learn More ›
- Building a pool runs between $700 to $125,000, but financing options such as pool loans, home equity loans, and personal loans may make the cost of this project more manageable.
- It’s essential to do sufficient research on local zoning laws, safety regulations, and any necessary permits before starting pool construction to avoid fines.
- The basic steps for building a pool include applying for permits, choosing a pool type, picking a location, designing the pool, choosing a financing option, excavating, laying a foundation, installing the shell, adding finishing touches, scheduling an inspection, and adding water and chemicals.
- Building a pool is a difficult and potentially dangerous project. Homeowners who don’t have pool construction experience will want to consider having a pool installation professional perform some, if not all, of this job.
Wondering how to build a swimming pool in your backyard but have no clue where to start? If you’ve never excavated or constructed an in-ground pool before, it can be a daunting task that takes several weeks and costs thousands of dollars. There’s a lot to keep in mind for this project, from choosing a location, financing the pool, excavating, building, and finally filling and treating the pool. Whether you plan on hiring an installer or tackling pool construction yourself, understanding the steps involved in this job will result in a smoother project and allow you to enjoy your new pool sooner rather than later.
Time required: 8 to 12 weeks
Difficulty: Expert
Estimated cost: $700 to $125,000
Tools & Materials
Bobvila.com may earn a commission from purchases made through these links.
- Heavy-duty digging equipment
- Pickax or sledgehammer
- Steel supports (if using concrete)
- Pump and filter system
These are the primary supplies and materials you will need when building a pool. Hiring one of the best pool installation companies can help narrow down which tools are necessary for the job.
Before You Begin…
There is a lot to consider for homeowners who are considering how to build an in-ground pool before even digging a hole. This is a big-time construction project, so make sure you know what you’re doing to avoid unexpected obstacles or additional costs. Whether it’s obtaining the proper permits, coordinating tools, or choosing a location with minimal barriers, particular expertise and knowledge help make sure everything gets done smoothly.
If your backyard has any challenging setups or conditions, those can drive up the final cost, too. If you’re planning on building a DIY inground pool, there’s the chance that the final product might not look as good as you’d expected.
Tips for Building a Pool
- Concrete pools take longer to install than any other type.
- Pool toys, pets, or sharp objects can puncture a vinyl lining.
- Prices vary based on residential location, soil conditions, water circulation system, and the pool’s type and size.
- Pools are subject to building and zoning regulations, and permits need to be approved before starting work.
Safety Considerations
- Pool lights not only set the mood for nighttime swimming but also make a pool safer.
- A safety fence, often included in basic contracting packages, ensures a secure area around the pool. Local construction departments often require fences to obtain permits.
- A safety cover can help protect users from accidentally falling in the water.
- Electrical safety is a significant concern, and faulty wiring can increase the risk of shock.
STEP 1: Apply for any necessary permits.
Most towns and cities require a residential building permit to construct a pool. Rafi Friedman is the president of Coastal Luxury Outdoors, a luxury pool builder, maintenance, and service provider based in Ponte Vedra Beach, Florida. He notes, “While this ultimately comes down to local regulations in your area, I’ve never encountered a city that didn’t require a permit to build a pool.” The local Department of Building and Safety lays out the exact requirements and specifications for homeowners to follow. Some projects may also require permits for water and gas lines depending on the pool’s features. Permits can cost anywhere from $250 to $2,000, but they are a necessary part of any construction project. Failing to pull the proper permits can result in hefty fines.
For those living in neighborhoods with an HOA, there may be pool construction requirements or restrictions in the community rules. The HOA can fine homeowners who put in pools that are not approved, or it may even require that the pool be removed. For this reason, it’s essential for homeowners to carefully review HOA guidelines before breaking ground on the pool installation. After that, bringing your backyard vision to life can begin.
STEP 2: Decide on the type of pool you want to build, as well as any accessories, features, or extras you want to include.
Next, decide the type of pool that best fits your property and desires. There are concrete, vinyl, and fiberglass pools, and each comes in round, square, or rectangular shapes. The different types have their pros and cons: Fiberglass is low maintenance but not as customizable, while concrete is higher maintenance and more expensive, but it’s fully customizable. Vinyl is often the least costly option, but it also needs more frequent repairs.
Pool design is another factor to consider. A lap pool is a great choice for those who primarily want to use their pool for exercise. Endless pools are an alternative to lap pools if space is limited. Infinity pools and custom pools can be visually striking but come at a relatively high price point. Spools or plunge pools can be a good compromise for those with limited space or budgets, as they are smaller than a standard swimming pool. Finally, saltwater and natural pools may be desirable for those who are sensitive to high levels of chlorine. Further decisions like depth, in-ground vs. above-ground, number of entrances, and lights or extra features can be discussed with a contractor. Those planning for an above-ground pool will need to choose between a stand-alone pool and a built-in above-ground pool.
| Pool Design | Cost |
| Custom | Up to $100,000 or more |
| Endless | $23,000 to $40,000 |
| Infinity | $55,000 to $130,000 |
| Lap | $6,000 to $500,000 |
| Natural | $50,000 to $100,000 |
| Plunge | $10,000 to $50,000 |
| Saltwater | $12,000 to $38,000 |
| Spool | $5,500 to $50,000 |

STEP 3: Decide on the location where you want to build the pool.
Choosing an optimal location is one of the most important parts of swimming pool construction. The location will partially depend on the pool’s distance from the home as well as the presence of any trees or fencing. It’s also worth checking local zoning laws to be aware of any potential legal restrictions on pool location. Yard size may ultimately determine how big a pool can realistically fit in the space.
Friedman adds, “Pools love sun…First of all, a pool that gets plenty of sun is going to warm up more quickly and reduce your need for heaters and pool covers. Second, pools in sunny spaces tend to have fewer overhanging branches that could lead to leaves and other debris in the pool. I always recommend the south or west side of a home for this reason.” Other factors to consider include:
- Wind blockage. When possible, it’s a good idea to place the pool in an area blocked from strong winds by nearby structures or fencing.
- Electrical or telephone wires. Placing the pool at a safe distance from electrical wiring is an essential safety precaution.
- Underground utility lines. If there are plumbing or gas lines in the pool location, rerouting them can add significantly to the project cost.
- Vulnerability to flooding. High and dry areas are a great choice for pool placement as they are less likely to flood.
- Visibility from the home. Especially for families with children, being able to see the pool from the home provides enhanced safety.
- Convenient access. According to Friedman, “Your pool should also be convenient to access…It’s almost always better to have it right out your back door than to have it around the side of your home.”
STEP 4: Design and plan the pool and come up with a budget.
Once the general location and style of pool have been determined, it’s time to develop a concrete plan. This includes taking measurements and marking the exact location where the pool will be installed, identifying potential blockages like tree roots and utility lines, and ensuring that any additional features like decks will have adequate space. It’s also essential to nail down specifics like the pool depth, as well as the number and type of entrances and exits it will have.
For some, this pool-building step may feel challenging or overwhelming. It’s often a good idea to have a professional draw up the pool plan so that nothing is overlooked and homeowners can feel confident with their pool installation going forward. Professionals can also review a homeowner’s material choices and confirm whether they are a good fit for their climate and budget.
STEP 5: Decide how to finance your pool and apply for a loan, if necessary.
After determining a budget, homeowners will need to decide how they will pay for their pool. When possible, it may be worth paying for the pool with cash to avoid paying interest. But the cost of building a swimming pool can be high, so in the majority of cases it’s necessary to take out a loan to finance a pool project. Fortunately, there are a wide variety of financing options available, from choosing one of the best pool loans to dipping into home equity.
- Home equity loan. The best home equity loans (such as one from U.S. Bank or Flagstar Bank) essentially act as a second mortgage that homeowners can repay in monthly installments.
- HELOC. Homeowners can also tap into their home equity with a home equity line of credit (HELOC). But instead of accessing funds as a lump sum, a HELOC is a credit line that homeowners can draw from as needed.
- Cash-out refinance. This option allows homeowners to replace their existing mortgage with a larger one and access the difference in cash. Homeowners can look into the best mortgage refinance companies, such as PNC Bank or Caliber Home Loans, for more information.
- Personal loan. For those who haven’t yet built up significant equity in their home, one of the best personal loans can be a suitable alternative.
- Contractor or manufacturer financing. Many pool manufacturers and installers offer financing so homeowners can pay for their pool over an extended period.
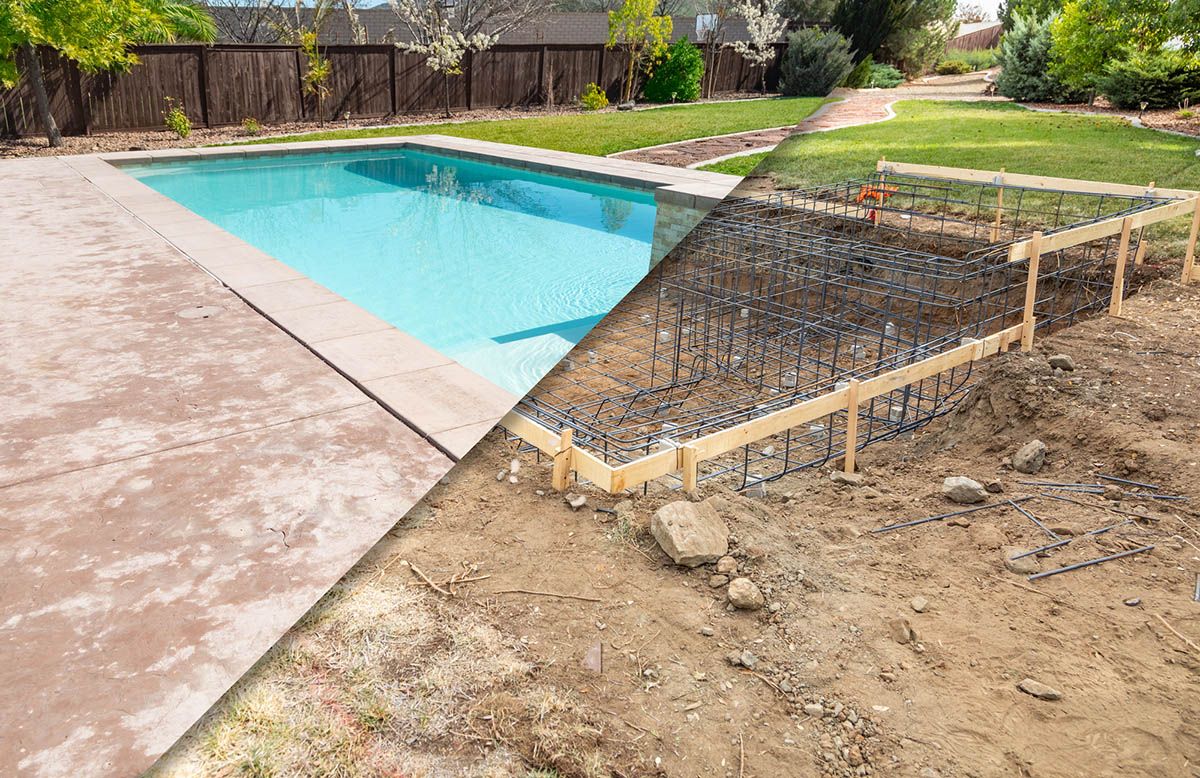
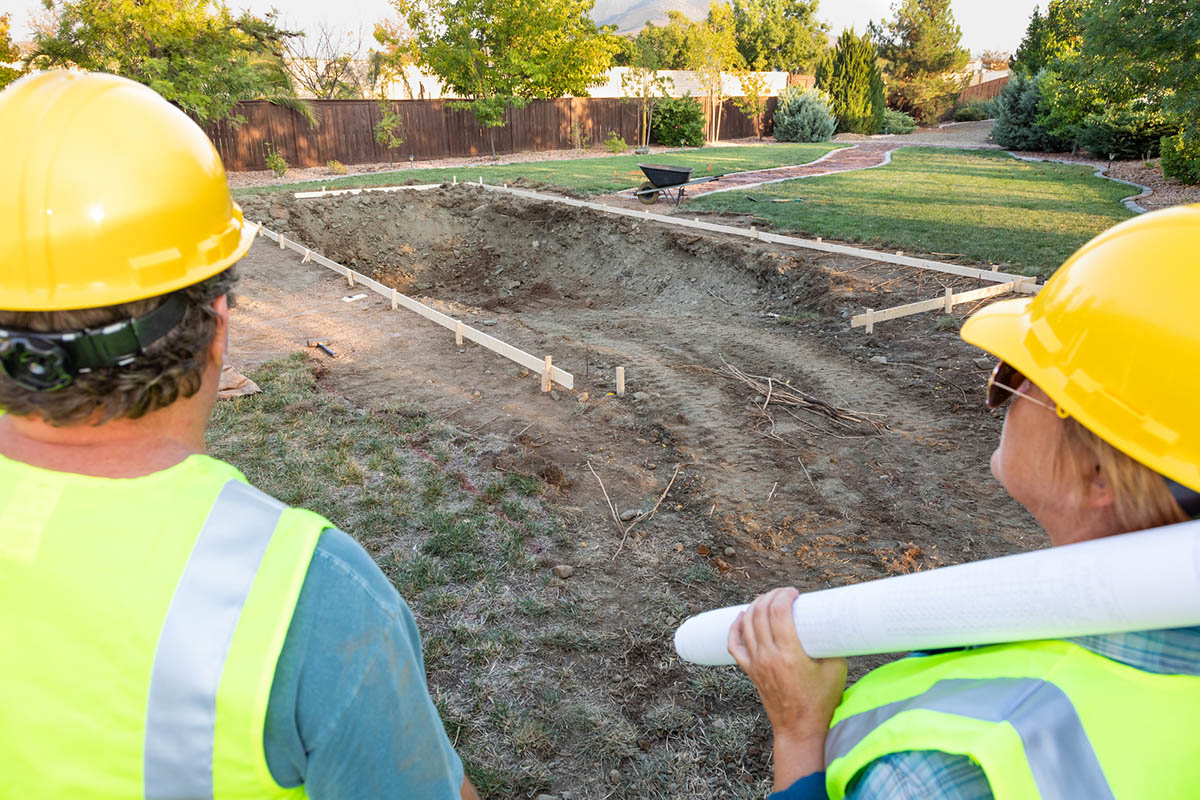
STEP 6: Mark the pool layout and start excavating.
Next, the layout of the pool will need to be marked on the ground so that the excavator knows exactly where to dig. If there are any buried utility lines in the proximity, their locations will also need to be marked so they aren’t accidentally damaged. “While I always start any pool-planning process by figuring out where underground utility lines may be running, that doesn’t tell us anything about the soil composition,” says Friedman. For this reason, performing soil tests first is an essential step in leveling the ground for a pool, as it ensures that the soil is uniform and suitable to support a pool. Salts, organic matter, clay, sand, gravel, and silt can affect these conditions. Friedman adds, “Loose soil that’s at risk of subsiding will need extra reinforcement, while clay can be especially challenging to dig out.”
Then, heavy-duty machinery (like a backhoe) is used to dig. This process can produce a lot of excess dirt. A professional removal company is equipped to haul it away. Finally, once the hole for the pool has been created, it’s essential to grade the bottom surface so it is as level as possible. The method for this may depend on the swimming pool’s construction, such as whether the bottom of the pool is flat or rounded.
STEP 7: Establish the foundation and add plumbing and electrical connections.
Regardless of the material of the pool liner, it will be necessary to frame the walls of the pool with steel supports. Some pool builders are not licensed for this work, so hiring an additional contractor may be required to oversee this part of the project.
This is also when any power and water lines that make the pool function will be installed. Part of this stage includes building an equipment pad to hold the pump and filter systems. The plumbing can sit below ground in concrete to hide it or on top of a pad. This installation process can take longer if the pool has extra components like lights, water features, and spas.
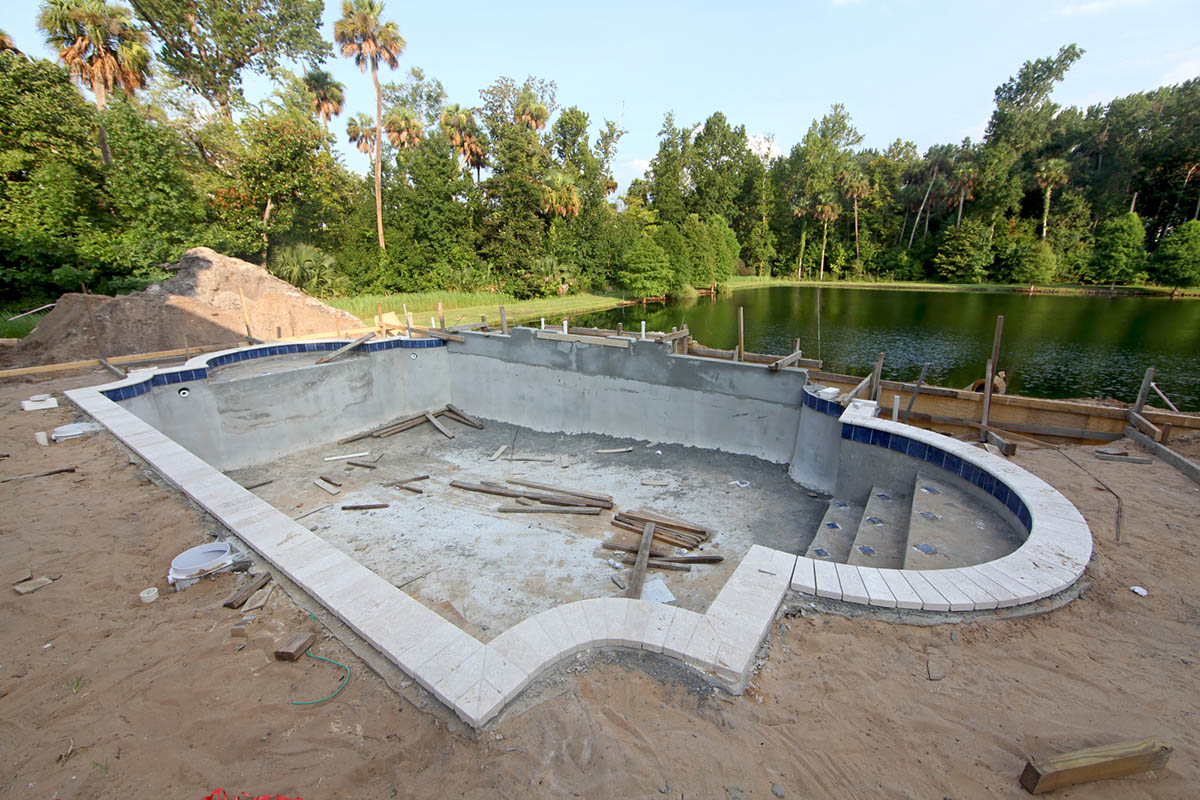
STEP 8: Install the steelwork or molded fiberglass pool shell.
Now that all the necessities are installed, it’s time to focus on the shell. A gunite (sprayed concrete) pool requires a steel-reinforced rebar skeleton and takes longer to build. Swimming pools made of concrete need about a month to set fully. Alternatively, shotcrete takes only a week to set but will need to be watered regularly. Finishes such as stone or tile will also be installed at this time.
A vinyl or fiberglass pool is quicker to install since the shell is created off-site, shipped, and installed directly. As the shell is installed, ensure it is level with the ground and that the sides are straight. The leveling process may take several adjustments. The gaps between the pool shell and the outside of the hole can be filled in with concrete or soil.
STEP 9: Add the finishing touches to your pool.
After the pool base is complete, a contractor will build a surface-level deck around it and apply the pool finish. At this point, landscaping can take place as well. Decorative finishing touches complete the look. The length of time for installation depends on the complexity of the design. Extra features do bump up the cost but give more customization options, including zero-entry points (like on a beach), waterfalls, hot tubs, lighting, and stones. Other extras include diving boards, slides, decks, and heaters.
STEP 10: Contact your local municipality to arrange a final inspection.
Before you fill the pool with water, a representative from the local municipality will need to perform an inspection and confirm that everything is up to code. If there are any issues, these will need to be repaired or corrected before the pool can be used. This process can take several weeks, so it’s important to plan accordingly.
STEP 11: Fill up the pool with water and treat it with chemicals.
Now that the interior is finished, the pool is ready to be filled. You may need to acid-wash it a day before, and then a pool technician will be able to fill it. Filling the pool with a hose is the least costly option, but can take up to 2 days. If you’d prefer a quicker result, you can also have pool water delivered. After the water goes in, added chemicals keep the water clean and swimmable. The chemical sanitizer helps kill organic contaminants in the water, such as bacteria or algae. Three EPA-registered sanitizers are commonly used in pools: chlorine, bromine, and PHMB. Pairing the sanitizer with one of the best pool stabilizers will prevent the chemicals from degrading and reduce the frequency with which they are added. It’s worth noting that it may take over a week to achieve a chemical balance in the water that is safe for swimming, so it’s important to test the pool’s pH and chemical levels before diving in.
While you may be able to DIY this project if you have the right tools, hiring a professional can ensure you have the correct permits and there’ll be no issues with digging, wiring, or installation. It’s a relatively expensive project requiring heavy-duty equipment and specialists to handle electric and plumbing installations along with extra features per your desires. A professional can alleviate the stress of planning how to build a pool and allow you to look forward to enjoying it. Finally, the addition of special features can add time and cost to the project, but they may greatly enhance your enjoyment of the pool. According to Friedman, “I always encourage our customers to make their pools their own. While we have some suggested additions, like poolside fire pits, shallow wading areas for lounging in the water, or built-in volleyball nets, we’re always open to suggestions and requests.” Professionals can help realize these ideas so that the result is just as their clients pictured it.
FAQs
Swimming pool installation is no small feat, so homeowners are bound to have a few questions before getting started. Learning the basics of swimming pools can provide some peace of mind about moving forward with this process.
Q. How long does it usually take to build a pool?
Those who choose to build a pool themselves can expect the project to take at least 3 months. Mistakes can significantly extend the time as well as the budget needed to build the pool. Hiring a contractor may shorten the pool-building process significantly since they have the tools, experience, and crew necessary to finish the job efficiently.
Q. What time of year is cheapest to build a pool?
Like many contractors, pool builders charge the lowest prices during their least-busy season. In many regions, this is late fall through winter. It’s important to take the area’s climate into account as it may not be possible to build in late winter if your region has harsh freezing conditions.
Q. Should you cover your pool every night?
While it isn’t strictly necessary to cover a pool every night, doing so can keep the pool’s water warm, keep debris out of the pool, reduce the frequency with which chemicals need to be added, and minimize water loss from evaporation.
Q. Do pools increase home value?
Adding a pool typically increases the value of a home by about 8 percent. However, the exact percentage may depend on what part of the country you live in.
Q. Where is the best place to put a pool?
When choosing a location for a pool, it’s important to prioritize areas that receive full, direct sunlight; are visible from the house; are not close to utility or power lines; and have plenty of room for additional desired features like decks, pool houses, or bars.
Q. How far away from the house can you put a pool?
Nationally, the required distance a pool must be placed from a home is 10 feet. However, some states or cities may require an even greater distance, so it’s important to verify local laws before installing a pool.