We may earn revenue from the products available on this page and participate in affiliate programs. Learn More ›
If you’re reluctant to rearrange the pictures on your walls because you dread dealing with the nail holes left behind, you’re in good company. Filling nail holes can be challenging, particularly if you’re trying to completely erase any trace of the fasteners. Those dimples left by well-intended spackling jobs can haunt us long after the gallery wall comes down. But take heart: With the right tools and techniques, you can have seamlessly smooth walls once more—and you’ll never again fear relocating pictures, calendars, clocks, or even wall-mounted shelves.
MATERIALS AND TOOLS
– Spackling paste (for nail holes in drywall)
– Wood filler compound (for nail holes in wood)
– 220-grit sanding block
– 2” putty knife
STEP 1: Sand the surface.
Prepping properly before you even start spackling is key to removing all traces of former holes. When you hammer a nail into drywall, some of the chalky gypsum material inside the drywall panel is displaced and has a tendency to push outward, forming a small ridge around the nail hole. Wood, on the other hand, has a tendency to splinter a bit around the nail. In either case, if you simply fill the nail hole, the area might look smooth to the eye for now, but the bump will stick out like a sore thumb once you paint it.
To prepare the surface, lightly swipe a fine, 220-grit sanding block over the nail hole to sand away ridges. Work in a circular motion over drywall. When sanding wood, however, always sand in the direction of the wood grain to keep from leaving cross-sanding marks.
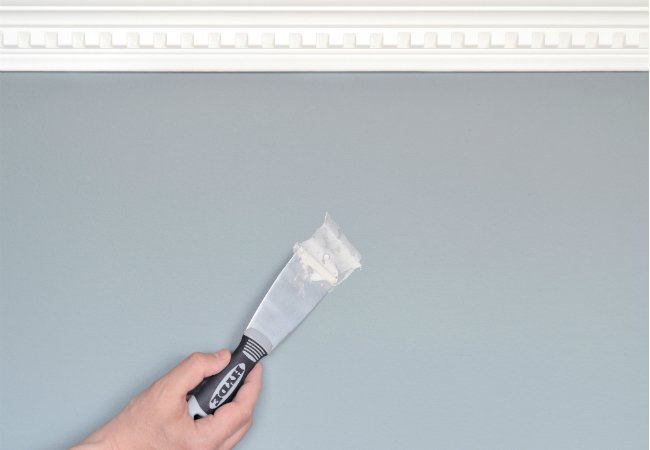
STEP 2: Choose the right hand tools.
For a small-scale spackling job, you’ll need to select a putty knife with a little bit of give in its blade, like HYDE’s 2” SuperFlexx Stainless Steel Putty Knife. The slight flexibility facilitates easy spreading as you pull the spackling over the hole. The bottom section of the blade glides at an angle along the wall surface, helping to push the compound into the hole and reducing the risk of scratching the surface with the corners of the blade (which can happen if you’re using a rigid blade). Plus, the tool’s stainless steel is impervious to rust. In fact, if you neglect to wipe it down immediately after the job, simply give it a small bend, and any dried leftover compound will fall right off.
STEP 3: Select and spread the compound.
Though similar in application, different patching compounds are formulated for use on different surfaces. Make sure you select the right one for the job.
- For drywall, pick up a good-quality spackling paste (your choice of either the premixed stuff, which comes in a small tub, or a dry powder that you’ll combine with water) to fill the holes.
- For wood, choose a wood filler that’s formulated for the surface at hand. Basic wood filler compounds work in situations where you’re planning on painting over the surface later to hide the obviously discolored patch. For bare wood that will be stained or wood used in an exterior project, look for compounds that are specifically labeled for the intended use.
Once you’ve selected an appropriate product, scoop up a roughly dime-size dollop of spackling paste or filler, and smooth it across the nail hole using the 2″ SuperFlexx Stainless Steel Putty Knife—not your fingers, however tempting that may be. Smoothing with your hands will leave the spackled hole with a slight depression because your digits are not perfectly flat.
The best method involves two swipes: one either sideways or downward to fill the hole with compound, followed by a second swipe back in the opposite direction to wipe away the excess. If you find that your second swipe across the nail hole leaves streaks of spackling paste on the wall or wood, you’ve probably used more paste than necessary; take note and scoop up a little less the next time.
Once the spackling paste has dried completely (the time varies by brand), lightly sand the area with a fine-grit sanding block. Remember: Move in a circular pattern when sanding drywall, and follow the grain when sanding wood.
STEP 4: Apply a second layer of compound.
Some spackling and wood filler compounds shrink more than others, but it’s difficult to see the shrinkage until the wall has been painted. For that reason, it’s best to apply another thin layer even if you think the first application filled the hole completely. Follow the same two-swipe method described in Step 3, then let the compound dry for the recommended amount of time.
Note: Some spackling paste is advertised as “paintable when wet,” but it’s best to err on the side of caution. If you don’t give it a chance to dry, you can’t sand it, and without sanding, you can’t be sure the wall is completely free of leftover bumps or depressions that would draw attention to your spackling job.
STEP 5: Prepare for paint with one last sanding.
Lightly sand the area around the hole to eliminate any excess compound from your second application, and then inspect the hole itself. The paste should only fill the hole and not extend past its edges. If you see extra filler, take care of it with some spot sanding; otherwise, you’re all set! Paint the drywall or wooden surface, and forget about those holes for good.
