We may earn revenue from the products available on this page and participate in affiliate programs. Learn More ›
The garage is often used for more than just storing the car, seasonal items, tools, and lawn mower. Many people take advantage of the extra space to create a functional workshop, mudroom, entertainment area, or another kind of use. However, in the middle of a hot summer, the garage can quickly turn into an oversized oven that becomes more uncomfortable as the temperature rises, and in the winter it may be too cold to properly use, even with the best space heater for the garage.
Insulation helps prevent the flow of heat into and out of the space, keeping it cool in the summer and warm in the winter. It also can lessen exterior noise, like traffic or loud neighbors. Insulating an unfinished garage can be a relatively simple task for experienced DIYers. Common types of DIY insulation for this job include fiberglass batts and rigid panels, with most people preferring the simplicity and affordability of fiberglass. However, rigid panel insulation is a more effective insulator than fiberglass, making it a better option for very hot or very cold climates. Spray foam insulation also can be used, though it typically costs more than either fiberglass batts or rigid panel insulation, and it’s more difficult to install.
Keep reading for detailed steps to help secure the garage space against freezing winters and sweltering summers.
Tools & Materials
Bobvila.com may earn a commission from purchases made through these links.
BEFORE YOU BEGIN
Insulating the garage is typically easiest when the studs of the garage are exposed instead of covered with drywall. If the studs are already covered with drywall, but the gap between the studs isn’t filled with insulation, it may be a good idea to consider having a professional use spray insulation to fill these gaps so only minimal damage is done to the drywall.
STEP 1: Remove anything mounted to the walls.
Nails, screws, and hooks are commonly installed on the wood studs of a garage so that lawn tools, ladders, and other objects can be mounted on the walls when they aren’t being used. A hammer, screwdriver, or pry bar is typically all that you need to remove any hooks, nails, screws, or any other fasteners or objects that may be mounted to the walls of the garage in order to get access to the bare studs of the structure.
STEP 2: Seal any cracks or gaps along the exterior wall.
Inspect the outside of the garage and the inside of the garage to detect any cracks or gaps along the exterior walls. It’s also a good idea to determine if there are any cracks or gaps in the wall that’s shared with the home. These narrow crevices can allow insects and other pests to invade and water also can cause the gap or crack to expand while contributing to mold growth and ongoing water damage inside the garage.
Apply waterproof masonry sealant with a caulking gun to seal any cracks, holes, or gaps. Allow the sealant to dry and cure according to the manufacturer’s directions before installing insulation.
RELATED: 10 Types of Insulation All Homeowners Should Know
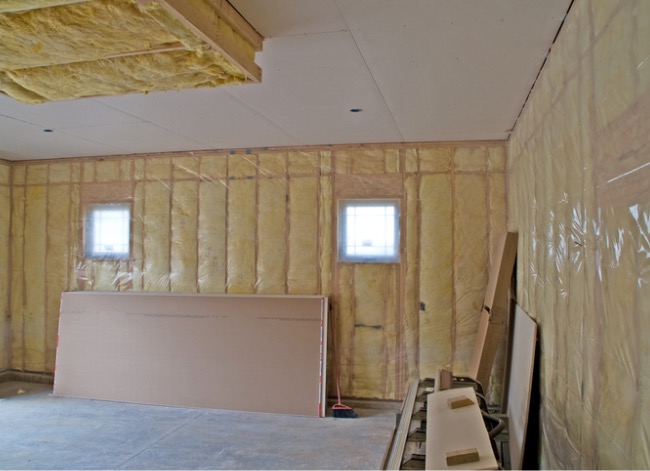
STEP 3: Install batts of fiberglass insulation between wall studs, cut to fit awkward spaces.
When the walls are properly sealed and clear of any nails, screws, hooks, or mounted items you can begin installing the insulation. Fiberglass batts and rigid panel insulation are the most commonly used options due to their versatility and affordable price. Fit the insulation into the gaps between the wall studs and use a sharp utility knife to cut the insulation to the correct size instead of forcing the insulation to fit the space.
Applying a vapor barrier on the warm side of the insulation helps to protect the insulation, the studs, and the exterior wall from issues that can be caused by excess moisture like rot and mold growth. In temperate climates, the vapor barrier is applied over the insulation on the room side by stapling the vapor barrier to the wall studs. However, it’s important that the vapor barrier isn’t damaged because any holes can trap moisture and lead to problems inside the walls.
STEP 4: Don’t forget the ceiling and garage door.
After installing insulation to the walls of the garage there are still two more surfaces that should be insulated to block outdoor noise and to reduce the flow of heat into or out of the garage. The ceiling can typically be insulated in essentially the same way as the walls, though you will likely require at least two people, with one up on a ladder and the other nearby to hold insulation, pass tools, and support the ladder.
The garage door follows a slightly different insulation method because it doesn’t have wooden frames to help secure it. Instead, adhesive retainer pins are applied to the garage door. After cutting the insulation to the correct size for each garage door panel, simply push the insulation into place over the retainer pins, then secure the insulation with snap-on retainer pin caps. (For even easier process, consider one of these all-in-one garage door insulation kits.)

RELATED: 6 Things to Know About Sheep’s Wool Insulation
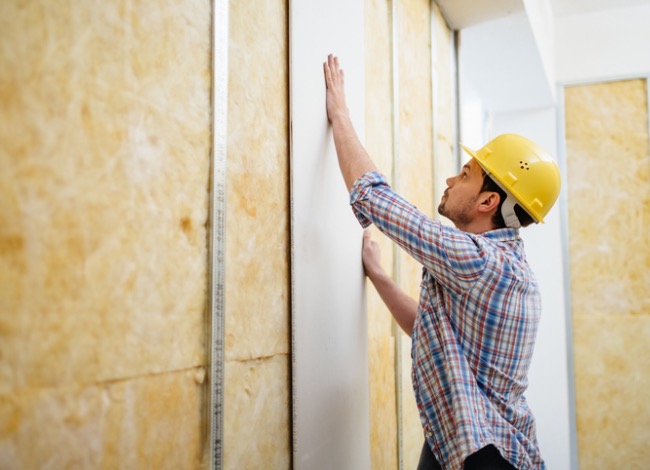
STEP 5: Install drywall.
With the insulation installed and the vapor barrier in place, the job is done and the garage is now insulated against exterior temperatures. However, the space could still look better with finished walls.
Measure the walls and ceiling to find out how many sheets of drywall, how much tape, and how much drywall compound is needed to transform the room into a finished space. Then, put together a basic plan for the layout. After checking all of the measurements, begin hanging the drywall. Secure the pieces of drywall to the studs of the garage using drywall screws, continuing until all of the walls and the ceiling are completely covered. Tape and mud the drywall, then sand the drywall compound (mud) to get a smooth surface. Finally, the walls can be painted to completely finish this update to the garage.
Follow this simple five-step method to properly insulate the garage, including the walls, ceiling, and garage door. By adding insulation to the garage, the space is protected against extreme temperature changes, allowing users to enjoy the garage in the middle of winter or in the sweltering heat of summer. However, it’s important to remember that all fasteners and any hanging objects need to be removed to prevent damage to the insulation and any cracks, holes, or gaps in the exterior wall should be sealed before installing the insulation to prevent pest infestations, water damage, rot, and mold growth.
You don't need to do it yourself
Insulation professionals near you are available to help with your project—get free, no-commitment estimates today.