
We may earn revenue from the products available on this page and participate in affiliate programs. Learn More ›
Learning how to install kitchen cabinets isn’t as difficult as it may seem. The most important part of installation is taking appropriate and accurate measurements before and during cabinet installation to ensure that the base kitchen cabinets are level and lined up with the wall kitchen cabinets. One wrong measurement can affect the entire project.
With updated cabinets that improve a kitchen’s aesthetic, the room becomes more appealing. Suddenly going to wash the dishes or preparing dinner isn’t as much of a hassle, and it’s more of a bright spot in the day.
Read on to discover how to install kitchen cabinets like a pro with these clear, detailed steps for installing kitchen cabinets.
Tools & Materials
Bobvila.com may earn a commission from purchases made through these links.
BEFORE YOU BEGIN
Lifting cabinets by yourself can put you at risk of severe injury. Not only can you hurt your muscles by straining to lift, hold, and balance the cabinets while attempting to mount them to a wall, you can also get hurt if the cabinets fall or collapse on top of you.
It’s recommended to have at least one other person to help support the weight of each cabinet while you mount them to the wall.
RELATED: 6 Things to Know Before Buying Kitchen Cabinets
STEP 1: Mark a level line 34.5 inches above the highest point on the floor to represent the top of the base cabinets.
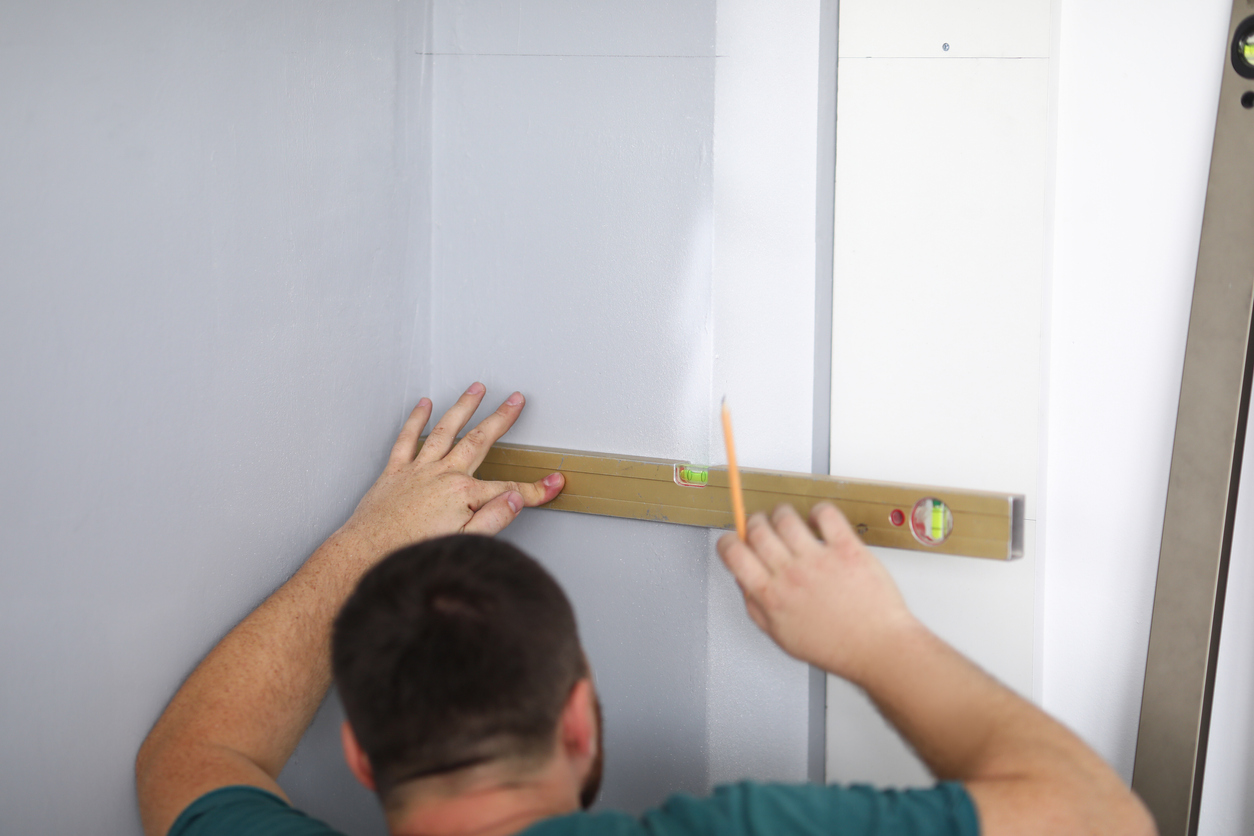
In order to ensure that cabinets will be properly aligned and level, it’s necessary to start the installation process by checking if the walls are level and plumb. Plumb is a term used to mean vertical level. Place a 4-foot level up against the wall, checking different sections of the installation area. Make a note of any dips or angles that may need to be shimmed.
Find the highest point on the floor by marking a level line for reference across the wall with a chalk line or a pencil, then measure from the line to the floor in several places. The highest point of the floor will have the shortest measurement between the floor and your reference line.
When working with standard-sized cabinets, measure 34.5 inches from the highest point of the floor and mark a level line that will serve as the layout line for the top of the base cabinets. Double-check that the line is completely straight and level before moving on to the next measurement.
STEP 2: Mark a level line 19.5 inches above the base cabinet line to represent the bottom of the upper cabinets.
If you are installing cabinets above the base cabinets, then the next step is marking a reference line for the bottom of the uppers. The standard distance is 19.5 inches vertically from the base cabinet line. Mark a level horizontal line to represent the bottom of the upper cabinets.
It’s a good idea to install a temporary ledger board or several cleats—narrow pieces of wood or metal used to support cabinets, frames, and other wall-mounted decor—just below the 19.5-inch line for the cabinets to rest on while you mount them. This step is helpful for anyone taking on this project, but it’s necessary if you are attempting to hang the cabinets without a second person.
The ledger board or cleats need to be drilled into the studs beneath the layout line of the upper cabinets. Use a stud finder to locate the studs behind the wall, then drill 2-inch screws through the cleat or ledger board to secure it to the studs. It’s recommended to install a cleat for every cabinet you are installing so that each cabinet unit is individually supported while you work.
STEP 3: Locate wall studs and mark them with plumb lines.
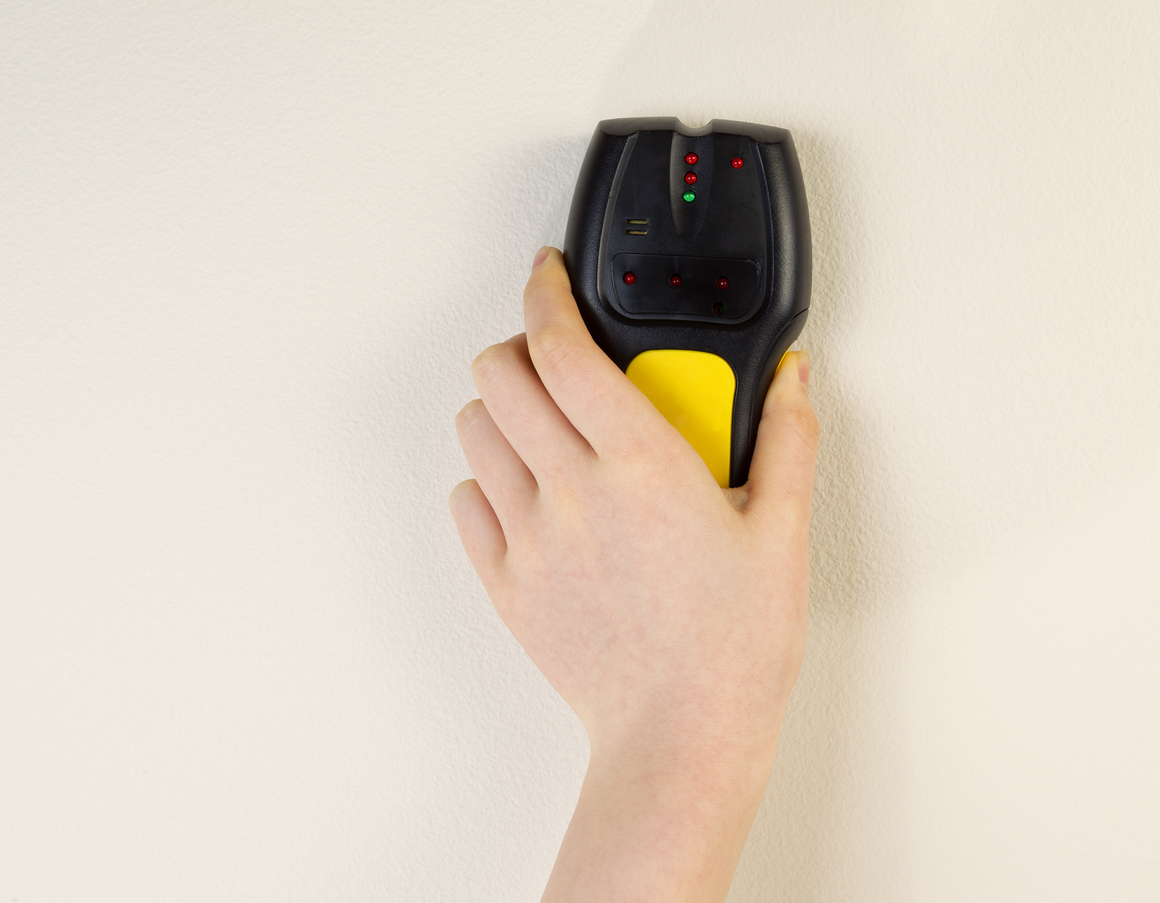
If you installed cleats for the upper cabinets, then you should already know where the wall studs are located. However, if you haven’t taken this step, then use a stud finder to locate the studs in the wall and mark the location with a pencil. Also, take this opportunity to add any markings for appliances or fixtures that will need to be installed after the cabinets, like a refrigerator.
Ideally, you will be able to mount the cabinets between two or more studs for sufficient support, but if the cabinet you are installing doesn’t end up covering the distance between the two studs, you can use a horizontal metal plate with a thickness of 2 millimeters and a width of 100 millimeters (3.9 inches).
Mount the metal plate between the two studs at the top of the upper cabinet layout and use self-drilling screws to fasten the cabinet to the metal plate. Mount a second metal plate between the two studs at the bottom of the upper cabinet layout. Each wall unit needs to be fastened to the metal plates with two screws at the top and two screws at the bottom.
STEP 4: Join all upper cabinets and install them on the wall.
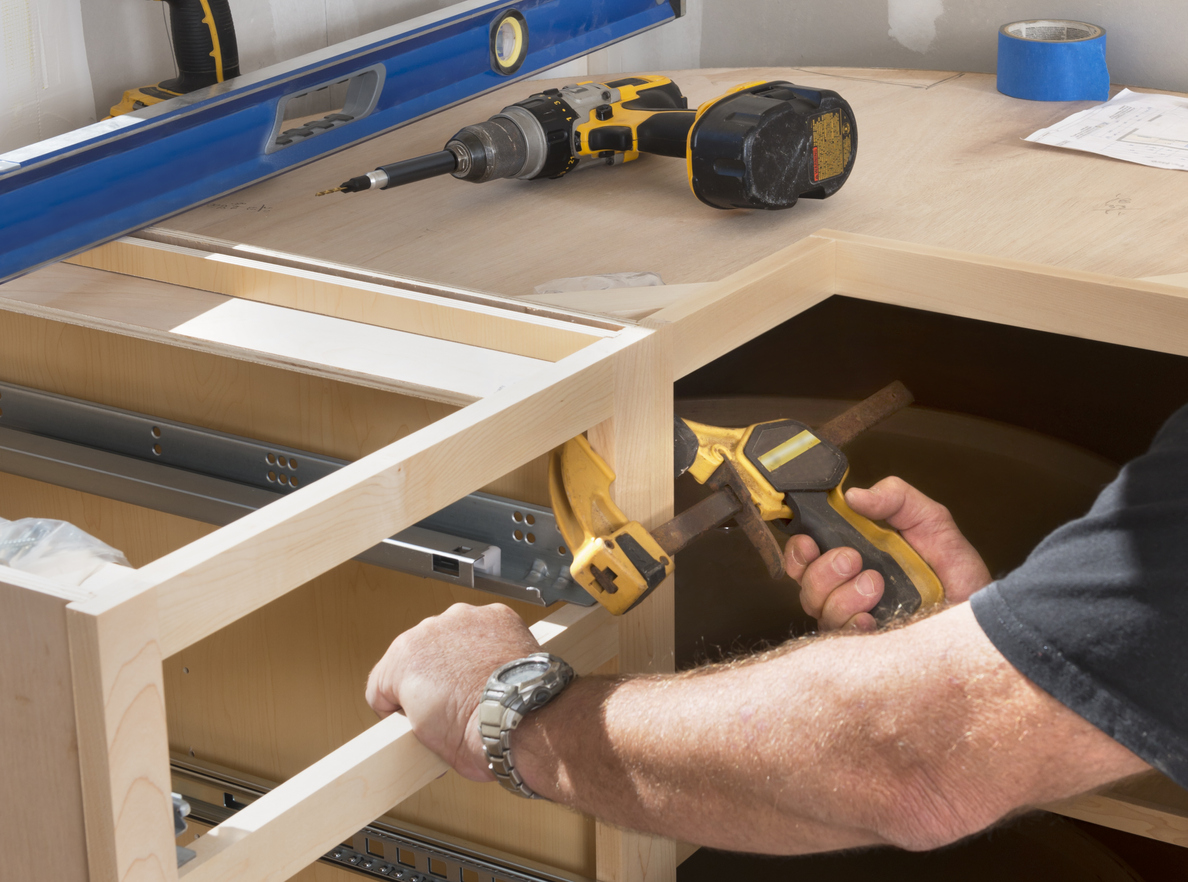
Before attempting to install the upper cabinets, it’s a good idea to remove the doors so that you don’t need to worry about them opening or closing while you are trying to work. Once the doors are removed and put in a safe place out of the way, line up the upper cabinets on the floor and clamp them together with ratchet or screw clamps. Use the drill to create pilot holes in the back of the cabinets so that they line up with the studs, ensuring that the holes are large enough for the 2-inch screws.
Fasten the upper cabinets together by driving screws through the top and bottom of the clamped frames, then lift the connected cabinets up onto the cleats to help support the weight while you ensure the cabinets are in the right position. Once the cabinets are properly lined up according to your measurements and desired layout, drive screws through the back of the cabinets into the wall studs, securing the cabinets at the top and bottom.
Once the upper cabinets are fastened to the wall, you can remove the cleats and assess the cabinets. Verify that the cabinets are even along the walls and add wooden shims where there are any gaps so that the cabinets are flush and even.
RELATED: Should I Paint My Kitchen Cabinets? When It’s Okay To—And When It’s Absolutely Not
STEP 5: Install an end base cabinet first.
The base cabinets are less difficult to install than the upper cabinets because there is less risk of personal injury, but you still need to verify that the cabinets are level and aligned properly for the best results. Choose an end base cabinet to start the installation. Position this cabinet according to your planned layout, then use the level to determine if it sits evenly or if you will need to use one or more shims to level out the cabinet.
Push the cabinet flush against the wall and lay the level on top of it. If the cabinet is out of level, use wooden shims under the cabinet or in the space between the wall and cabinet to ensure the first cabinet is perfectly level. Drill screws through the back of the cabinet and into the wall studs, securing the cabinet at the top and bottom to prevent shifting or sliding.
STEP 6: Install adjacent base cabinets one-by-one.
After getting the first base cabinet in place, the rest are usually easy enough to install. Align each additional cabinet, making sure they are level, before drilling screws through the back and into the wall studs. Connect the cabinets to each other with 2-inch screws at the top and bottom of the cabinet to help prevent gaps from forming between the individual cabinet units.
Work slowly and diligently, frequently checking the cabinets to ensure that they are level. Add shims under the cabinets or between the cabinets and the wall to achieve a level and even installation. Keep in mind that you will need to create cutouts in the back of the cabinets if any plumbing or electrical lines need to run into the cabinetry for sink, dishwasher, or garbage disposal connections.
STEP 7: Install filler strips and cabinet trim.
With the upper and base cabinets in place, you can begin adding the finishing touches to the installation. Filler strips can be used around the back and sides of the cabinets to fill any gaps that may still be noticeable after installation. These strips are also very useful for gaps between the cabinets and any appliances, like stoves or refrigerators.
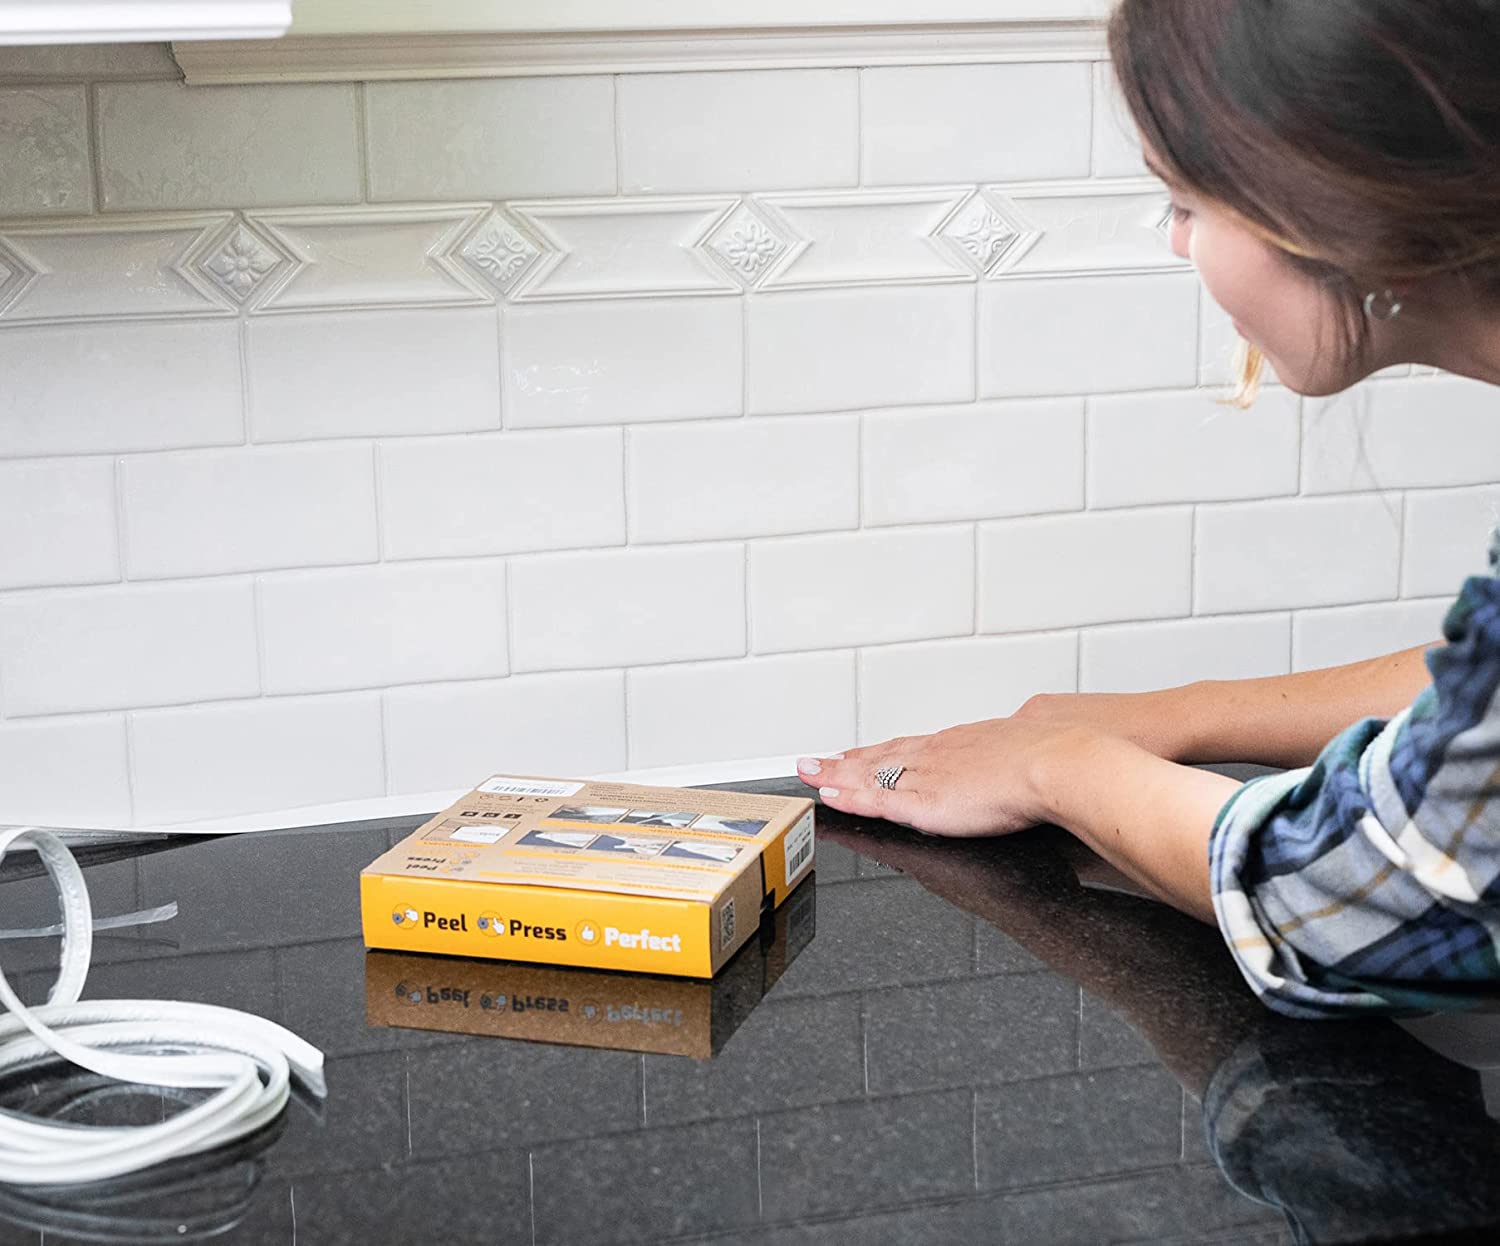
Cabinet trim can also be used around the back and sides of the cabinets, but it should also be used to cover the small gap between the base of the cabinets and the floor. Some products like this option available at Amazon are self-adhesive, so you just need to peel the backing and stick them over the gap, but other products may need to be secured with small fasteners.
STEP 8: Replace cabinet doors and drawers, making adjustments as needed.
At this point, you should have fully installed upper and base cabinets that are level, even, and not showing any gaps. This includes gaps between the cabinets, gaps between the cabinets and floor, as well as any gaps between the cabinets and the wall.
Reattach the cabinet doors and test them to ensure that they open and close properly without overlapping or having too much distance between the doors when they are closed. Use the level to verify that the cabinet doors are even. If the cabinets are not level, remove and adjust the hinges to straighten out the doors. Finally, set the drawers in the designated tracks and push them into place.
RELATED: How To: Paint Kitchen Cabinets
Final Thoughts

With accurate measurements, careful positioning, and secure mounting procedures, cabinet installation is a job that can be successfully completed by a DIYer. However, it’s always important to put safety first when you are taking on a home renovation project. Make sure to wear appropriate personal protective equipment, including gloves, safety glasses, and steel-toe shoes to help keep your feet from being crushed by a falling cabinet.
Remember, if the cabinets are not level, the cabinet doors will not close properly and the drawers may get stuck when you attempt to pull them out or push them in. Proceed carefully and check every measurement throughout the installation process to avoid making time-consuming mistakes.
