We may earn revenue from the products available on this page and participate in affiliate programs. Learn More ›
Frequently used in foundations, backyard patios, and fence-post installations, concrete is one of the strongest building materials around. But did you know that it can also be one of the most beautiful? Thanks to the mix’s moldable nature, variable color, and potential for sleek results, it stars just as easily in home furnishings as it does behind the scenes. In fact, one of the best ways that savvy do-it-yourselfers can take advantage of the material’s durability, versatility, and budget-friendliness is to use it in custom countertops.
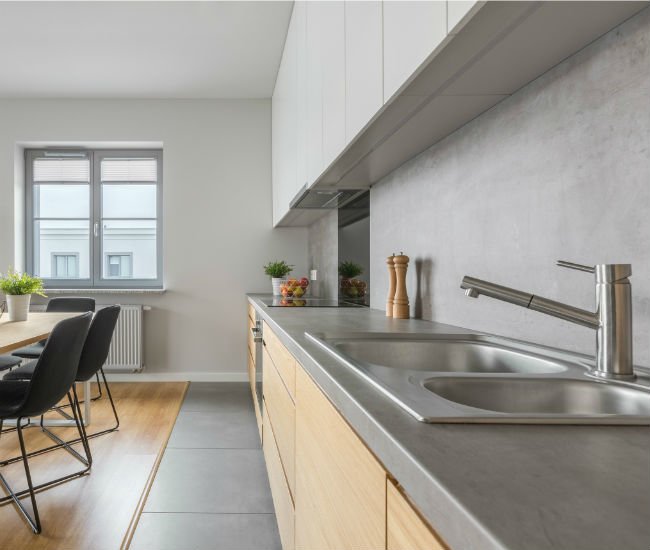
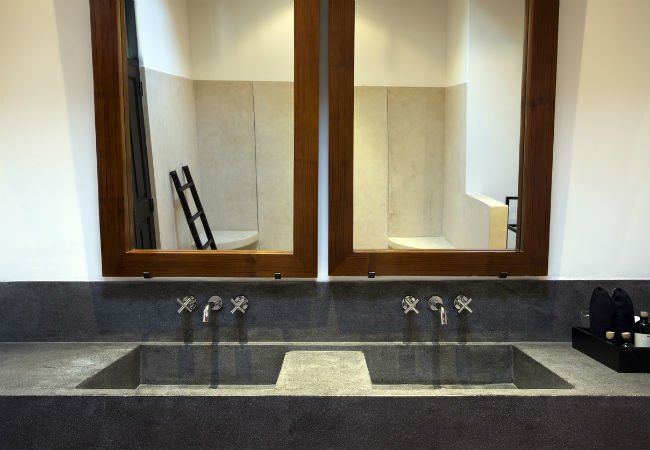
Unsurprisingly, concrete countertops are showing up everywhere—kitchens, bathrooms, even outdoor food prep areas. If you’ve been thinking about creating your own sleek work surfaces, keep reading. We’ve got tips from the pros at Quikrete for creating and maintaining these custom counters.
THE BENEFITS OF CONCRETE
If you’re still on the fence about bringing this construction material into the kitchen, consider the many functional and aesthetic reasons that have led homeowners to install their own concrete countertops:
- Customizability. Quikrete’s Countertop Mix can be cast into virtually any shape you can imagine, so you can create one-of-a-kind countertop configurations. It’s easy to incorporate holes for sinks and built-in soap dispensers, and even add a peninsula, when you’re building the forms.
- Color choices. While concrete’s standard color is a cool gray or tint-based white, color can be added when mixing to produce various shades and hues.
- Creative add-ons. The surface of the countertop can be enhanced by the addition of embedded stones, colorful marble and glass chips, or tiles—or, more practically, embedded cutting boards. Once you understand the basic construction process, you can experiment to create a variety of stunning surface effects.
- DIY- and budget-friendly. Creating a countertop is an accessible project for most crafty homeowners, especially those with a little bit of concrete experience under their belts. Quikrete’s project guides and video tutorials can help even novices proceed with confidence. As well, by taking this remodeling project on yourself, you can benefit from lower materials costs and zero labor costs.
USING THE RIGHT MIX
Before you rush out to buy materials, know that all-purpose concrete really isn’t the best choice for this particular project. For best results, you’ll want a high-strength mix specially formulated to create a smooth concrete surface that can be polished to a high sheen without cracking. Quikrete’s Countertop Mix, for example, contains smaller aggregate pieces and super-plasticizer additives that form a dense and smooth countertop. The mix is also self-consolidating, meaning it flows easily into the edges and corners of the form to create an unblemished finish. This type of concrete is also designed to be stripped from forms in 18 hours, expediting the finished countertop.
Strength is essential when creating concrete countertops because these slabs are relatively large, yet thin (approximately two inches thick), and they’ll probably see a lot of use in your kitchen or bathroom. Three days after pouring a counter with Countertop Mix, the compressive strength of the slab will achieve resistance equal to 2,000 pounds per square inch (PSI). At seven days, it reaches 4,000 PSI, and at full cure (28 days), the countertop slab will reach 6,000 PSI. All-purpose concrete at full cure reaches only 4,000 PSI. Choosing the mix with the higher PSI will provide better defense against cracks (and limit crack repair) down the line.
PLANNING FOR INDOORS OR OUT
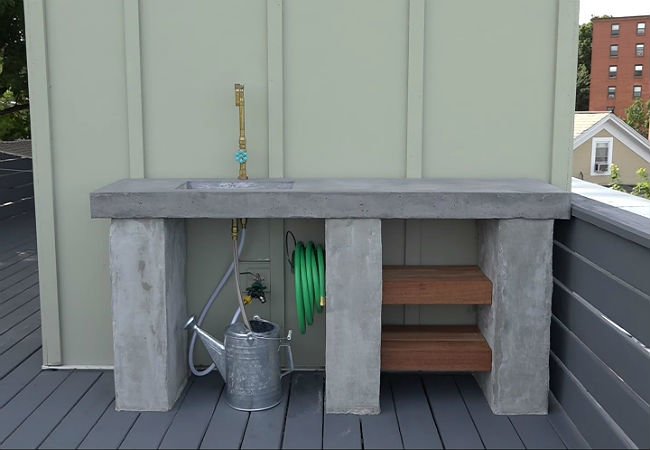
Unlike many building materials, concrete tolerates climate-controlled environments as well as some temperature and humidity fluctuations. So, while concrete countertops are often the focal point of indoor kitchens, they’re equally at home out on a deck or patio. And they’re great for more than just food prep. Imagine using Countertop Mix to create a beautiful outdoor countertop to serve as a sturdy work surface for all your potting and transplanting needs! To learn more, check out this instructional potting counter video from the pros at Quikrete.
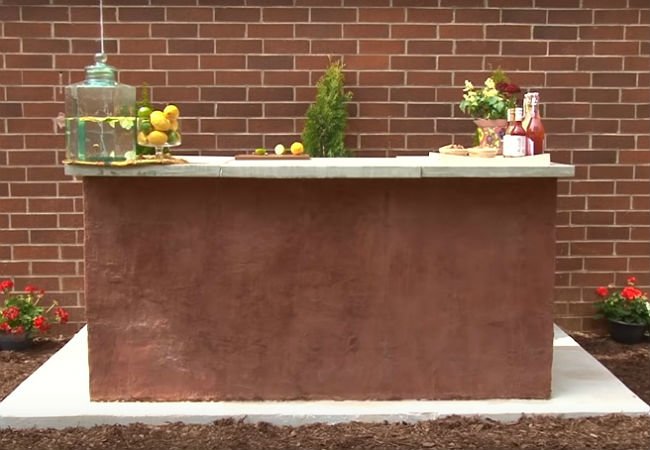
Perhaps the most popular way to use a concrete countertop outdoors, however, is as a bar for an outdoor kitchen. In this second video tutorial from Quikrete, see exactly how easy it is to design a bar from scratch and incorporate the concrete slab work surface. You can complete this project in a weekend, just quickly enough to let you squeeze in a few barbecues before the end of summer.
PRO TIPS FOR A DIY PROJECT
If you’re not experienced working with concrete, it’s a good idea to pour a small countertop before you tackle a larger project. Even a small 2-foot-by-3-foot countertop that’s two inches thick will weigh around 145 pounds, so you’ll still need to recruit a helper or two to move the finished concrete countertop. But whether you’re starting small or diving right in, the following tips will help you get started pouring your countertops:
- An 80-pound bag of Quikrete’s Countertop Mix will yield approximately 0.6 cubic feet of concrete. For example, to make the above 2-foot-by-3-foot countertop, you’ll need two 80-pound bags. The mix comes in standard gray and white, either of which can be tinted with the earthy tones of Quikrete’s Liquid Cement Colors: brown, red, charcoal, terra cotta, and buff.
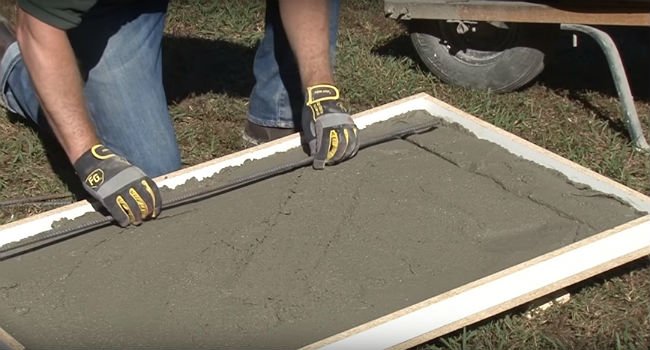
- Build your countertop forms from 3/4-inch melamine-coated particleboard. The water-resistant melamine side should face inside the form so that when it comes time to strip the forms, they’ll come off easily and leave you with a smooth surface. Attach the sides of the form to the base with screws inserted from the outside.
- After you’ve built your forms, apply a bead of silicone caulk to the inside joints. Smooth it into the joint with your finger to seal the joints so no concrete mix will seep out. Doing this will also help form smooth edges on the countertop.
- Vacuum out the interior of the form. Once the caulk has completely dried, you want it to be as clean as possible.
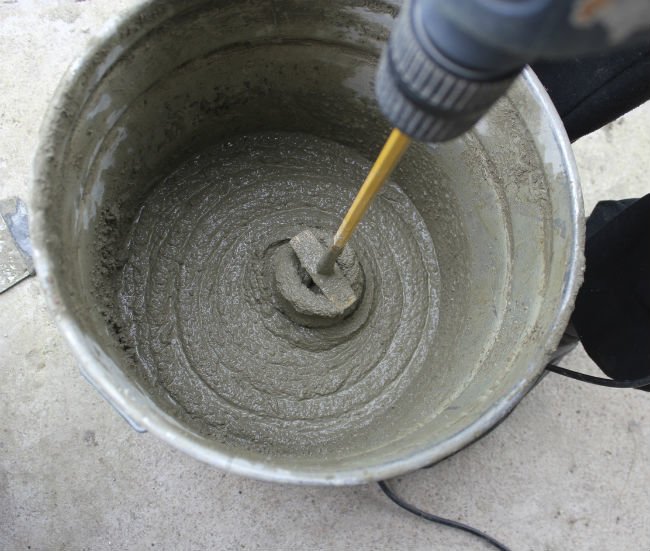
- Protect yourself when working with Countertop Mix. Wear heavy rubber gloves and both a dust mask and eye protection while you’re mixing the concrete.
- Mix water with the concrete. For each 80-pound bag of Countertop Mix, you’ll need to add about seven pints of water. Blend in either a drum-type concrete mixer or a five-gallon pail, using a heavy-duty drill fitted with a concrete paddle bit. Thorough mixing is essential for good results, so mix for a minimum of five minutes.
- Add color, if desired. Mix it in lightly for a marbled look or until the pigment is evenly distributed.
- Pour the concrete to fill the form halfway. Spread the wet concrete evenly, using a hand trowel, and make sure that the wet concrete fills into the corners and along the edges.
- Insert reinforcement. For small slabs like this practice one, you can skip the reinforcement, but larger slabs should have a layer of 3/8-inch #3 steel rebar or other reinforcing material put in place after the first half of the concrete has been poured.
- Fill the form the rest of the way with concrete. Once the form is completely full, smooth the top by pulling a board (long enough to stretch across the form) from one end to the other, sliding it back and forth as you go. This is what the pros call “screeding.” Make several passes in both directions.
- For the smoothest edges, tap the form with a hammer or mallet. Vibrate the concrete by tapping lightly and repetitively along the exterior of the form to work out any air bubbles that might otherwise mar the surface.
- Cover the filled form with plastic sheeting. Let it sit, undisturbed, for 18 hours while the concrete solidifies enough to remove the forms.
- Strip the forms. Remove the screws that hold the forms together and carefully pry the boards away. Because you used melamine-coated particleboard, they should come off easily.
- Smooth the hardened concrete. Work out rough areas along the edges with a sanding sponge. Voids can also be filled with unsanded tile grout and smoothed with a fine-grit sandpaper.
- Seal your new countertop. Use Quikrete’s High Gloss Acrylic Sealer to protect it and add a glossy sheen. For the best results, wait the full 28-day curing time before sealing.
CUSTOMIZING A COUNTERTOP
Once you’re comfortable with the process of pouring a basic countertop, you can experiment with different decorative finishes. Try sprinkling tiny flakes of colorful glass fibers or chips in the bottom of the form before pouring in the concrete. Other artistic effects can be created by using a small amount of aggregate or by stirring together two or more colored concrete mixes to form a uniquely marbled design.
MAINTENANCE MUST-DOS
Although concrete is durable, a little special care of your new countertop will go a long way toward keeping it looking great for years!
- Reseal exterior countertops with Quikrete’s High Gloss Acrylic Sealer once a year to help prevent staining from liquids like spilled wine.
- Don’t use abrasive cleaners on the countertop, which could damage the sealer coat.
- Always wipe up spilled liquids promptly with a damp rag.
- Clean the countertop daily with a diluted solution of plain dish soap and water.
- Apply a food safe wax on countertops that will be exposed to food
This content has been brought to you by Quikrete. Its facts and opinions are those of BobVila.com.