We may earn revenue from the products available on this page and participate in affiliate programs. Learn More ›
Usually, it’s expected that older homes may have quirky spaces that are outdated or aren’t particularly functional. We sometimes forget that new construction doesn’t magically meet every family’s needs—a discovery that we made about the area next to the garage door entryway of our 3-year-old house.
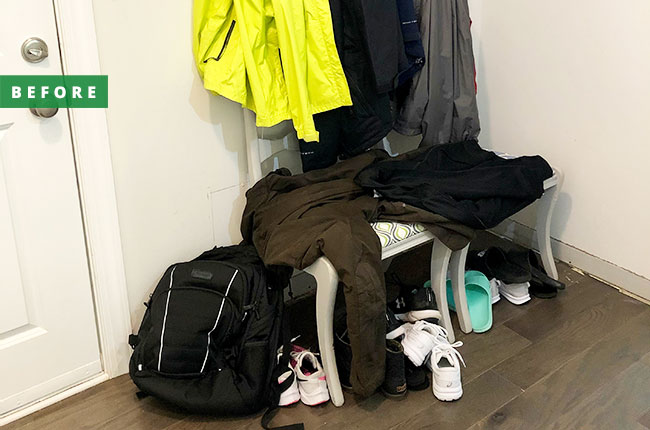
Like many homes, this door serves as a major ingress and egress. Shoes and backpacks are unceremoniously dumped by the door only to be dug through later when it’s time to go out. Coats are hung three or four deep on a single pathetic hook.
In an effort to organize the incoming flow, we mounted a few more hooks to the wall, under which we placed a couple of mismatched chairs, hoping (in vain) they would stem the tide. In addition to not being the most aesthetically appealing design, the makeshift coat rack and chairs were no match for the mountain of footwear, outerwear, and school books that quickly covered and overwhelmed them.
It became clear that our hooks-and-chairs idea was a failure. It was time to install something more substantial, and so we began plans to renovate by adding a drop zone.
Researching Design Ideas
After spending a significant amount of time exploring a myriad of drop zone designs from various online sources, our family decided we needed a sizable bench with two large open areas that could accommodate baskets for shoes. Accompanying the bench would be a series of hooks low enough for our 9 year old to reach but high enough that hanging coats wouldn’t interfere with someone using the bench to put on shoes or load a backpack.
RELATED: Before & After: An Old Home Bar Gets a Budget Mudroom Makeover
Deciding on the Style
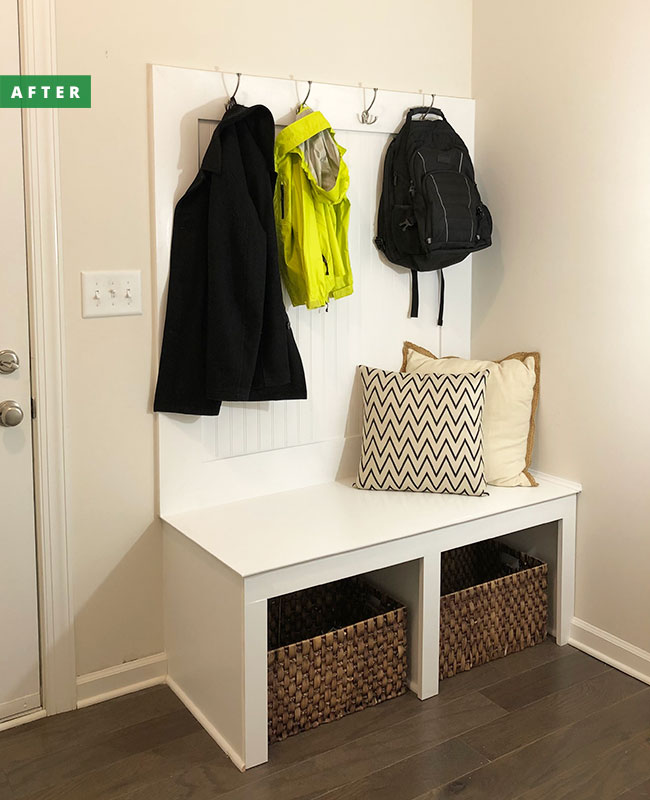
While the impetus for adding a drop zone was largely functional, it was also crucial that it mesh with our home’s modern farmhouse decor, so we chose a beadboard backing for the drop zone framed with simple 1×6 boards. For hooks, we went with the old-school curved triple hook that would match the look we were after while offering more storage capacity than a single hook.
Choosing the Bench Materials
The biggest decision we had to make after we came up with the design for the drop zone was what material to use for the bench. Our options were solid wood boards or plywood. Solid hardwood would more than double the project cost compared to plywood, so we quickly eliminated it. And while pine boards were a cheaper solid-wood alternative, we ruled it out because pine dents fairly easily (a lesson I learned with a pine table I once built).
We decided on a more affordable birch plywood, which has a hard birch veneer that won’t dent easily but is much much less expensive than solid hardwood boards.
RELATED: 17 Types of Wood All DIYers Should Know
Prepping the Space for Construction
We were working with an open foyer that was essentially a blank slate, so we thankfully had little in the way of demolition to do. Readying the area for construction involved removing the makeshift coat rack and prying off the baseboards.
Preserving the baseboards was key as I knew I would have to reinstall baseboards in and around the drop zone after installing it. With that in mind, I drove the head of a pry bar between the baseboard and adjacent drywall with light taps from a hammer then slowly worked the board off by pulling on the end of the bar while moving it down the length of the board.
Reusing the existing baseboards that were already painted, primed, and fitted with shoe molding—instead of buying, installing, and painting new ones—was a real time saver and helped cut the project’s overall cost.
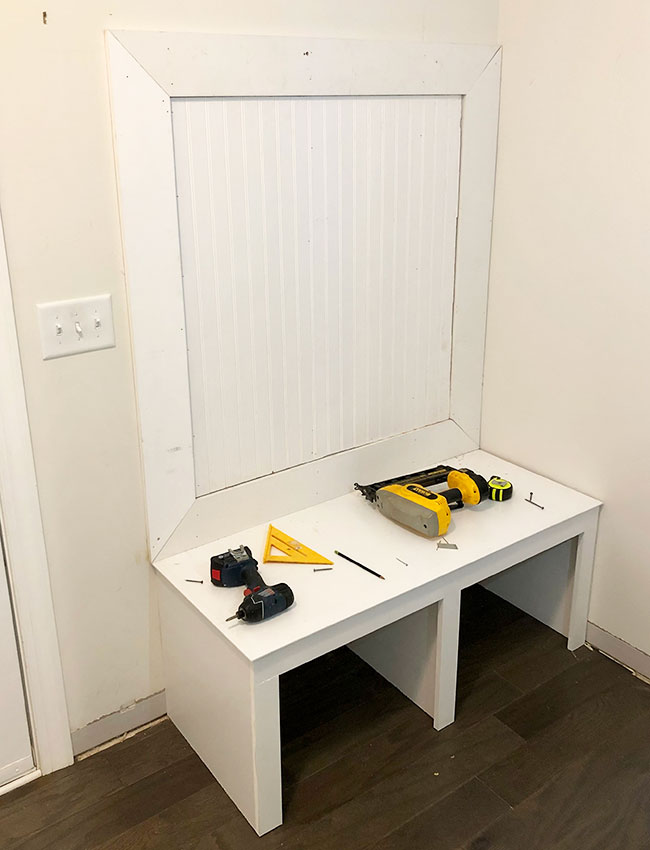
Assembling the Bench
The nice part about this project is that it consists mainly of a freestanding piece of furniture—the bench. This meant I could construct the entire thing in my garage workshop and paint it with semi-gloss white latex paint before moving it into the house for the installation. This saves time while keeping much of the project mess confined to the garage.
To join the plywood panels that made up the framing of the bench, I used a Kreg pocket hole jig, an invaluable tool that allows you to join wood pieces while hiding the screw heads and wood glue. We used pre-primed 1×3 boards to face the bench, hiding the unpaintable rough edge of the plywood, and attaching cove molding around the plywood benchtop to finish the edges. Shoe molding that matched the baseboards created a nice built-in look by covering the gaps between the bench and the floor.
After installing the bench, we built a simple square frame for the backing out of pre-primed 1x6s, which we attached to the drywall with construction adhesive and 2-inch finish nails. Then we cut the beadboard to size, and glued and nailed it inside the framed space.
RELATED: Before & After: An Unused Storage Space Becomes a Secret Playroom Hideout
Enjoying the Results
While we will have to wait for cooler months to determine if this drop zone can manage the shoes, boots, and outerwear that my family dons and sheds each time they exit and enter the house, it certainly looks the part.
The hooks offer ample hanging space for hats, scarves, and jackets, while the wicker baskets we added to the cubbies below the bench are large enough to handle numerous pairs of shoes. Just as importantly, this part of the house now fits with the modern farmhouse look of the rest of the home.
