We may earn revenue from the products available on this page and participate in affiliate programs. Learn More ›
Whether your daily drink of choice is a frothy latte, creamy hot cocoa, or an old-fashioned cup of Joe, the Keurig can help satisfy your caffeine cravings in record time, all without leaving pesky spills behind. But after serving up buzzworthy beverages around the clock, even a no-fuss, no-mess coffee dispenser like the Keurig requires a routine cleanup to keep up with your coffee habit and keep out the most unsavory of intruders: limescale. Learning how to descale a Keurig can put your beverage ritual to rights again in a jiffy.
What is limescale, and why does it build up in my Keurig?
Limescale, or calcium carbonate, can form on the inside of any heated appliance when hot water evaporates and leaves behind solid white calcium and magnesium deposits. Limescale is particularly prone to developing in areas with hard water, due to its high mineral content. Hard water develops when rainwater travels over rocks, and picks up tiny mineral particles along the way. If left untreated, the chalky culprit can diminish the look of a coffee maker and produce a bitter aftertaste in your morning Joe, and even prevent your Keurig from heating properly.
Fortunately, even stubborn limescale breaks down when exposed to the acetic compounds found in a commercial descaling solution or the household equivalent, white vinegar. The descaling process is the same, whether you opt for Keurig’s Descaling Solution or white vinegar, and the results are similar. The main downside to descaling and cleaning with vinegar is that the Keurig company could potentially void the machine’s warranty if users have descaled with non-Keurig branded cleaning solutions.
Use your preferred solution when you follow these descaling instructions for how to clean a Keurig coffee maker, and follow through with the routine every 3 to 6 months. For those who have one of the company’s newest coffee makers, the machine may even remind you to descale with an alert. Done regularly, you’ll not only improve the taste of your brewed beverages but also extend the life of your Keurig coffee machine.
How is a Keurig different from a drip coffee maker?
Keurig machines differ from standard drip coffee makers in that they use pods filled with ground coffee rather than a standard coffee filter, into which grounds are poured. While a Keurig’s mode of operation may be different, the cleaning process for Keurig and drip coffee makers is relatively similar.
Both drip coffee makers and pod coffee makers need to be cleaned and descaled regularly in order to ensure that coffee continues to taste great. Keurig machines and drip coffee makers both typically have cleaning cycles, which makes the process simple and user-friendly.
Before You Begin
How do you know when your Keurig machine needs to be descaled? Some new models have an indicator light that will alert you when there’s limescale buildup, but older models don’t. Signs that a machine needs descaling include:
- The coffee is dispensing more slowly.
- You see chalky white residue in the machine’s interior.
- The machine continues to drip after the coffee has been dispensed.
Before you start the descaling process, begin by preparing the machine. Unplug the Keurig from the electrical outlet, empty the water reservoir, and remove any K Cups that are in the machine. Have a large mug at the ready, too—you’ll need it when draining out the descaling solution.
Tools & Materials
Bobvila.com may earn a commission from purchases made through these links.
Step 1: Cut the power to the Keurig and clean any detachable parts.
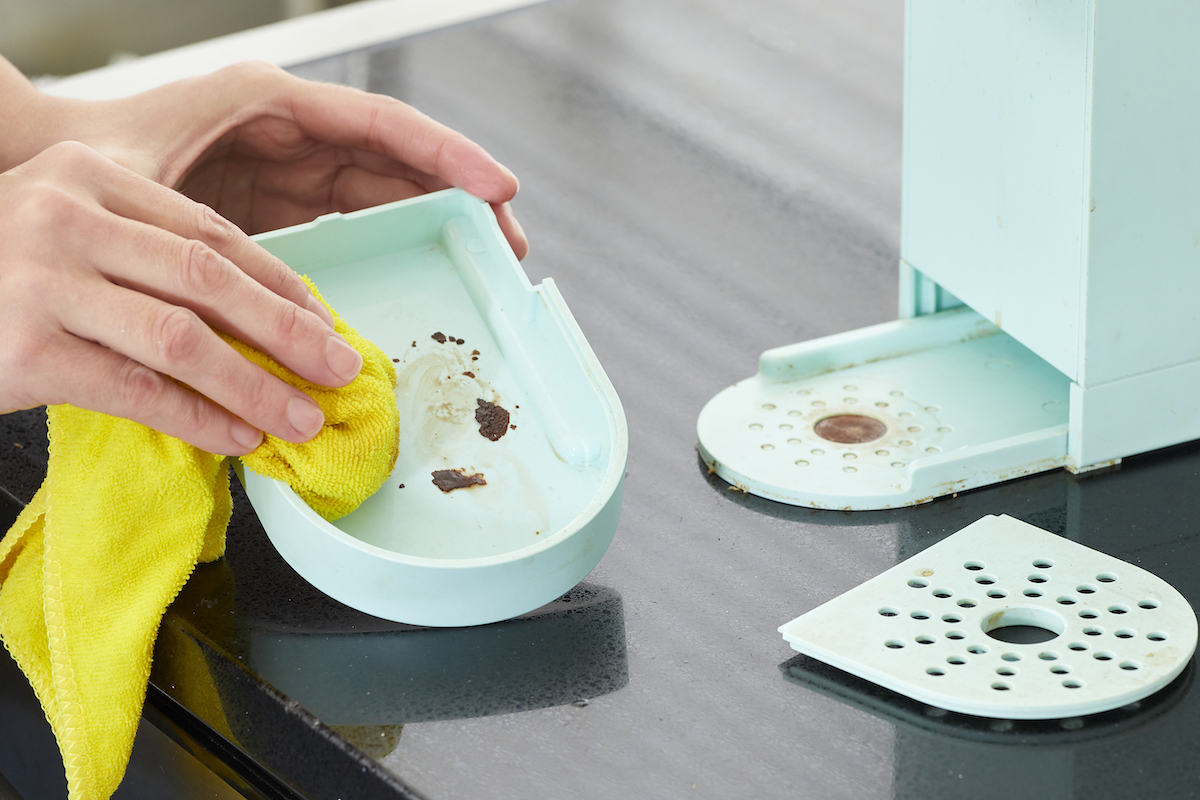
If the Keurig model has the auto-off capability enabled, disable it according to the owner’s manual. Then, power off and unplug the brewer from the wall. When the brewer is cool to the touch, remove any detachable Keurig parts, including the Keurig water reservoir, lid, water filter, drip tray, and brewing pod holder.
Empty residual water from the water reservoir into the sink, and discard any used coffee grounds and brewing pods in the trash. Then, wipe down the interior and exterior of the water reservoir and other loose parts with a damp, non-abrasive cloth. Dry and reinstall all detached parts except for the water filter.
Note: Never submerge the electrical components of the brewer in water.
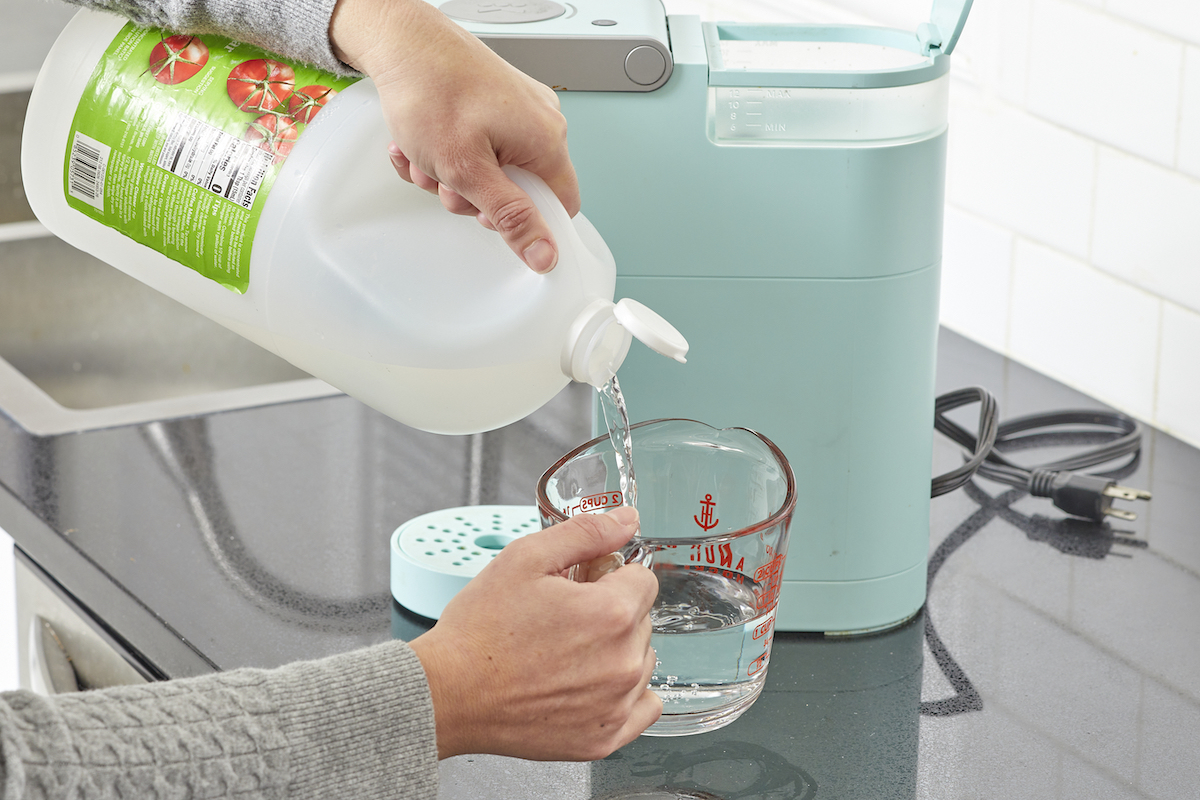
Step 2: Fill the reservoir with a commercial descaling solution or a vinegar-based solution.
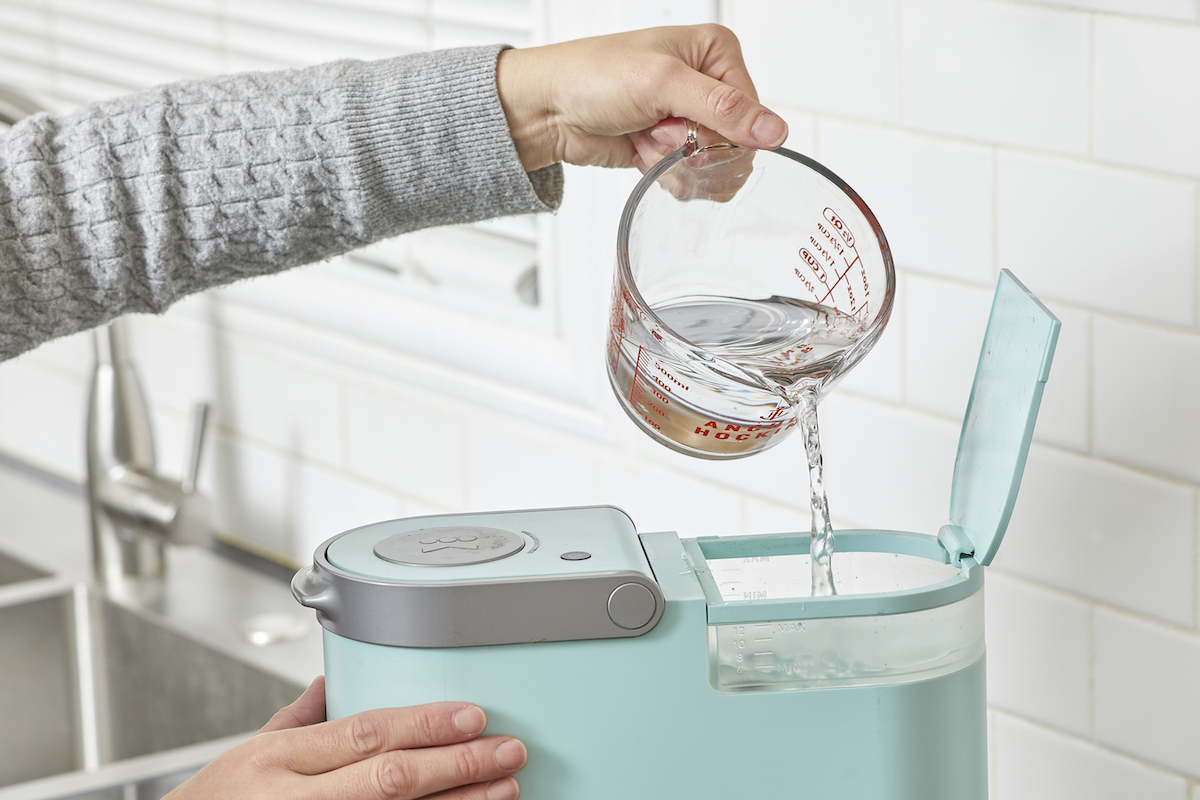
To loosen and lift built-up limescale from your brewer, fill the water reservoir with the descaling solution of your choice and then replace the reservoir lid. You can opt for the company’s specially formulated descaling solution or a handy homemade equivalent.
Option 1: If you’re using a Keurig-branded descaling solution, pour equal parts descaling solution and water into the water reservoir to fill it. Depending on the model and size of your brewer, this could range anywhere from one-third of the 14-ounce bottle to a full bottle of Keurig’s descaling solution, followed by an equal amount of water.
Option 2: For a DIY descaling solution, pour equal parts water and distilled white vinegar into the reservoir until it’s full.
Step 3: Turn on the Keurig and run a brewing cycle with the cleaning solution.
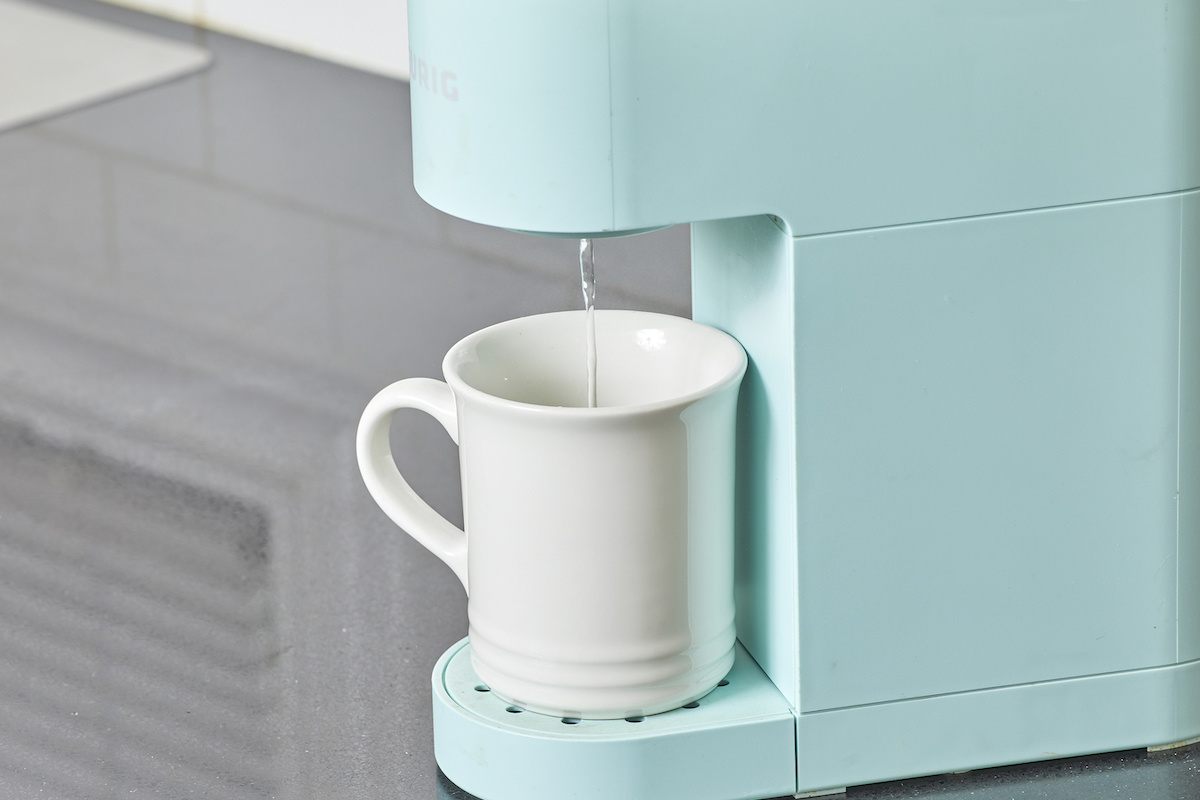
Plug in the machine. Then, place a large mug on the machine’s drip tray. Without inserting a Keurig beverage pod, lift and lower the brewer handle. If the water reservoir is not detachable—as on a smaller Keurig appliance—allow 5 to 10 seconds here for any descaling solution to drain into the appliance before lowering.
Select the largest brew size and then press the Brew button to start a cleaning brew cycle using the reservoir filled with descaling agent. When the cleaning cycle is complete, remove the mug and discard the hot water in the sink.
Repeat this step until the appliance prompts you to refill the water reservoir, or until there is no more visible scale in the water reservoir. Then, power off the brewer and wait for 30 minutes before removing and discarding the contents of both the mug and the water reservoir.
Step 4: Flush the reservoir with fresh water.
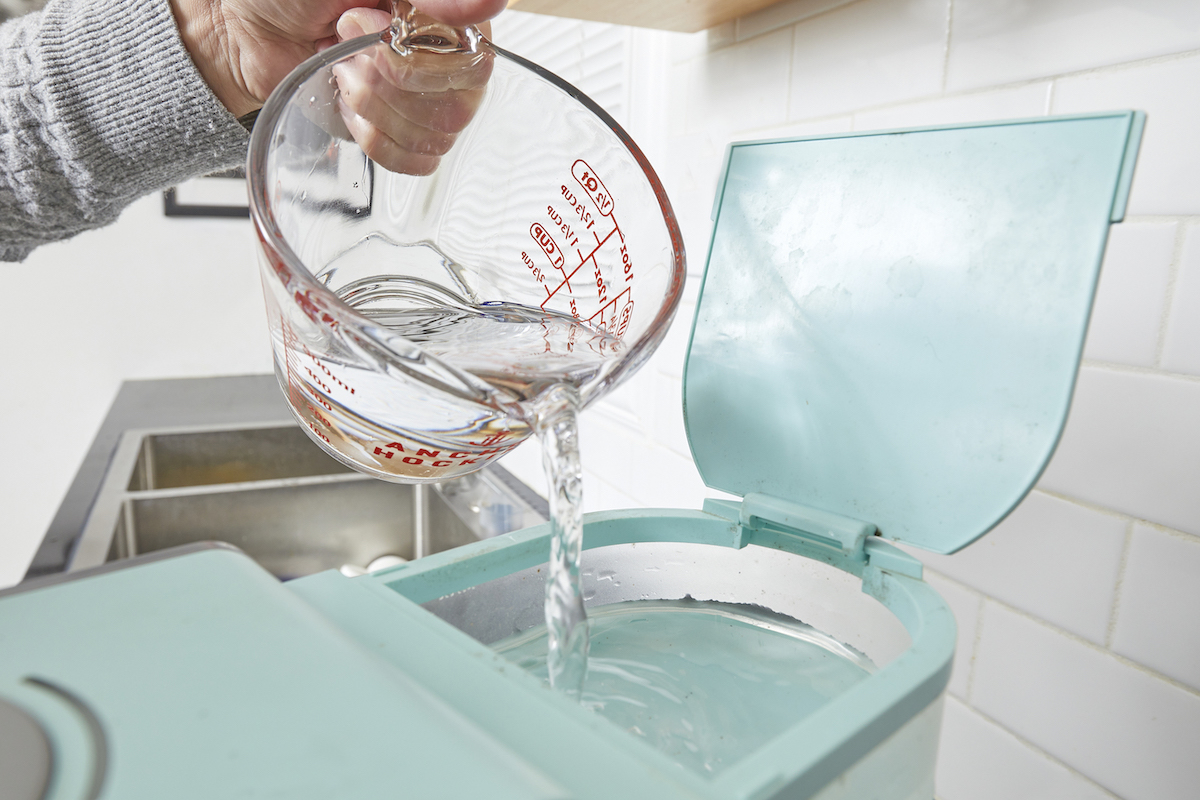
Reinstall the water reservoir in the brewer. Fill the reservoir with fresh, filtered water from a clean pitcher or glass, taking care not to fill past the maximum fill line.. Power on the brewer and return the mug to the drip tray. As in Step 3, select the largest brew size and start another cycle to rinse away any residual buildup or vinegar odor from inside the Keurig.
Repeat the fresh water rinse cycle at least three more times (for heavily scaled brewers, you may have to rinse as many as 12 times), refilling the depleted water reservoir with fresh water as needed to complete the brew. The more rinsing, the better. Residual flavors of vinegar or descaling solution can certainly taint a future cup of coffee.
Step 5: Rinse and dry the reservoir.
When you’re finished rinsing the brewer, power it off and discard the residual water from the water reservoir. Rinse the reservoir with filtered water, then air-dry it before reinstalling it in the brewer.
Keeping Your Keurig Coffee Maker Clean
While descaling a Keurig coffee maker is relatively simple, the less often you have to do it, the better. Here are some tips for keeping your machine clean so that you have to descale it less frequently:
- Use filtered water. If you live in an area with hard water, consider filling your Keurig machine with filtered water instead of tap water in order to reduce limescale.
- Never put liquids other than clean cold water in the water reservoir.
- Wash the inside of the water reservoir regularly.
- Don’t leave water inside the reservoir for longer than 3 or 4 days at a time without refreshing it.
Final Thoughts
Regular cleaning of a Keurig will allow you to enjoy your favorite hot drinks the way they were meant to taste. Be sure to descale your Keurig machine every 3 to 6 months in order to prevent limescale buildup and ensure that your coffee consistently has a high-quality flavor. If you live in an area with hard water, consider using bottled or filtered water to brew your coffee instead of tap water.
FAQs
Q. Can I put my Keurig in descale mode?
Some modern Keurig models feature a descaling mode, which is designed specifically for the descaling process. In order to activate descale mode, turn the machine off and then press the 8 ounce and 12 ounce buttons simultaneously until the Keurig descale light turns solid.
Q. Why won’t my descale light go off on my Keurig?
On Keurig models featuring a descale indicator light, the light will not turn off until all calcium deposits have been cleared from the sensor.
Q. How do I descale my Keurig without a descaling solution?
While there are plenty of descaling products available on the market, the right product may already be in your pantry. Rather than using a commercial descaling solution, consider opting for white vinegar, which achieves the same results. Follow the instructions in the steps outlined above to find out how to descale a Keurig with vinegar.
Q. How long do you let vinegar sit in a Keurig?
During the descaling process, allow the vinegar or descaling solution to sit for approximately 30 minutes before rinsing it out in order to get the best results.
Q. How often should I descale my Keurig?
A Keurig machine should typically be descaled every 3 to 6 months, depending on the quality of your tap water. Those living in areas with hard water may need to descale their machines more frequently.